


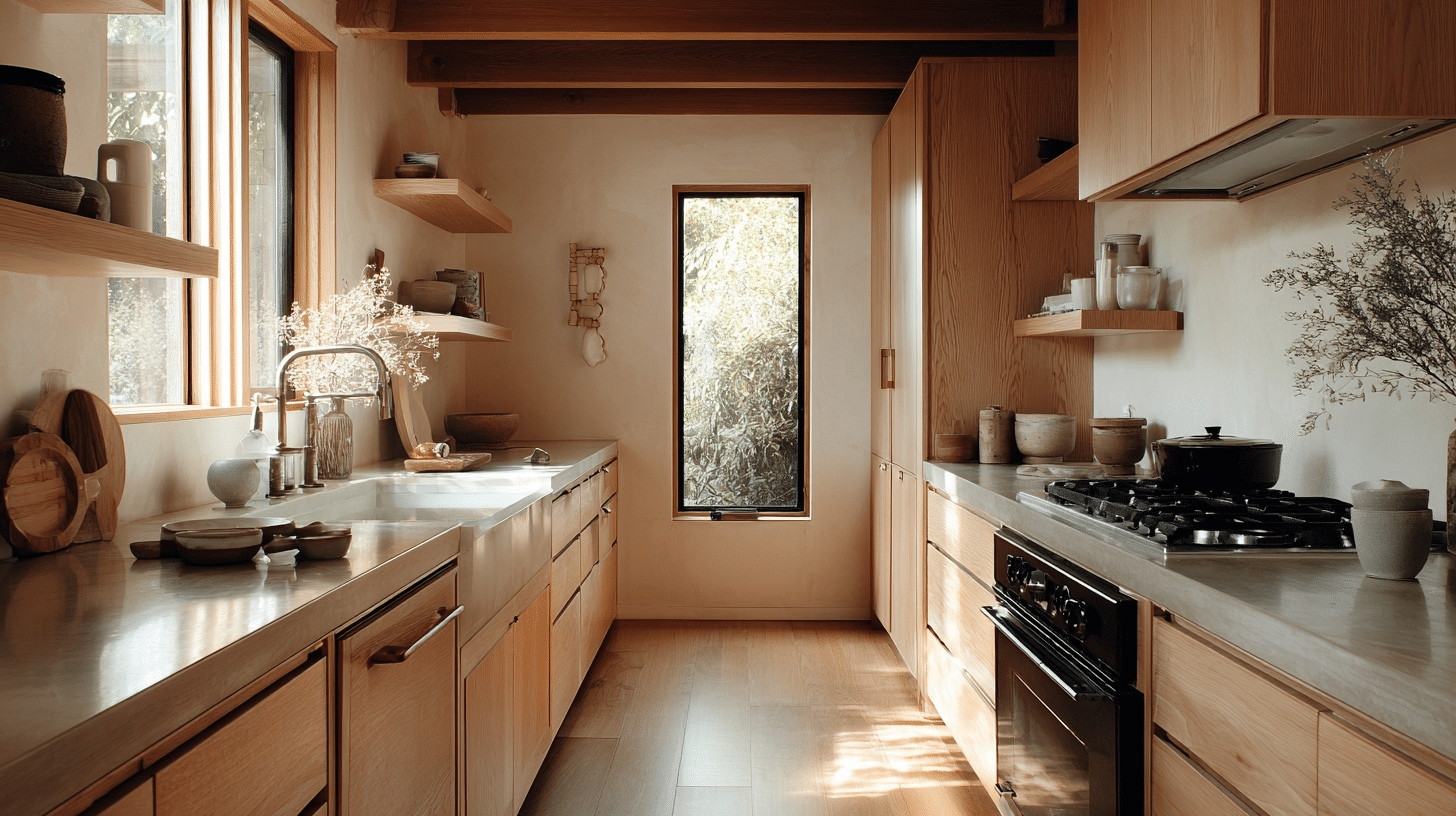
It’s the kitchen that whispers, not shouts. A space where Scandinavian coziness meets Japanese calm. A Japandi kitchen blends the best of both worlds, pairing minimalism with warmth and simplicity with soul.
This isn’t sterile minimalism or cluttered hygge. Japanese restraint brings clean lines and purposeful objects, while Scandinavian comfort adds warm wood and soft textures.
The result? A kitchen that feels both uncluttered and deeply human.
The foundation is simple. Muted neutrals that soothe your senses, natural materials like oak and stone that age beautifully, and streamlined forms that make function feel effortless.
You’ll grasp what makes japandi different, see design ideas worth stealing, and get the simple steps to make it yours without the designer price tag.
Why Japandi Works for Kitchens?
Japandi merges Japanese zen simplicity with Scandinavian comfort, creating a philosophy where less meets cozy. In kitchens, this translates to real advantages.
Minimal clutter means easier cleaning and maintenance. Neutral tones and natural materials create a visual calm that makes daily cooking feel peaceful rather than chaotic.
Quality pieces over disposable trends ensure your space ages well. Unlike pure minimalist kitchens that feel sterile and unwelcoming, or traditional Scandinavian designs that can accumulate clutter, japandi strikes a balance.
It keeps counters clear and lines clean while layering in warmth through honey-toned wood and organic textures.
The result is a kitchen that breathes and stays uncluttered yet never feels cold or empty. It’s functional minimalism with a pulse.
Step-by-Step: How to Create a Japandi Style Kitchen
Building a japandi kitchen is about intentional choices, not replacing everything at once.
- Assess & Declutter: Clear counters and keep only essentials visible. Empty surfaces create japandi’s signature calm.
- Plan Layout & Zones: Divide into prep, cook, and clean zones with smooth flow. Leave an empty space between areas.
- Cabinet & Storage Strategy: Use flat-front cabinets with integrated handles. Mix closed lower cabinets with open upper shelves.
- Material Selection & Finishes: Choose pale oak or walnut with matte stone counters. Pick materials that age gracefully.
- Lighting Design: Layer ambient, task, and accent lights with warm 2700K bulbs. Add dimmers for flexibility.
- Appliance Integration: Panel appliances to match cabinets. Choose induction cooktops and low-profile hoods.
- Styling & Accents: Display ceramics, linen towels, and one plant. Group in odd numbers with a space around them.
- Maintenance & Longevity: Seal wood yearly, wipe stone quickly. Choose matte finishes that hide wear.
Start with decluttering and one material change. Each small step brings more calm.
Japandi Kitchen Design Ideas & Inspiration
These design ideas show how japandi principles come to life in real kitchens, from cabinetry choices to the smallest styling details.
1. Light Oak and Charcoal Contrast Island
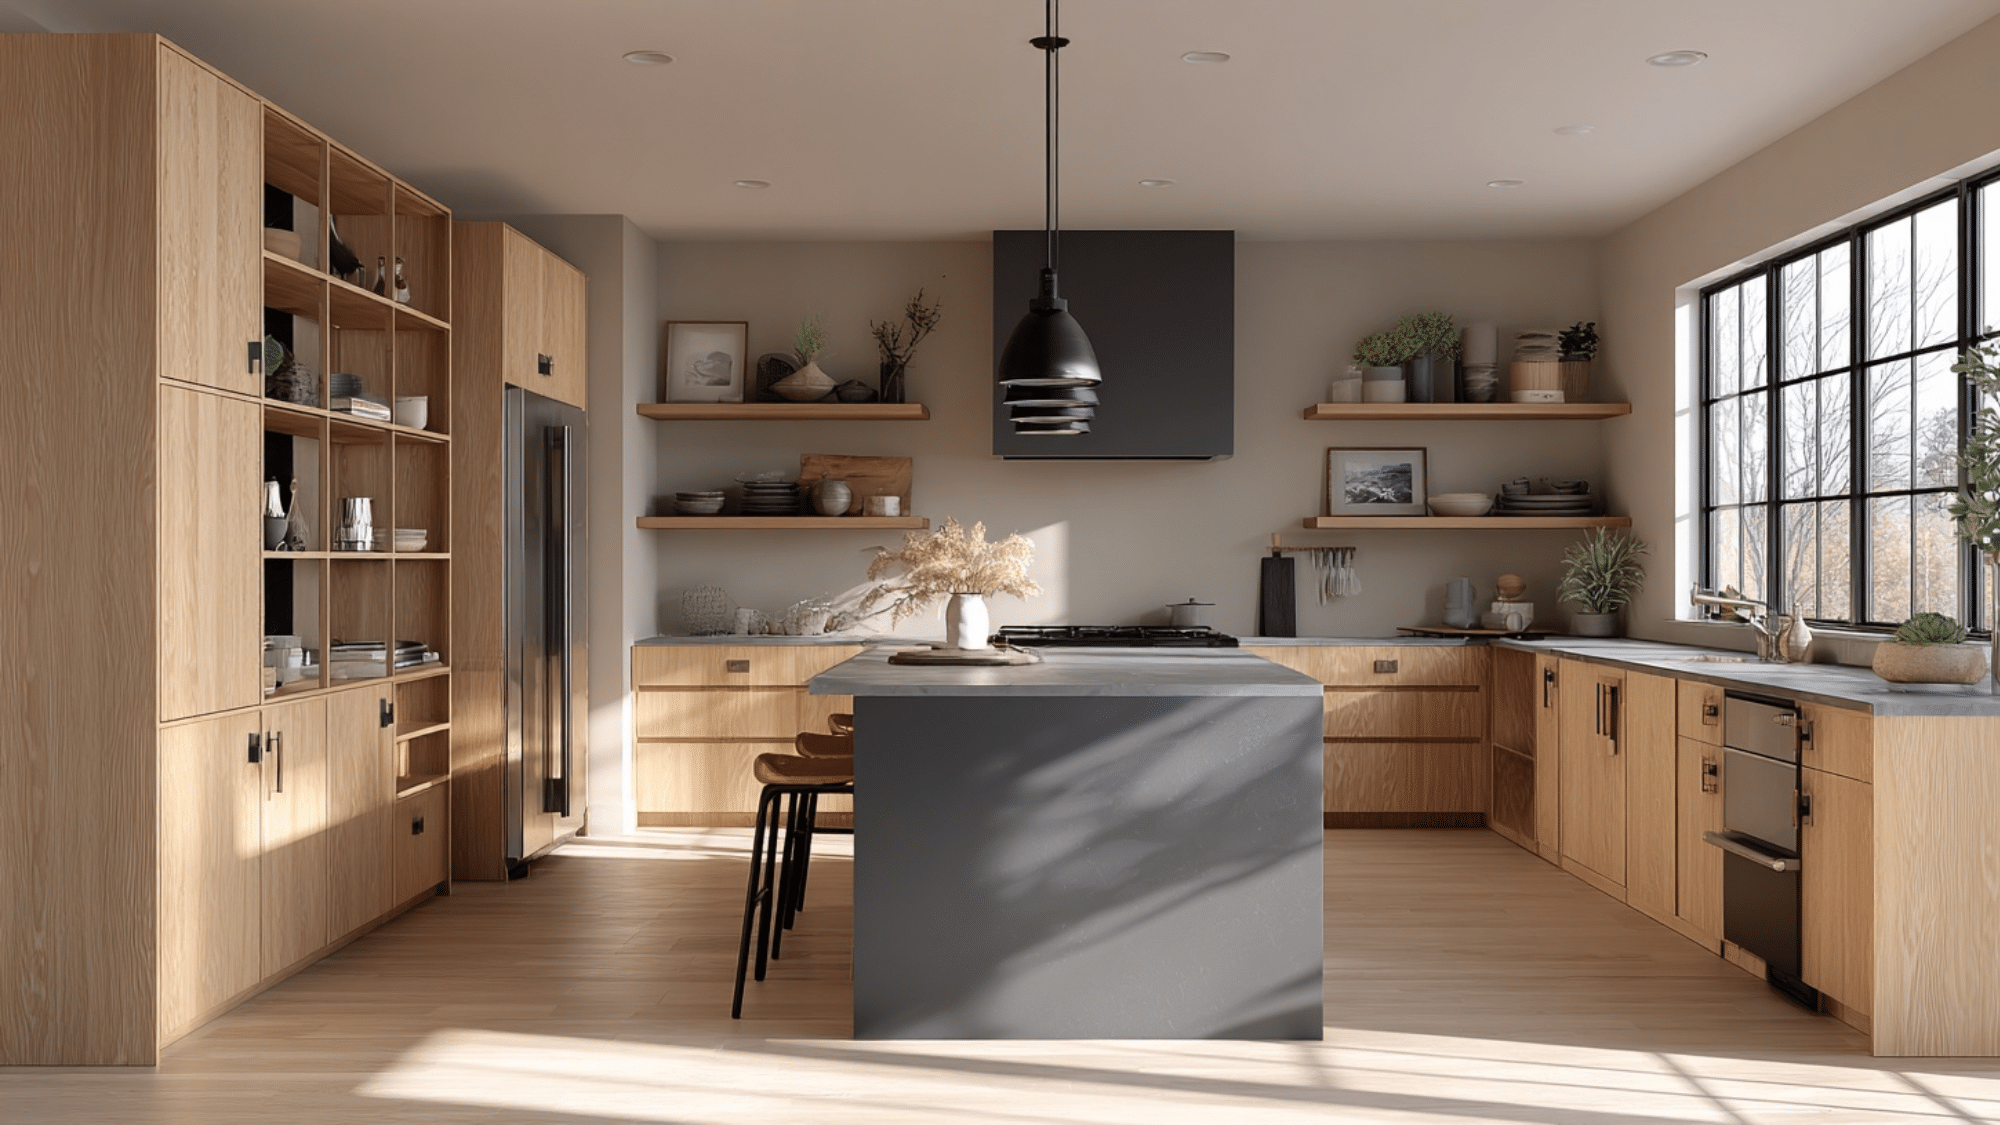
Light oak cabinetry wraps the perimeter while a charcoal-painted island anchors the space. This creates visual weight without overwhelming the room’s airiness.
The contrast draws the eye but stays grounded in neutral territory. The dark island offers depth while pale wood keeps the mood open and breathable.
Pro Tip: Use darker tones on only one element to maintain balance.
2. Two-Tone Cabinets with Warm Grey Base
Lower cabinets in warm grey paired with upper cabinets in off-white create subtle separation. This layering adds dimension without busy patterns or bold colors.
The softer grey feels modern yet inviting, bridging the gap between Japanese restraint and Scandinavian warmth. It grounds the room while keeping sightlines light.
Pro Tip: Choose grey with beige undertones to maintain warmth.
3. Bleached Wood Cabinets with Matte Black Hood
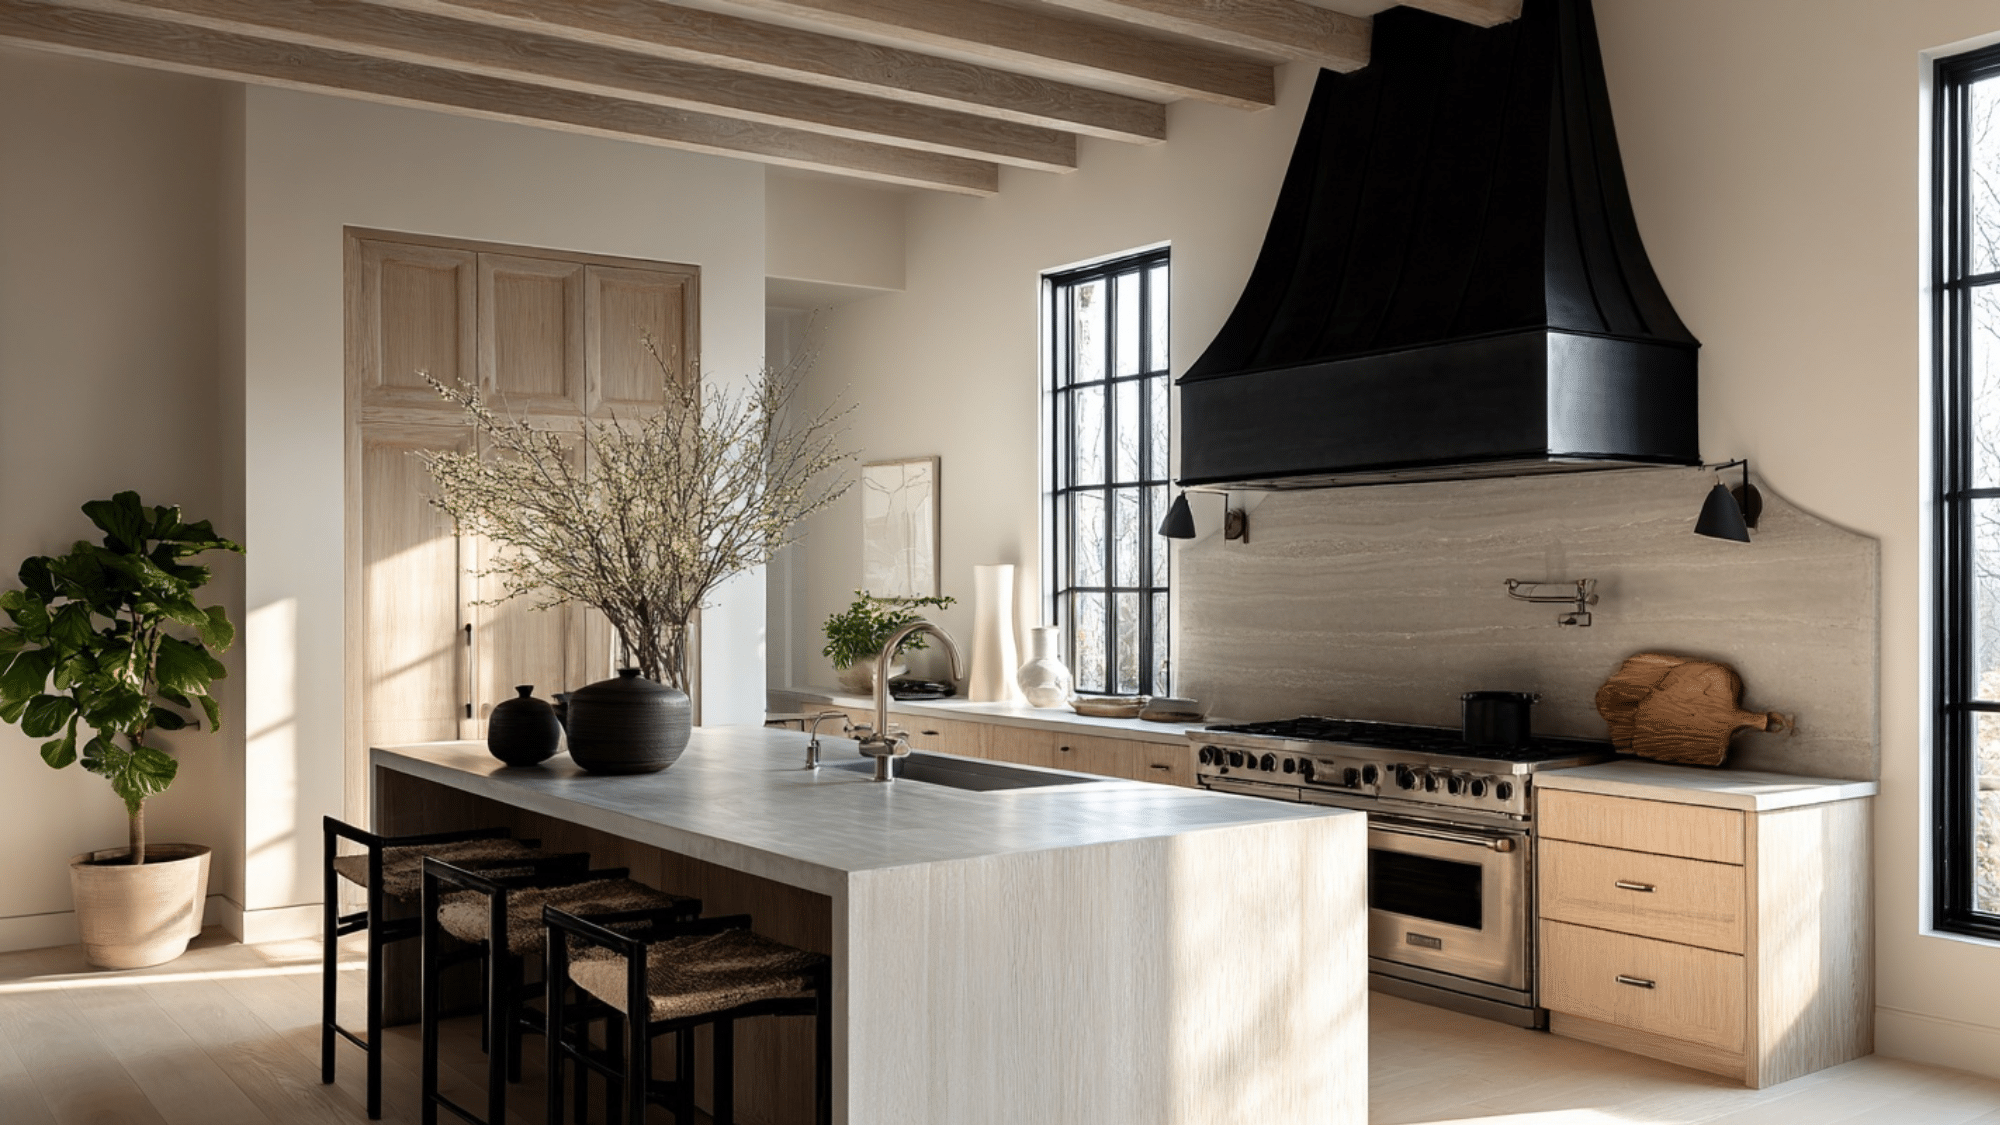
Bleached or whitewashed wood cabinets keep the space feeling airy and coastal. A matte black range hood becomes a sculptural focal point against the pale backdrop.
The black hood adds necessary contrast without competing for attention. Its matte finish keeps it understated while the form speaks for itself.
Pro Tip: Keep all other accents neutral so the hood stands alone.
4. Limed Oak Finishes for a Soft, Airy Look
Limed oak has a pale, almost ghostly appearance that maximizes light reflection. The visible grain adds texture while the whitewashed tone keeps things serene.
This finish works beautifully in smaller kitchens where brightness matters. It maintains wood’s warmth without the visual weight of darker species.
Pro Tip: Pair limed oak with white walls for a cohesive look.
5. Sage Green Cabinets for a Calm Accent
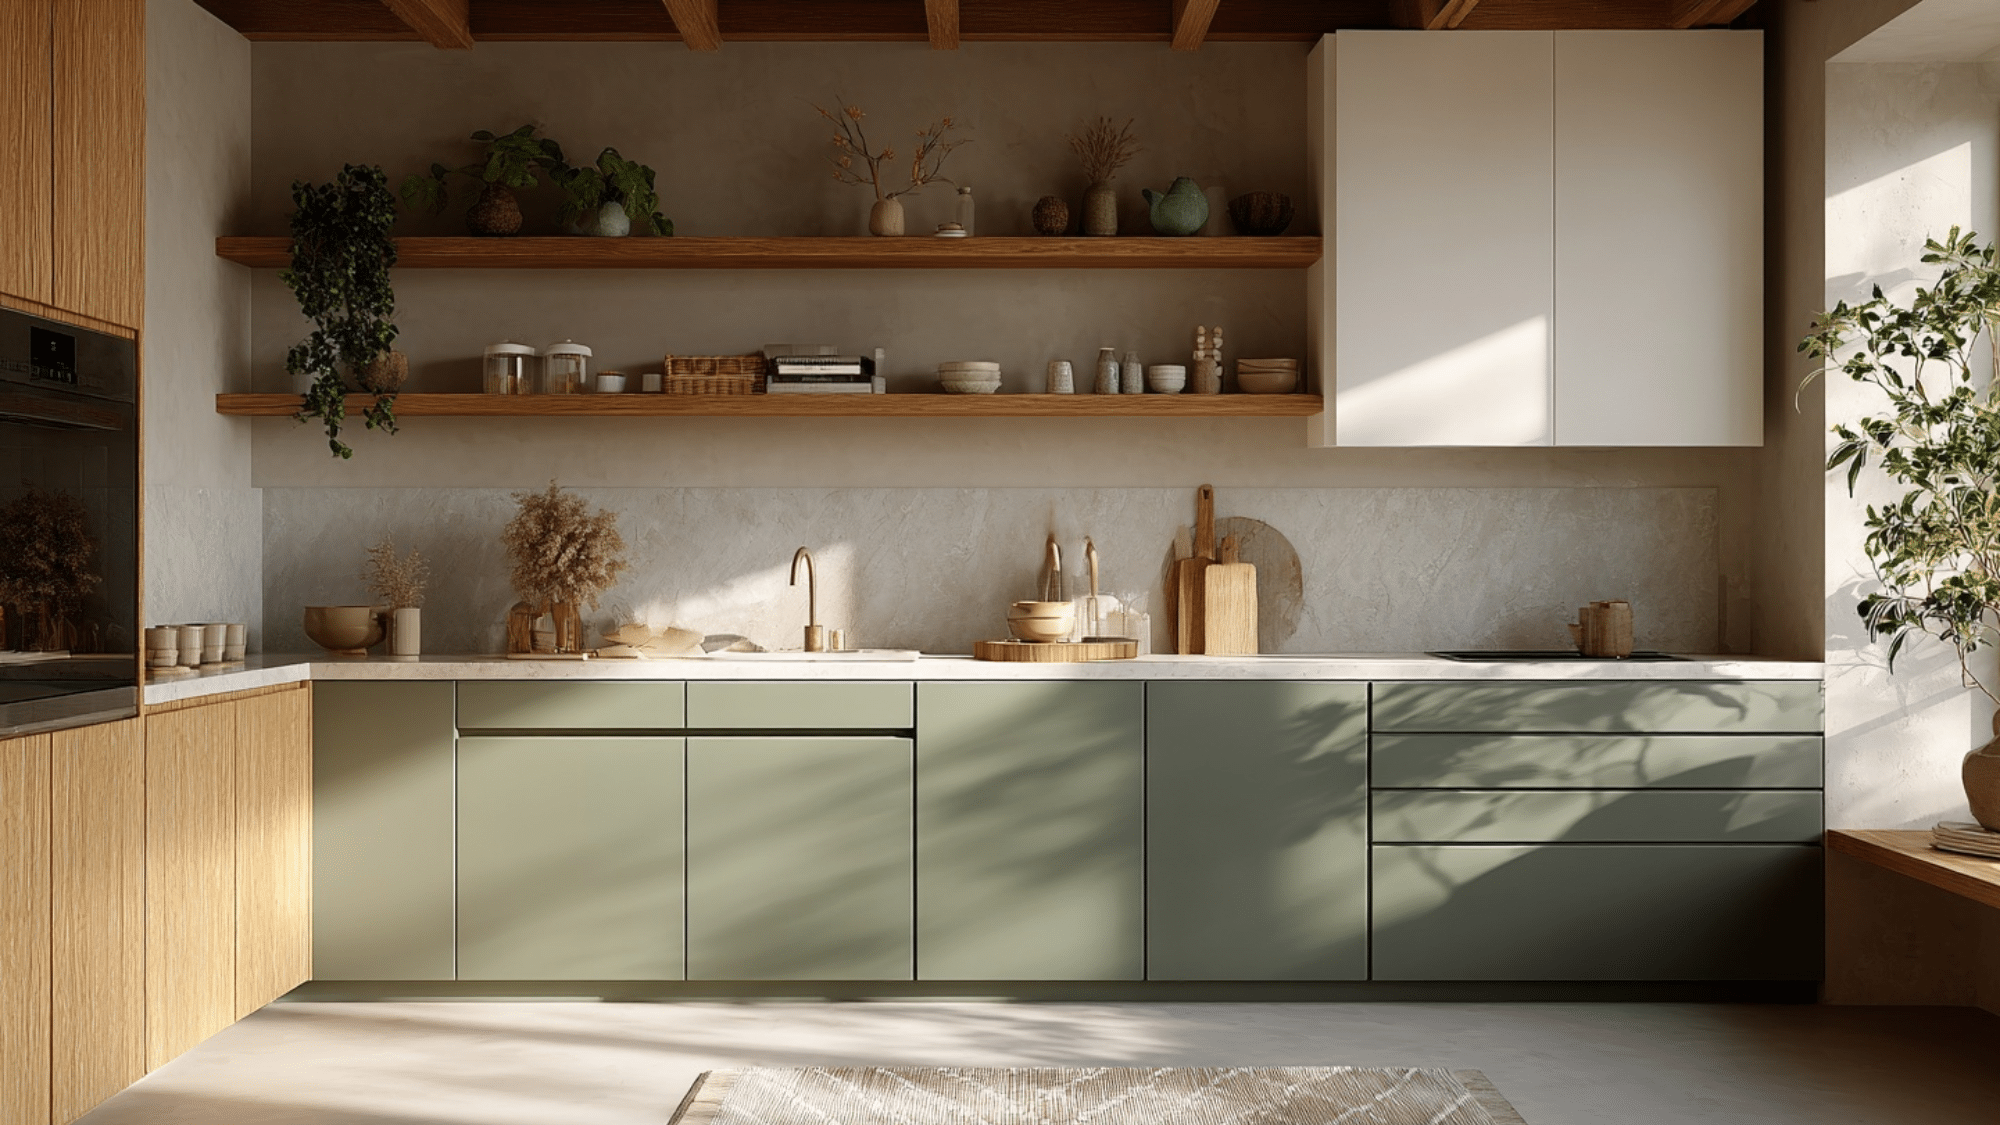
Soft sage green brings subtle color without breaking japandi’s neutral rule. It nods to nature while maintaining the muted palette the style demands.
Green reads as neutral when kept soft and grey-toned. It adds personality without shouting, perfect for those wanting color without commitment.
Pro Tip: Use sage on lower cabinets only, keep uppers wood or white.
6. Moss Green Backsplash Behind Neutral Counters
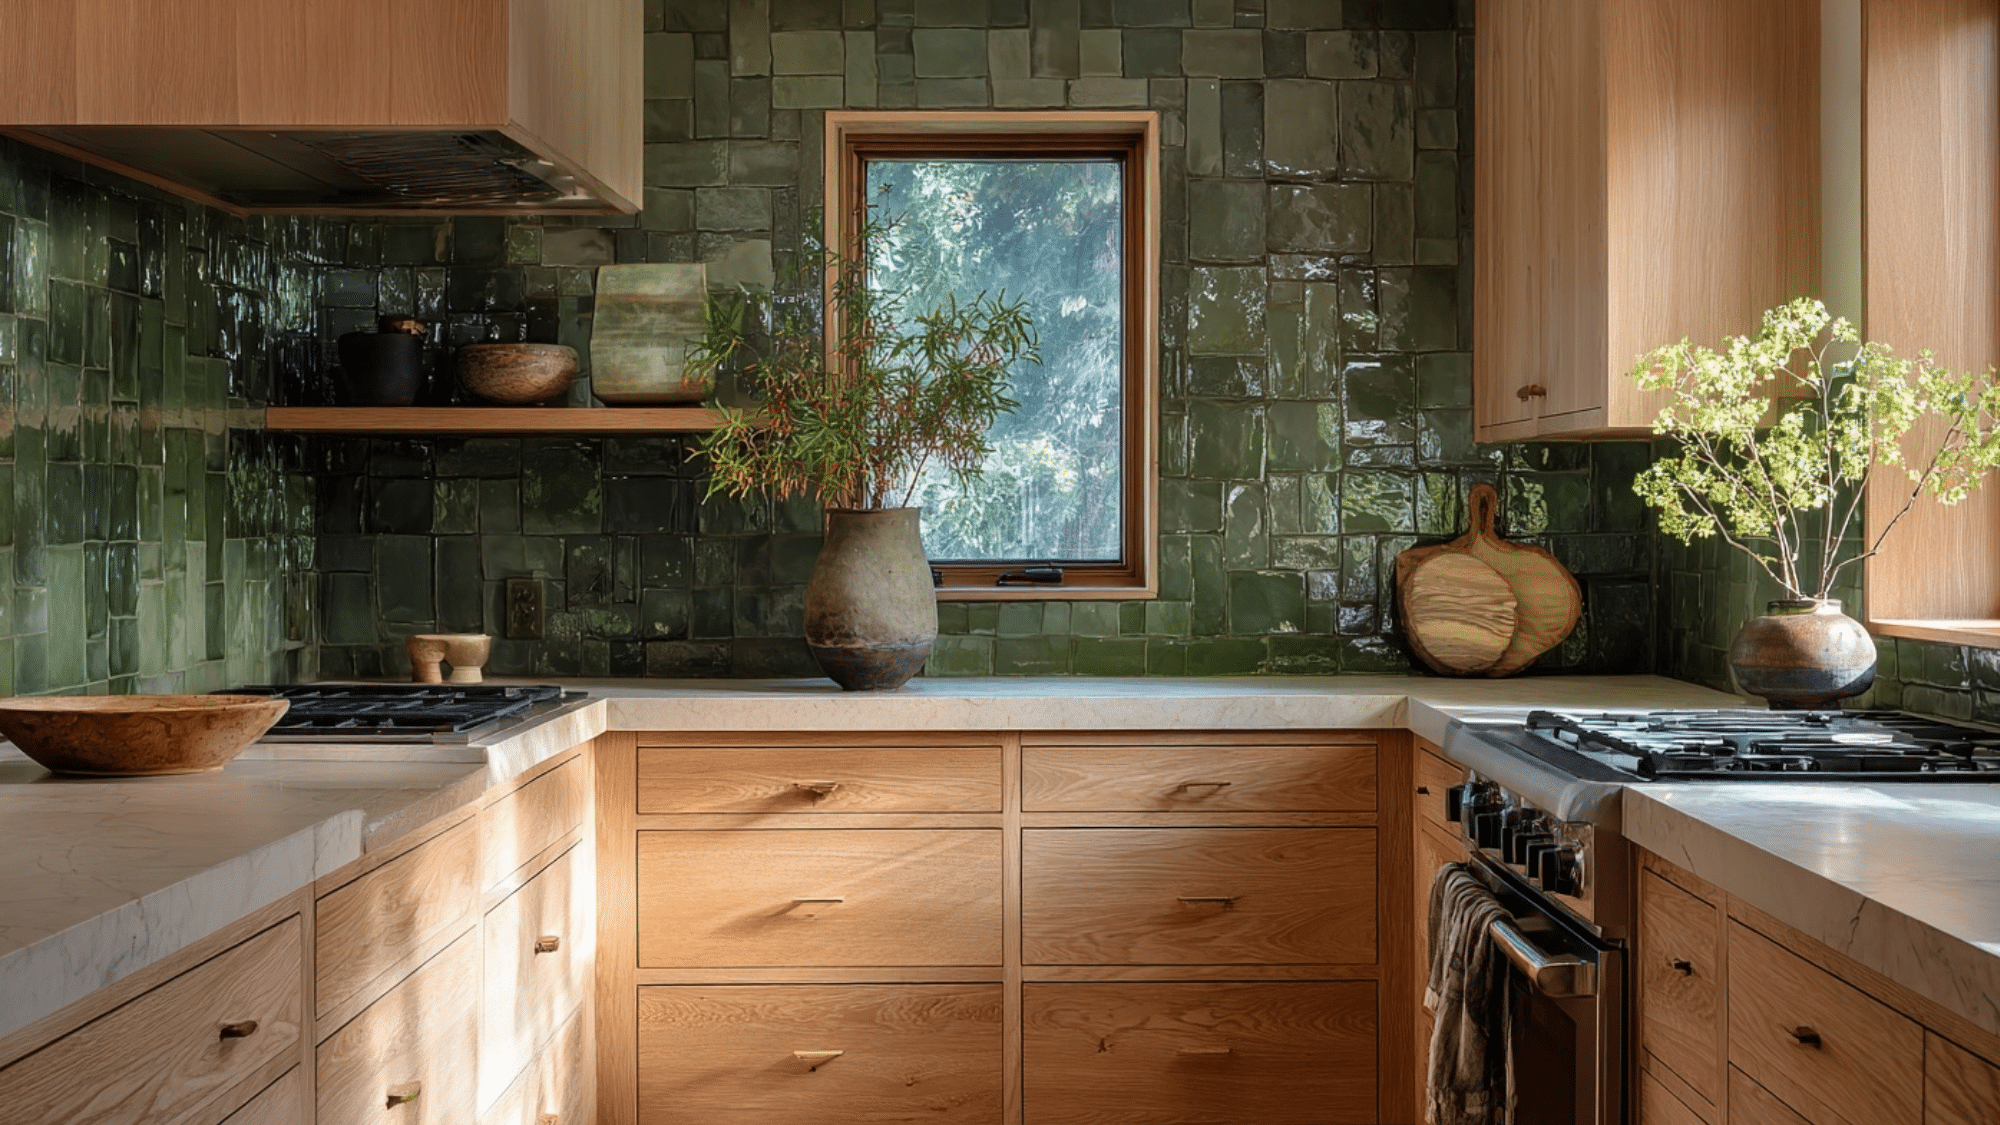
A moss green tile backsplash adds organic depth behind pale stone or wood counters. The color stays earthy and grounded, never bright or tropical.
This approach layers color where it won’t dominate daily sightlines. The backsplash becomes a textured backdrop rather than the main event.
Pro Tip: Choose matte tiles to avoid reflective shine.
7. Muted Olive Shelving for Gentle Color Depth
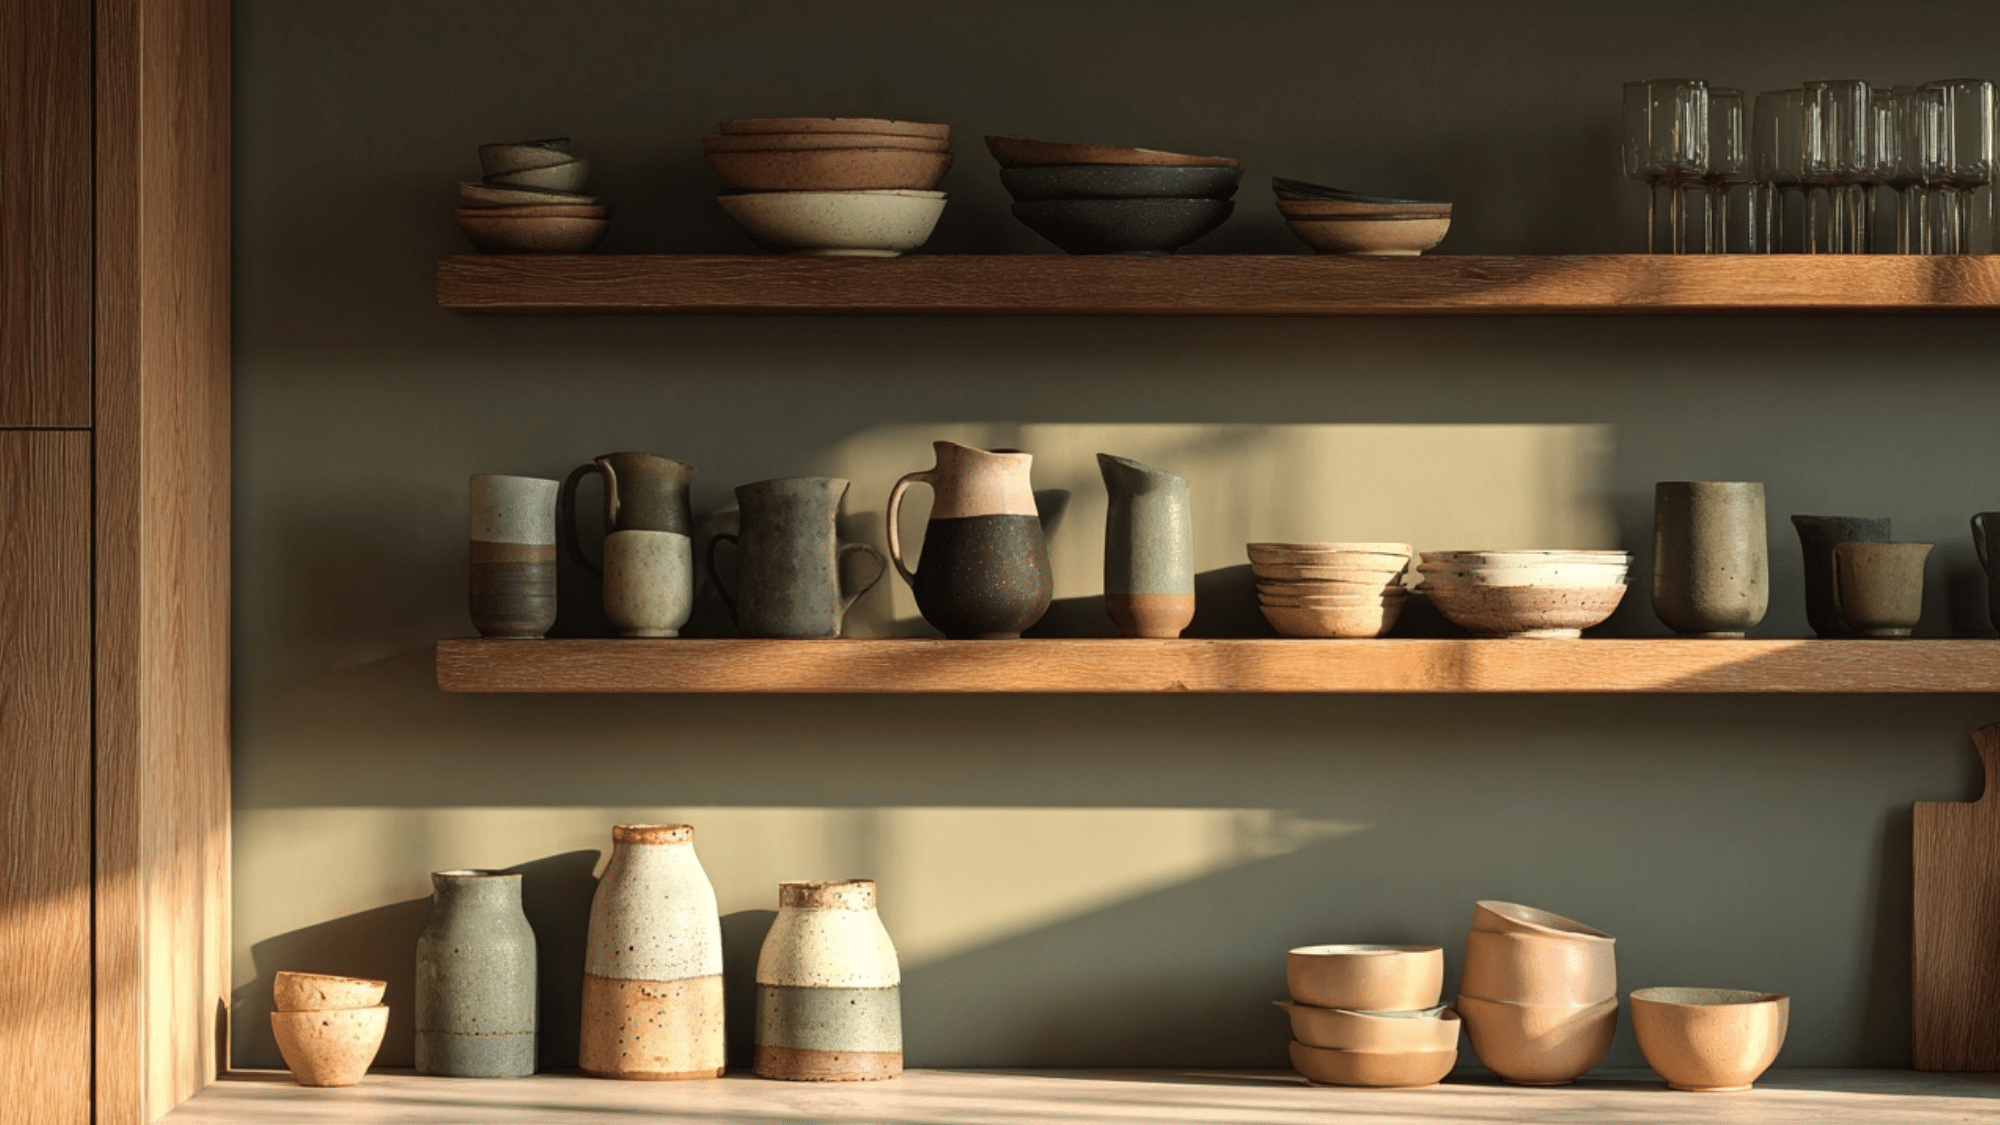
Open shelving painted in muted olive provides color while displaying ceramics and glassware. The tone stays natural, reading almost as a warm neutral.
Olive adds warmth without the heaviness of dark wood or the starkness of white. It creates visual interest in a way that feels organic.
Pro Tip: Style olive shelves with cream and terracotta ceramics.
8. Honed Concrete Countertops with Pale Wood
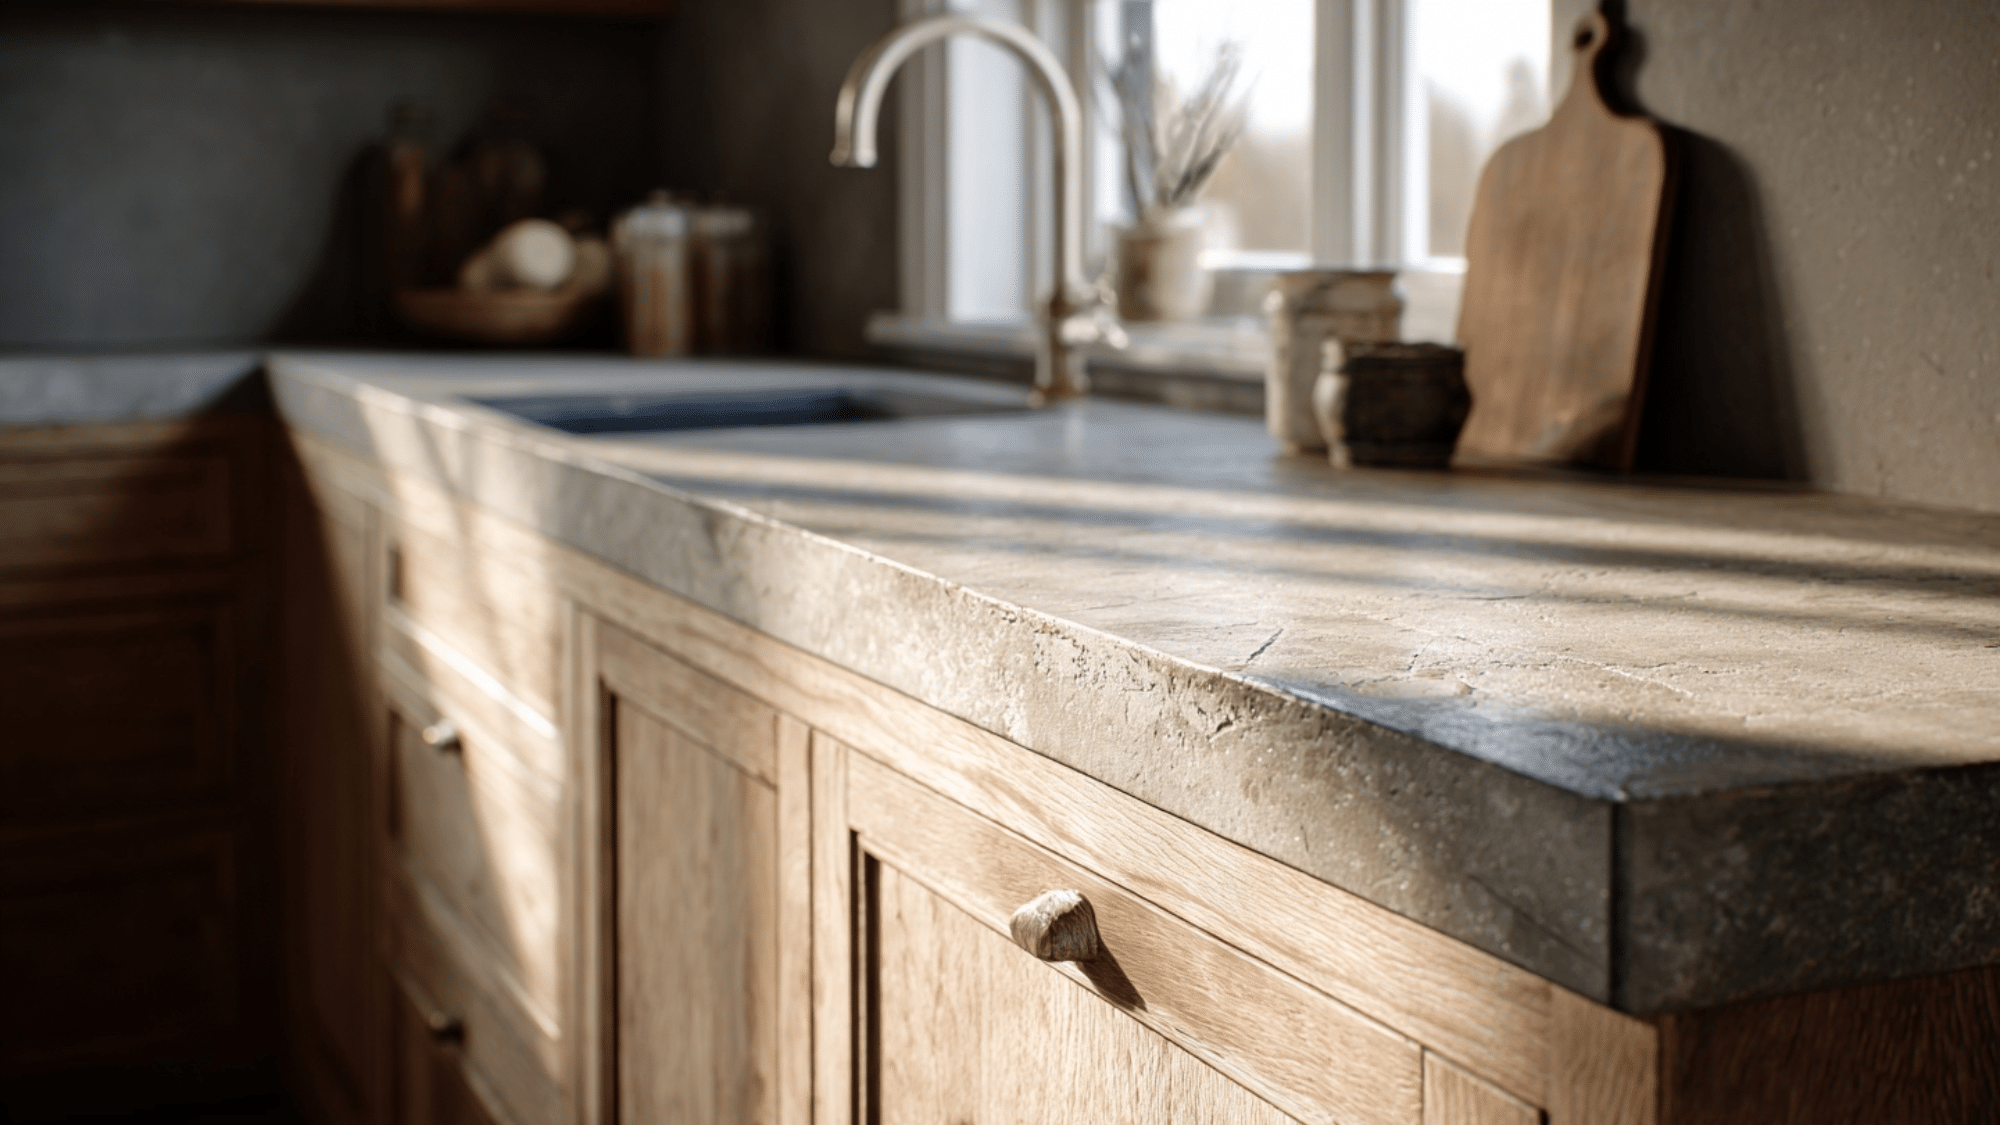
Honed concrete offers durability and texture without glossy polish. Paired with pale wood cabinets, it creates industrial softness that feels modern yet warm.
The matte surface absorbs light gently, and the natural variations in concrete add character. It’s practical for heavy use while looking intentionally minimal.
Pro Tip: Seal concrete properly and let it develop natural patina.
9. Matte Stone Full-Height Backsplash for Seamless Flow
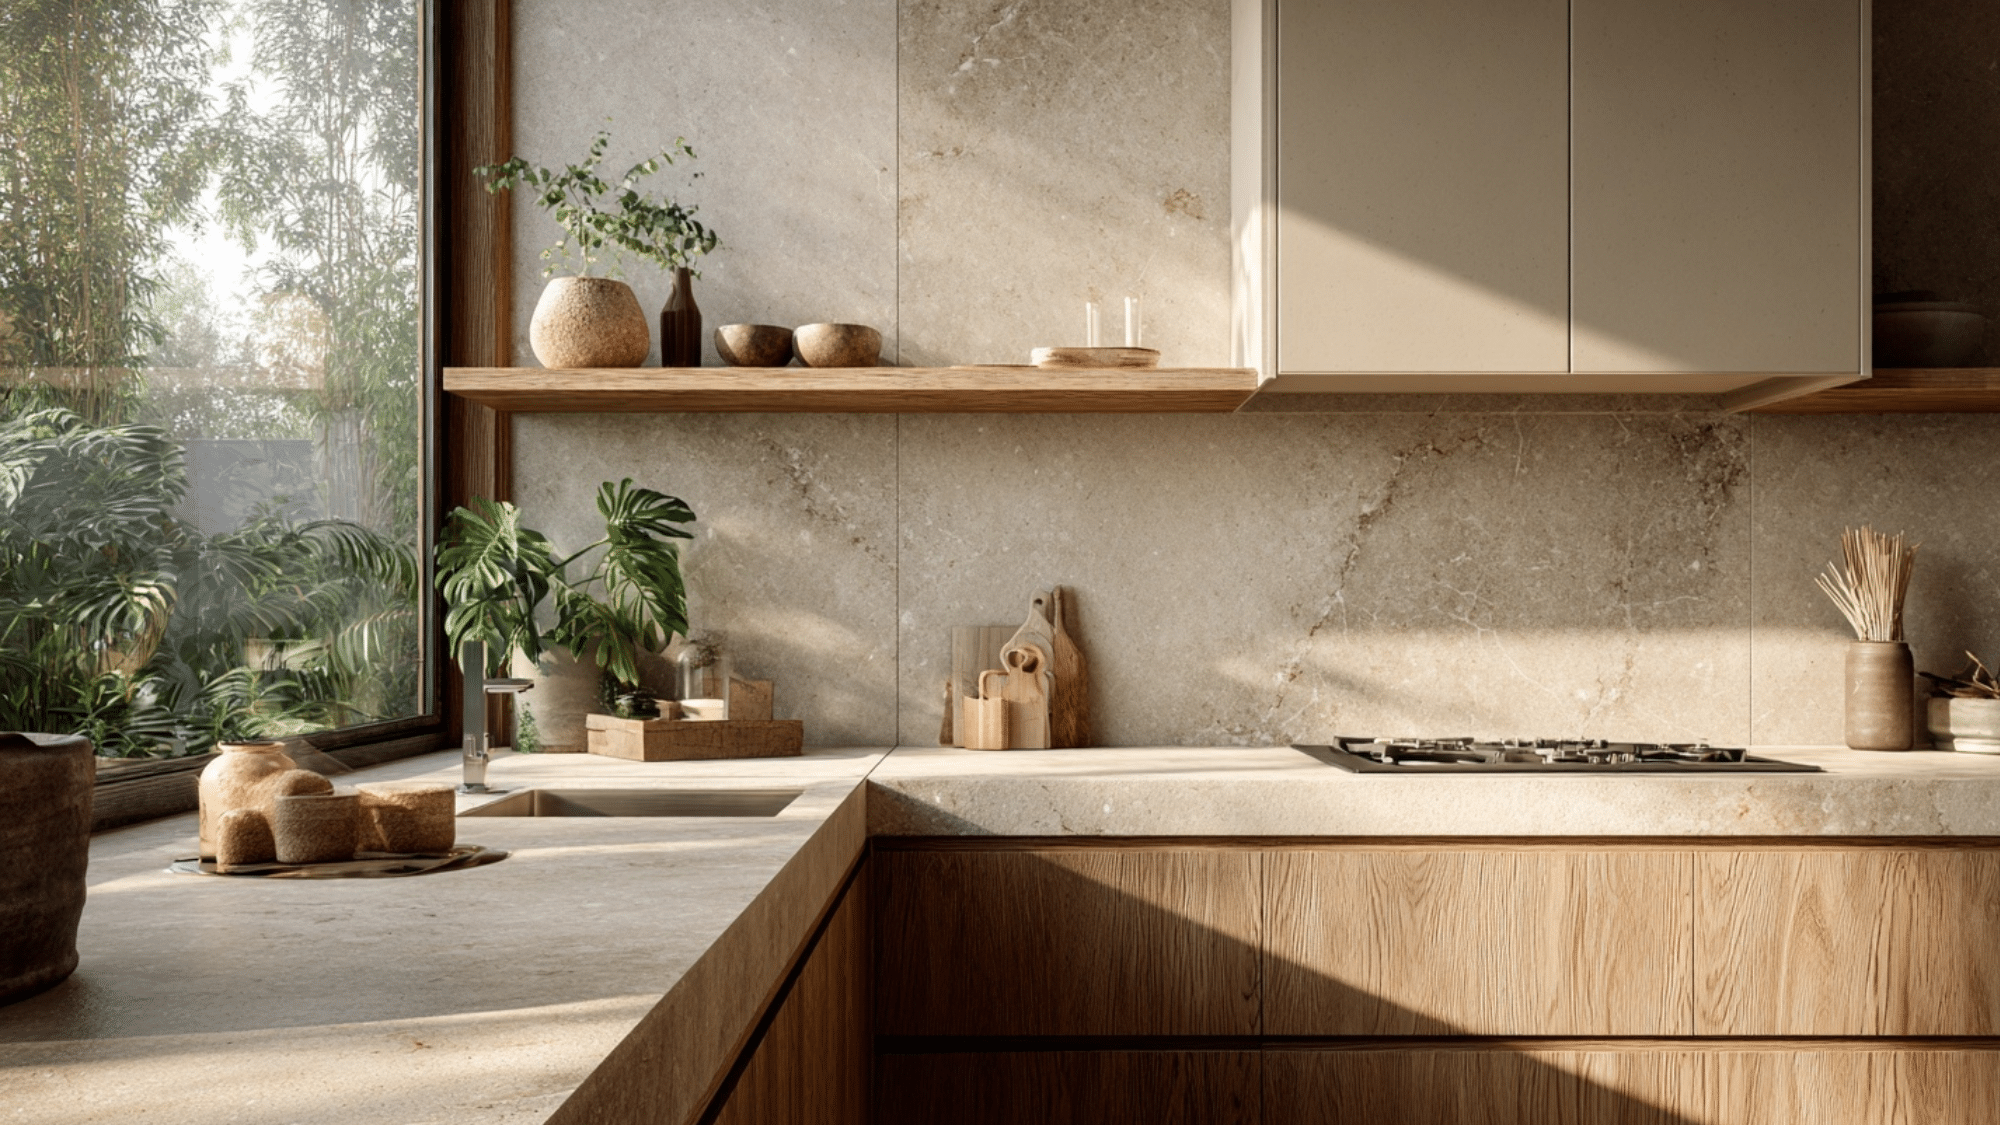
Extending countertop stone up the full wall height reduces visual breaks and grout lines. The uninterrupted surface creates calm through simplicity.
This treatment works especially well behind cooktops or sinks. It’s easier to clean and maintain the uncluttered charming japandi prizes.
Pro Tip: Choose honed finishes over polished for softer appeal.
10. Large-Format Slabs to Reduce Visual Clutter
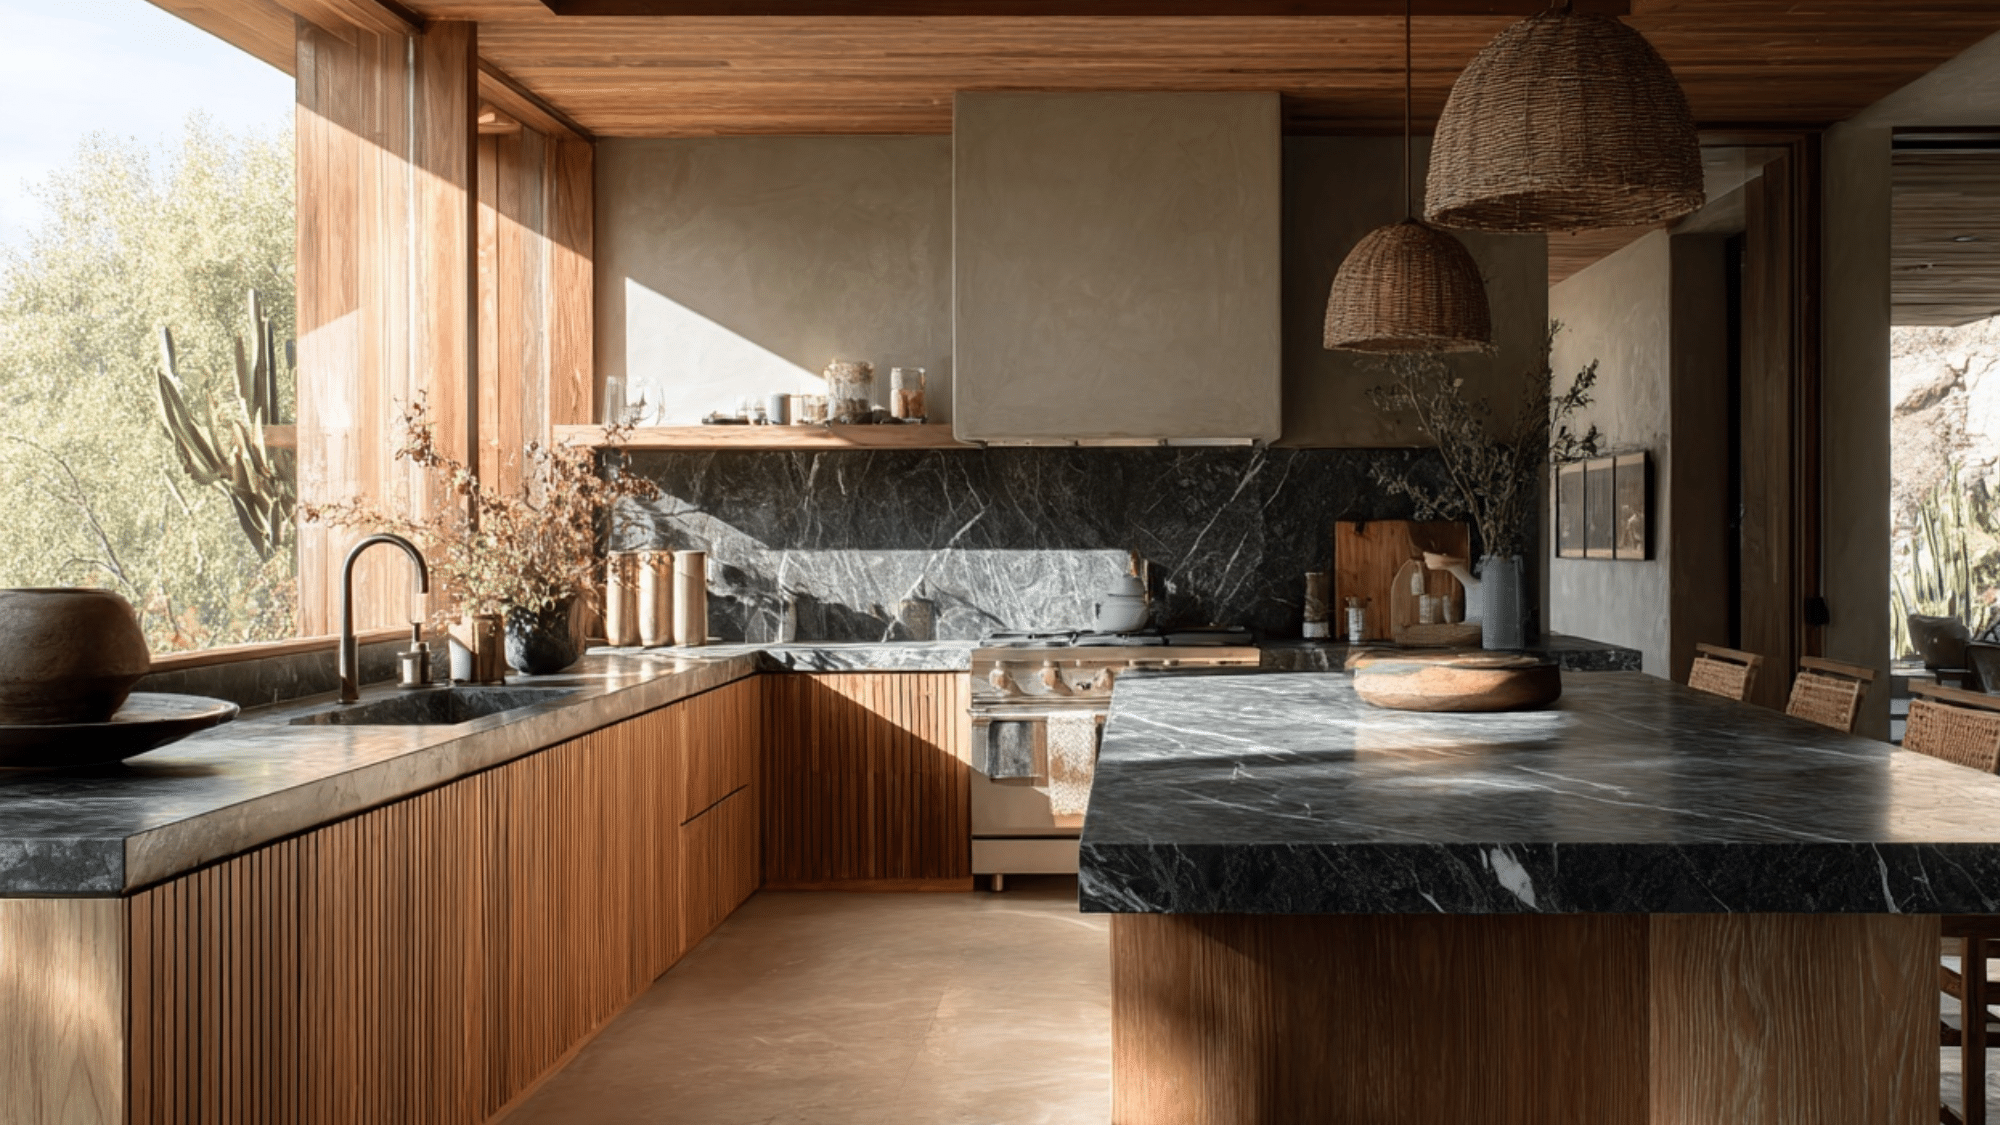
Large stone or porcelain slabs minimize seams and grout lines on counters and backsplashes. Fewer breaks mean less visual noise and a cleaner overall look.
The expansive surface feels luxurious in its simplicity. It lets material quality speak without competing patterns or busy tile layouts.
Pro Tip: Stick to neutral tones so slabs read as background.
11. Textured Plaster or Micro-Cement Feature Wall
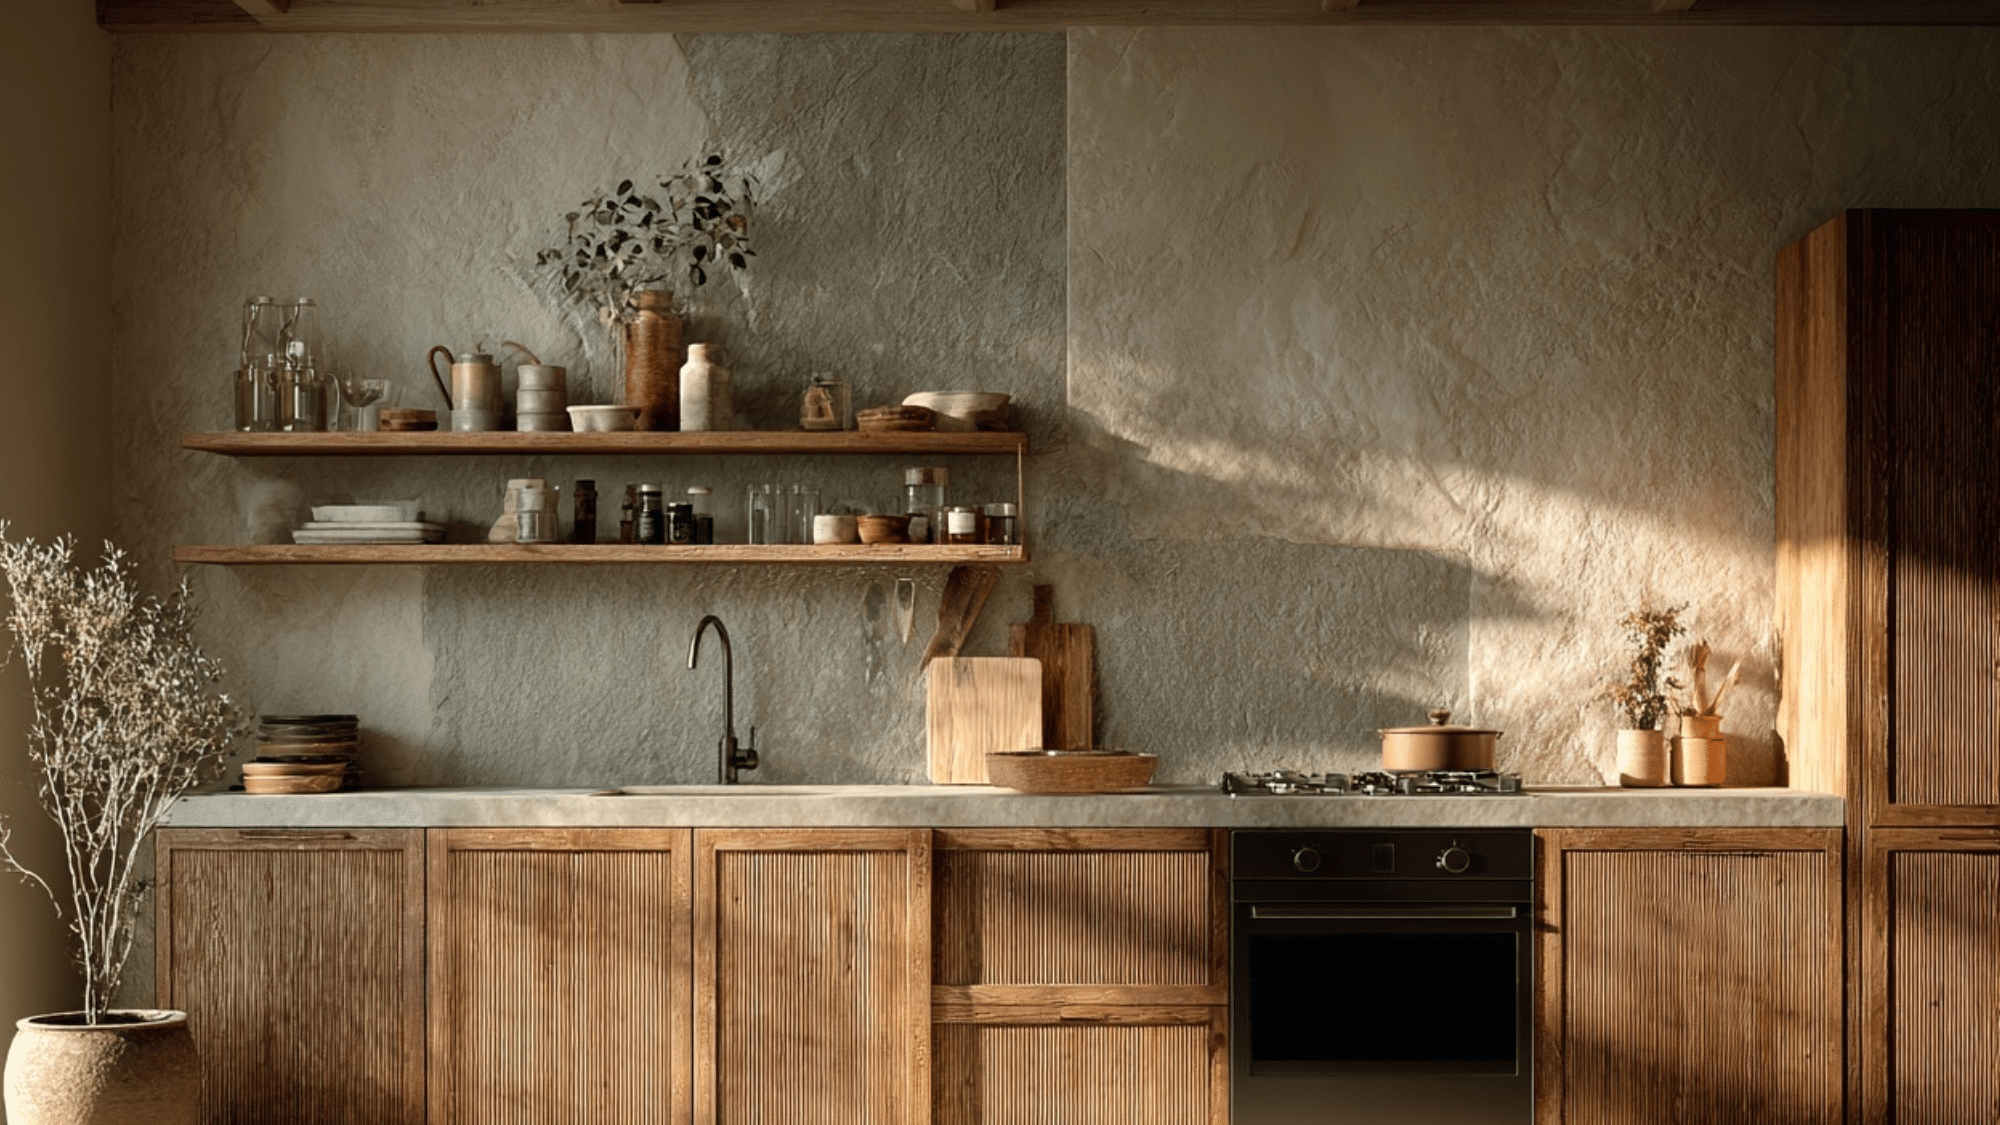
A textured plaster or micro-cement wall adds organic depth without pattern or color. The subtle variation catches light beautifully throughout the day.
This treatment brings handmade quality and tactile interest to a single wall. It’s architectural without being ornate, fitting japandi’s restraint.
Pro Tip: Use on one accent wall only for balance.
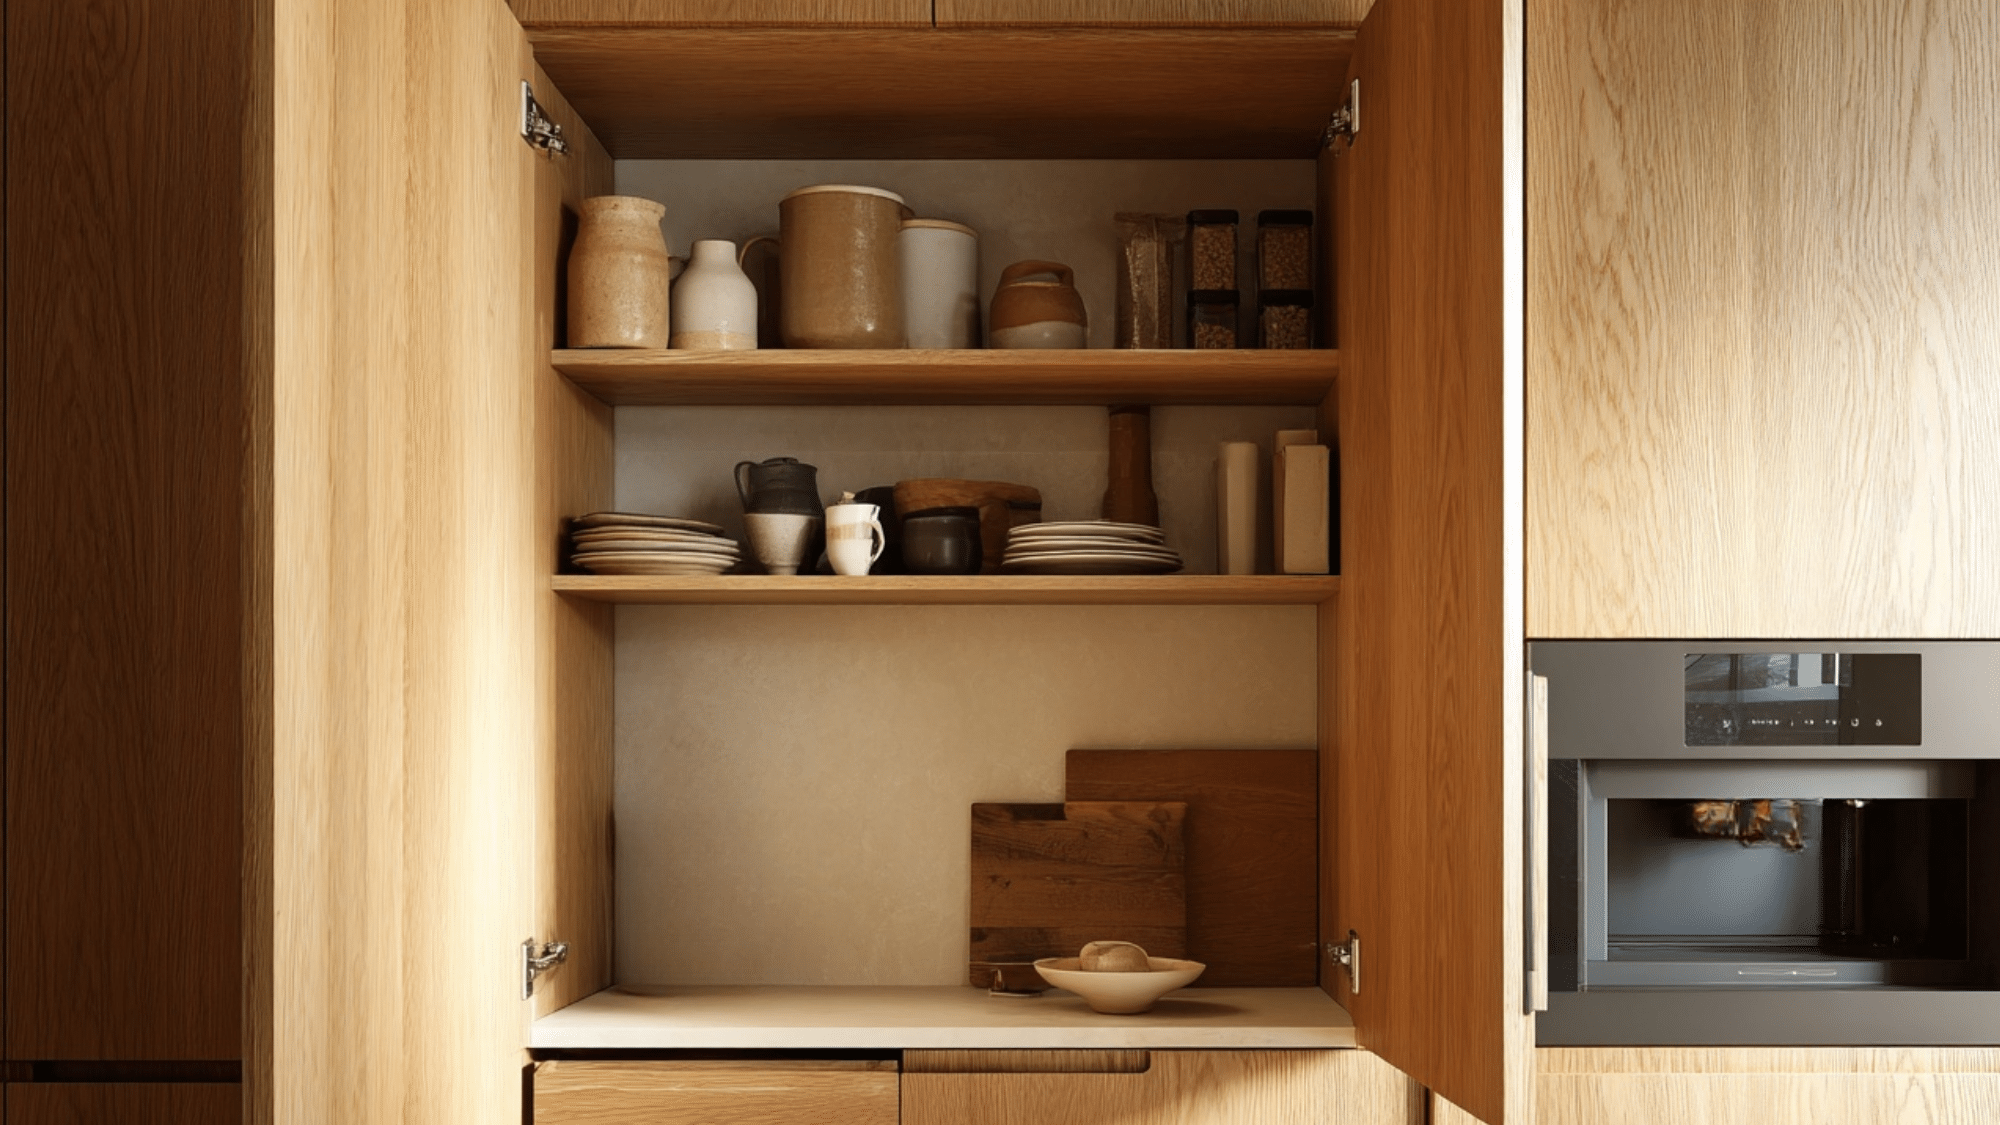
12. Closed Lower Cabinets with Open Wood Shelves Above
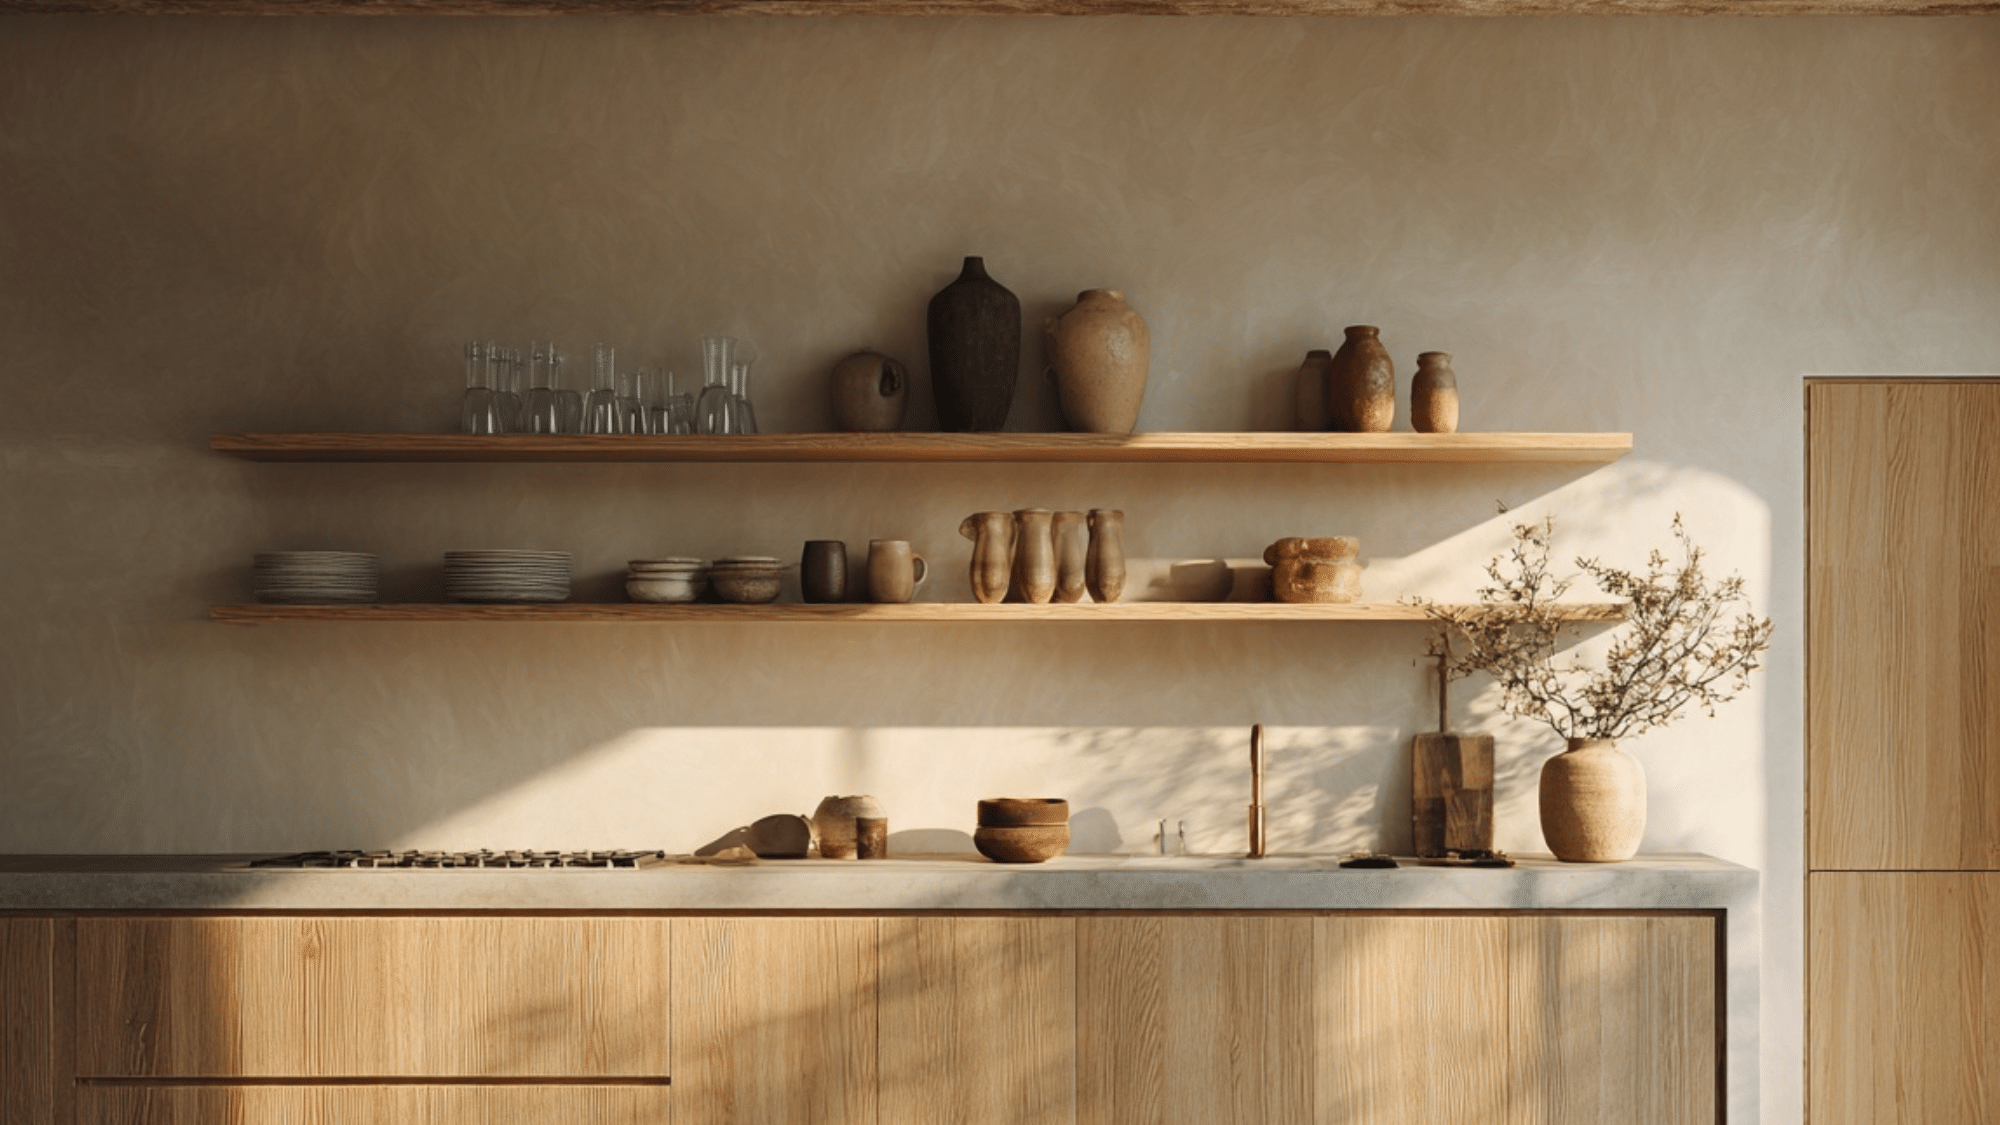
Lower cabinets hide everyday clutter while open wood shelves display chosen ceramics and glassware. This split creates storage and display in equal measure.
The combination maintains clean counters and sightlines. It offers practical concealment below and curated beauty above eye level.
Pro Tip: Limit open shelves to two or three rows maximum.
13. Floating End-Shelves Framing the Kitchen Layout

Floating shelves on end walls frame the kitchen’s entry or edges. They add function without boxing in the space or requiring full cabinetry runs.
These shelves feel intentional yet light, never heavy. They’re perfect for cookbooks, plants, or daily-use bowls within easy reach.
Pro Tip: Mount shelves at varying heights for visual rhythm.
14. Hidden Corner Storage for a Clean Visual Field
Pull-out corner units or lazy Susans keep awkward corners functional without visible clutter. Everything stays accessible but out of sight.
Corner storage often becomes a dumping ground, but smart solutions keep it useful. Hidden mechanisms mean clean exterior lines remain unbroken.
Pro Tip: Install soft-close mechanisms for smooth, quiet operation.
15. Panel-Ready Refrigerator for Seamless Integration
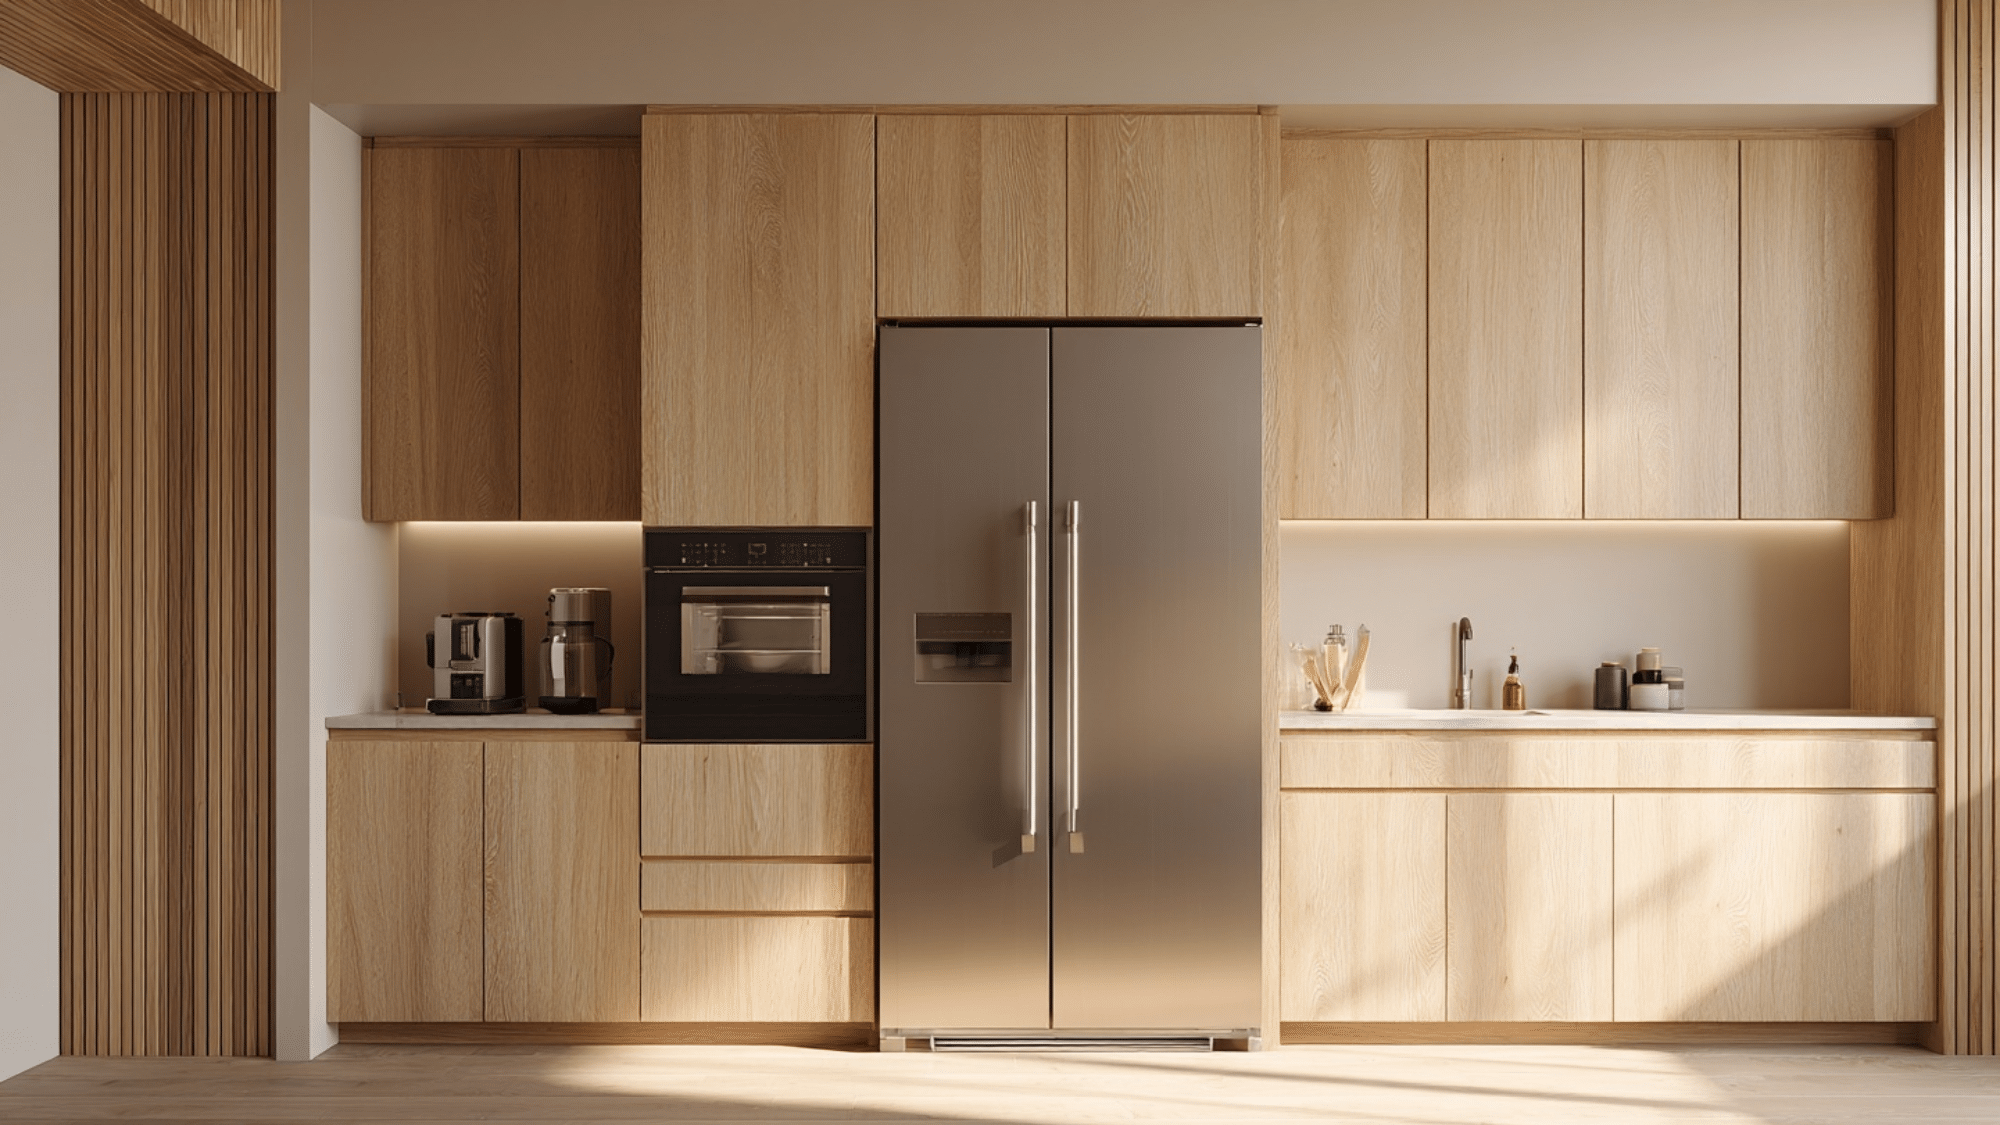
Covering your refrigerator with cabinet-matching panels makes it disappear into the wall. The appliance becomes part of the architecture, not a bulky intrusion.
This integration is key to japandi’s clean charming. Large appliances fade into the background, letting materials and light take focus.
Pro Tip: Choose handle-less push-to-open panels for seamless look.
16. Flush Induction Cooktop for Streamlined Design
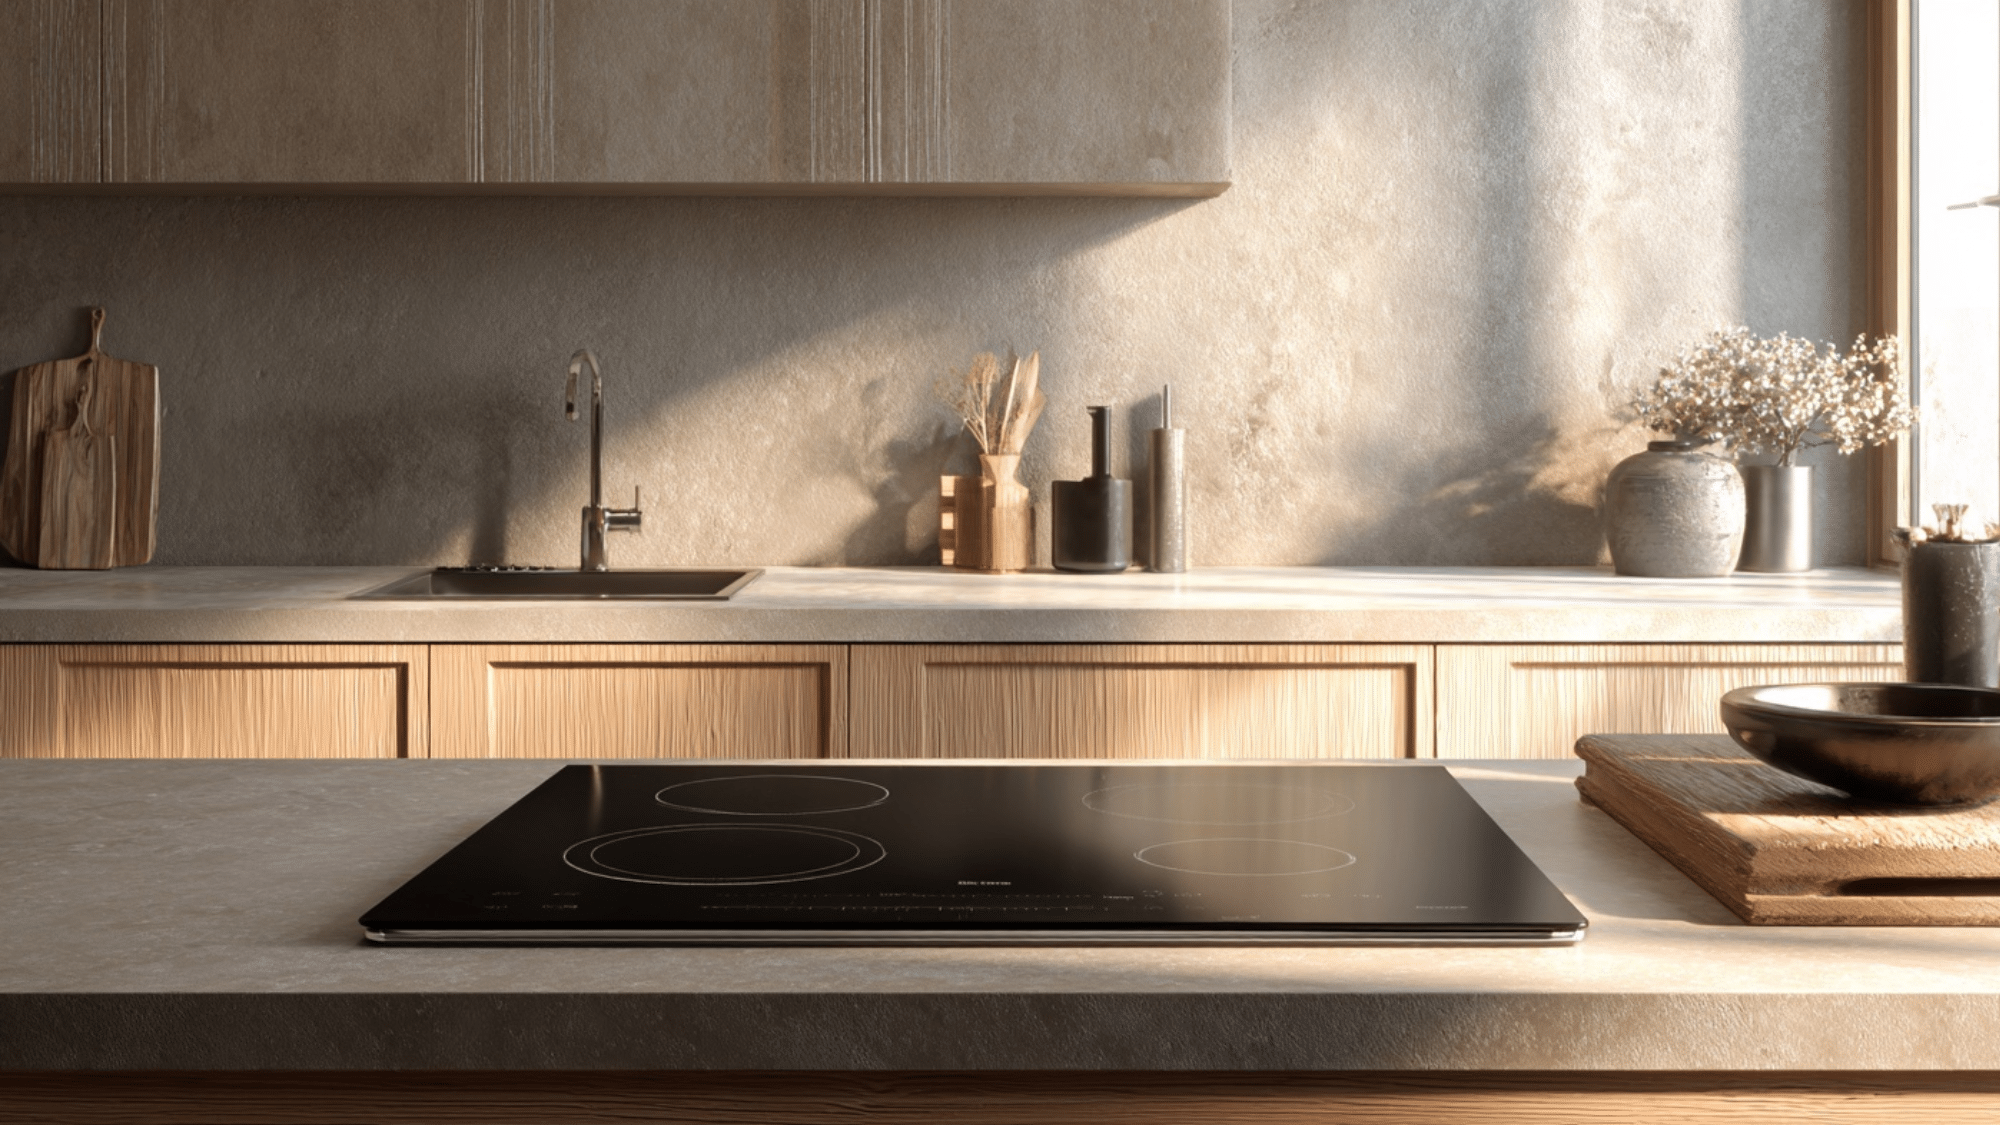
Induction cooktops sit flush with the counter, creating an uninterrupted surface when not in use. No raised edges or grates break the clean plane.
The sleek installation looks modern and minimal. It’s easier to wipe down and maintain the uncluttered charming that japandi demands.
Pro Tip: Choose black induction against pale counters for subtle contrast.
17. Discreet Appliance Garage to Keep Counters Clear
An appliance garage with a roll-up door or sliding panel hides toasters, blenders, and coffee makers. Counters stay clear while everything remains accessible.
This built-in solution prevents small appliances from cluttering sightlines. Open the door when needed, close it when guests arrive.
Pro Tip: Add an outlet inside so appliances stay plugged in.
18. Concealed Range Hood Behind Matching Wood Panel
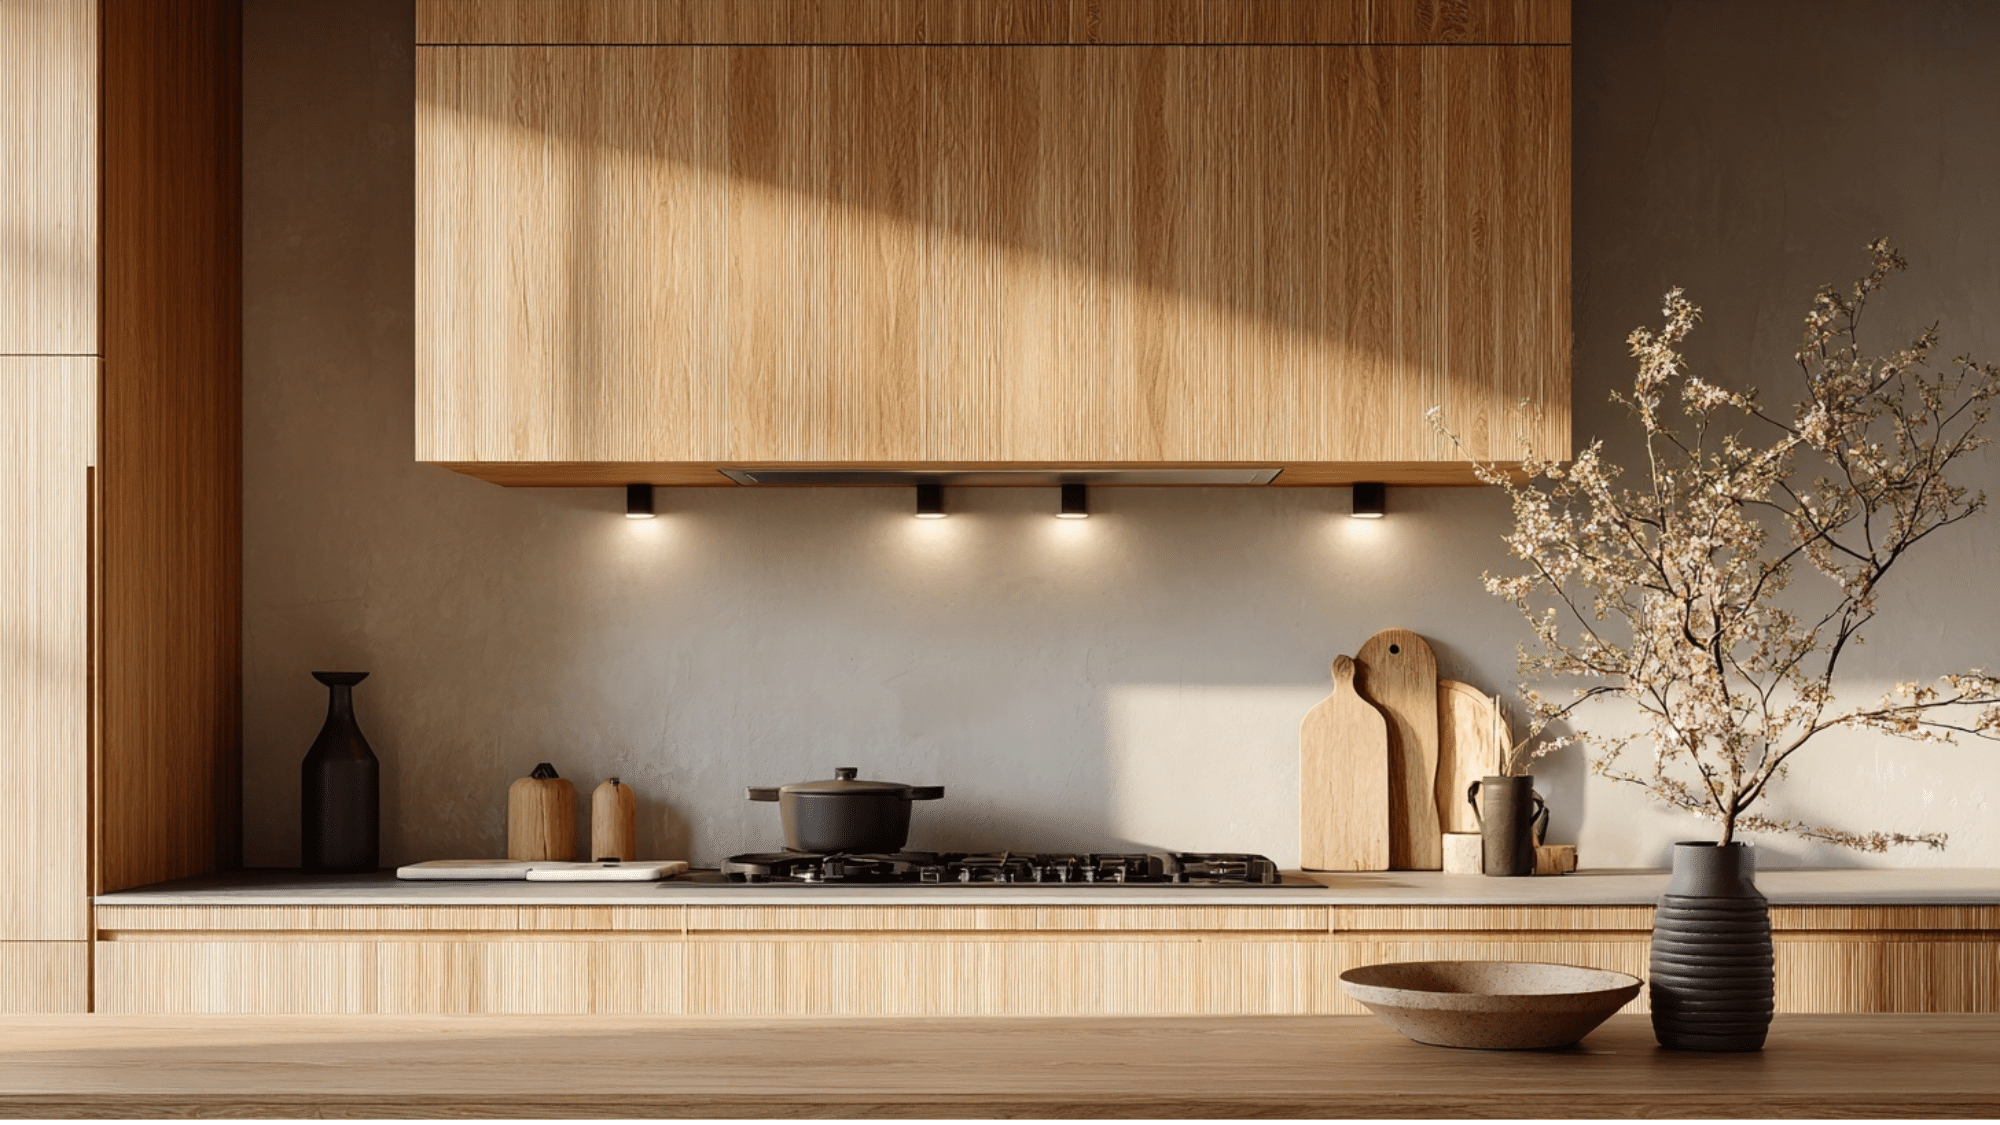
A range hood covered in the same wood or paint as the surrounding cabinets becomes invisible. Function remains, but the visual bulk disappears.
This approach maintains ventilation without the industrial look of exposed metal hoods. The kitchen feels cohesive and uninterrupted.
Pro Tip: Ensure proper CFM rating even with concealed paneling.
19. Rounded Island Corners for Softer Geometry
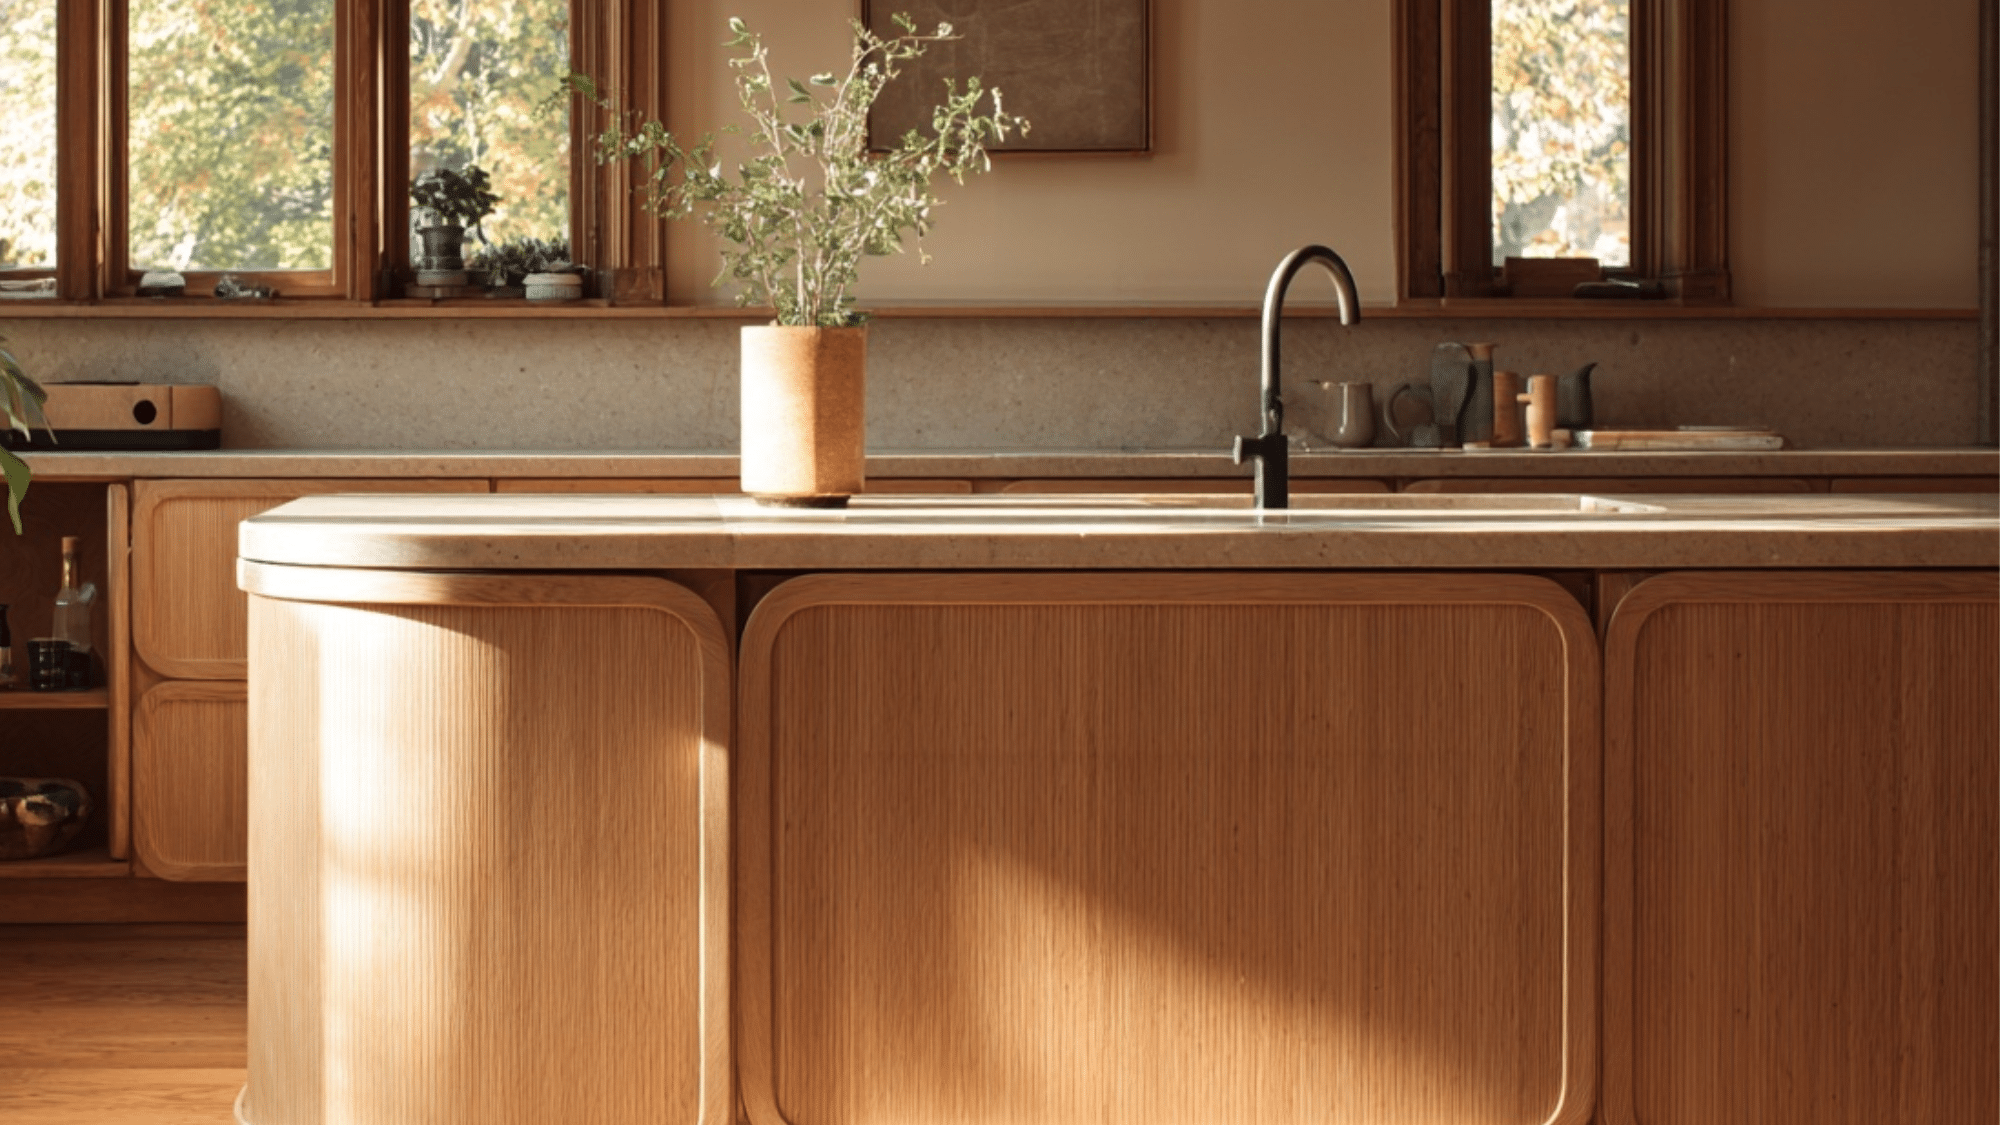
Rounding island corners softens the kitchen’s geometry and improves traffic flow. The curves feel gentler and more organic than sharp right angles.
This small detail changes how the space feels physically and visually. It invites movement and reduces harsh lines common in modern kitchens.
Pro Tip: Extend rounded edges slightly beyond the base for waterfall effect.
20. Curved Breakfast Nook Built into Cabinetry
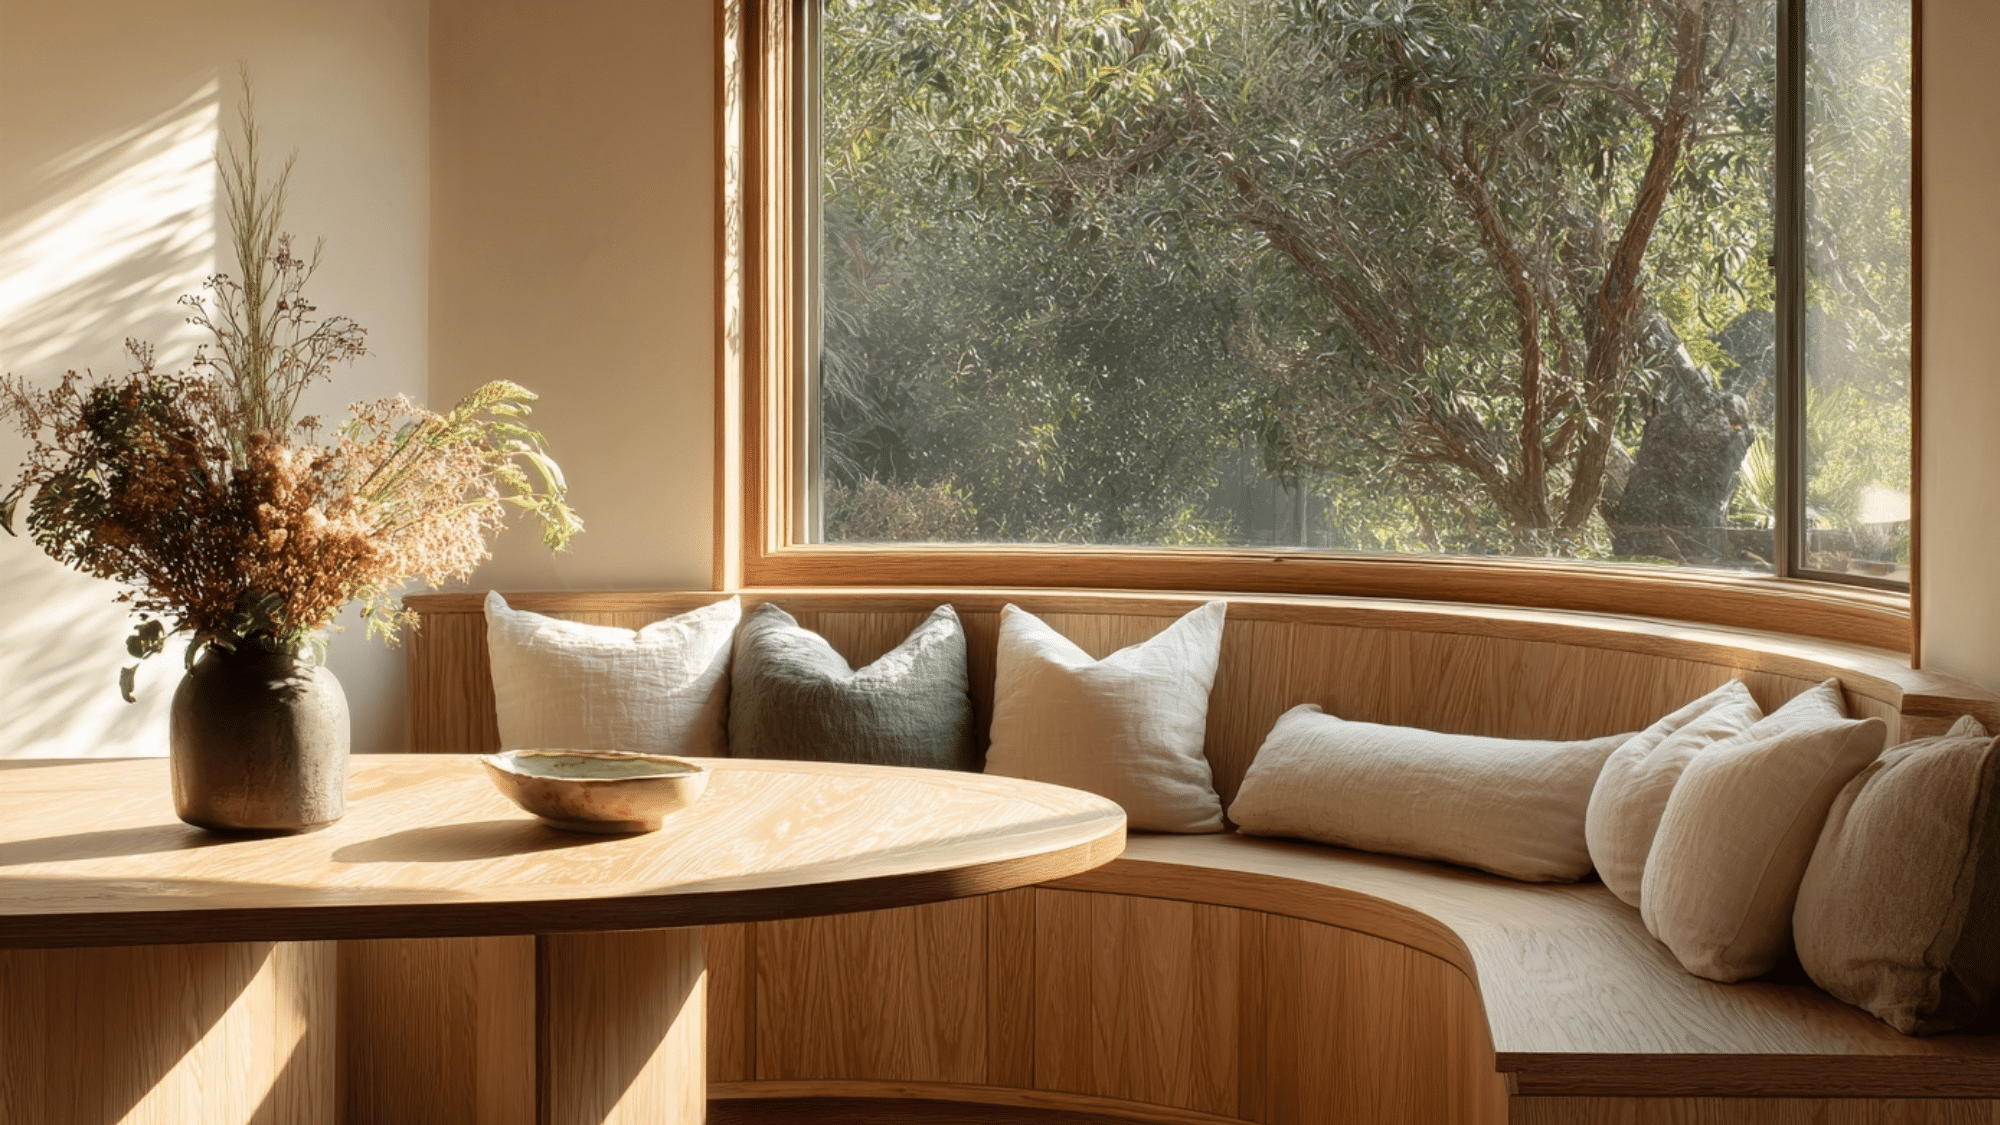
A built-in breakfast nook with curved banquette seating creates an intimate eating area. The curve draws people in and softens the kitchen’s overall lines.
This feature adds warmth and function without separate furniture. It carves out a cozy zone within the larger kitchen space.
Pro Tip: Use same wood species as cabinets for visual continuity.
21. Arched Doorway or Niche for Gentle Flow
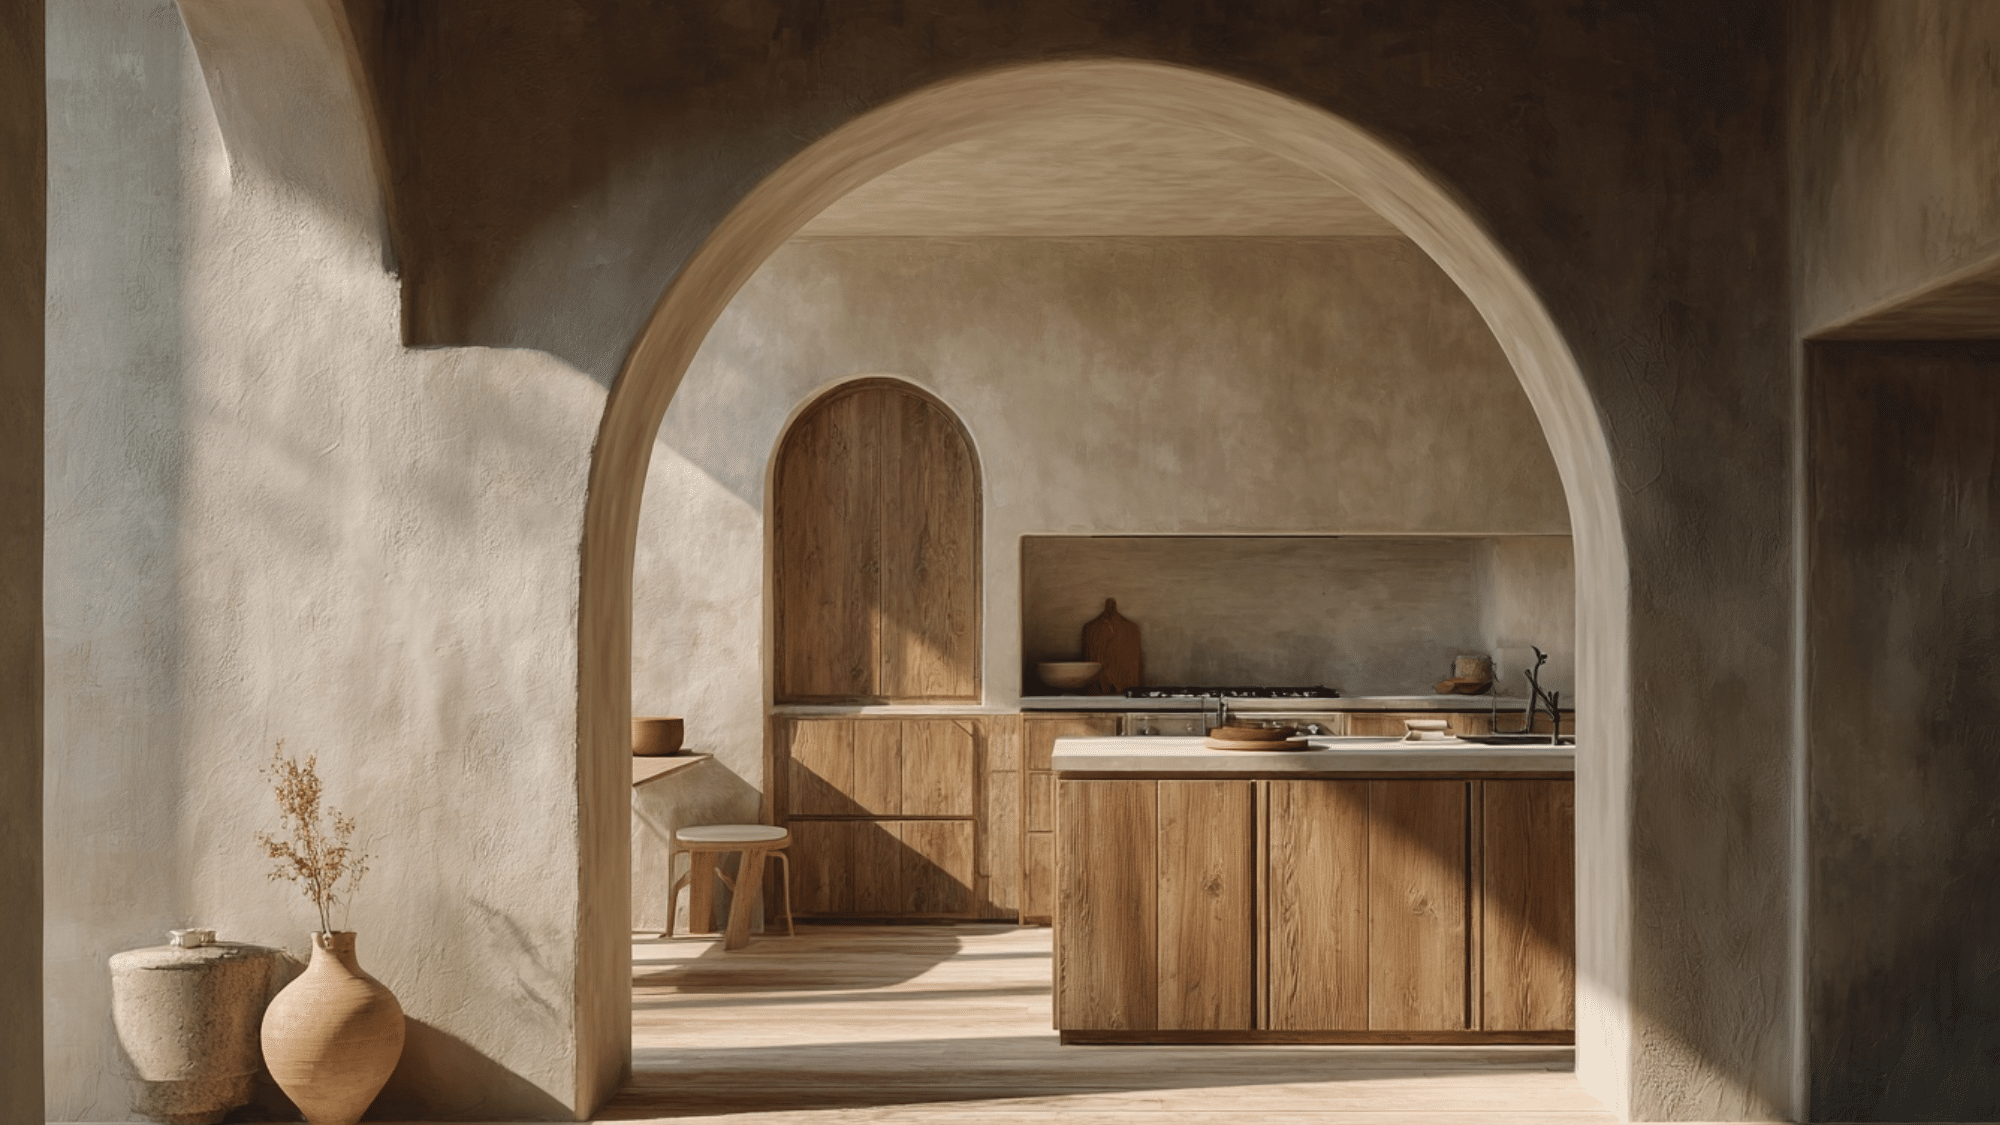
An arched doorway leading into the kitchen or an arched display niche adds softness. The curve contrasts beautifully with japandi’s typically straight lines.
Arches bring architectural interest without ornate detail. They feel both modern and classical, adding character subtly.
Pro Tip: Keep arches simple and unadorned for clean impact.
22. Skylight Over the Kitchen Island for Natural Light
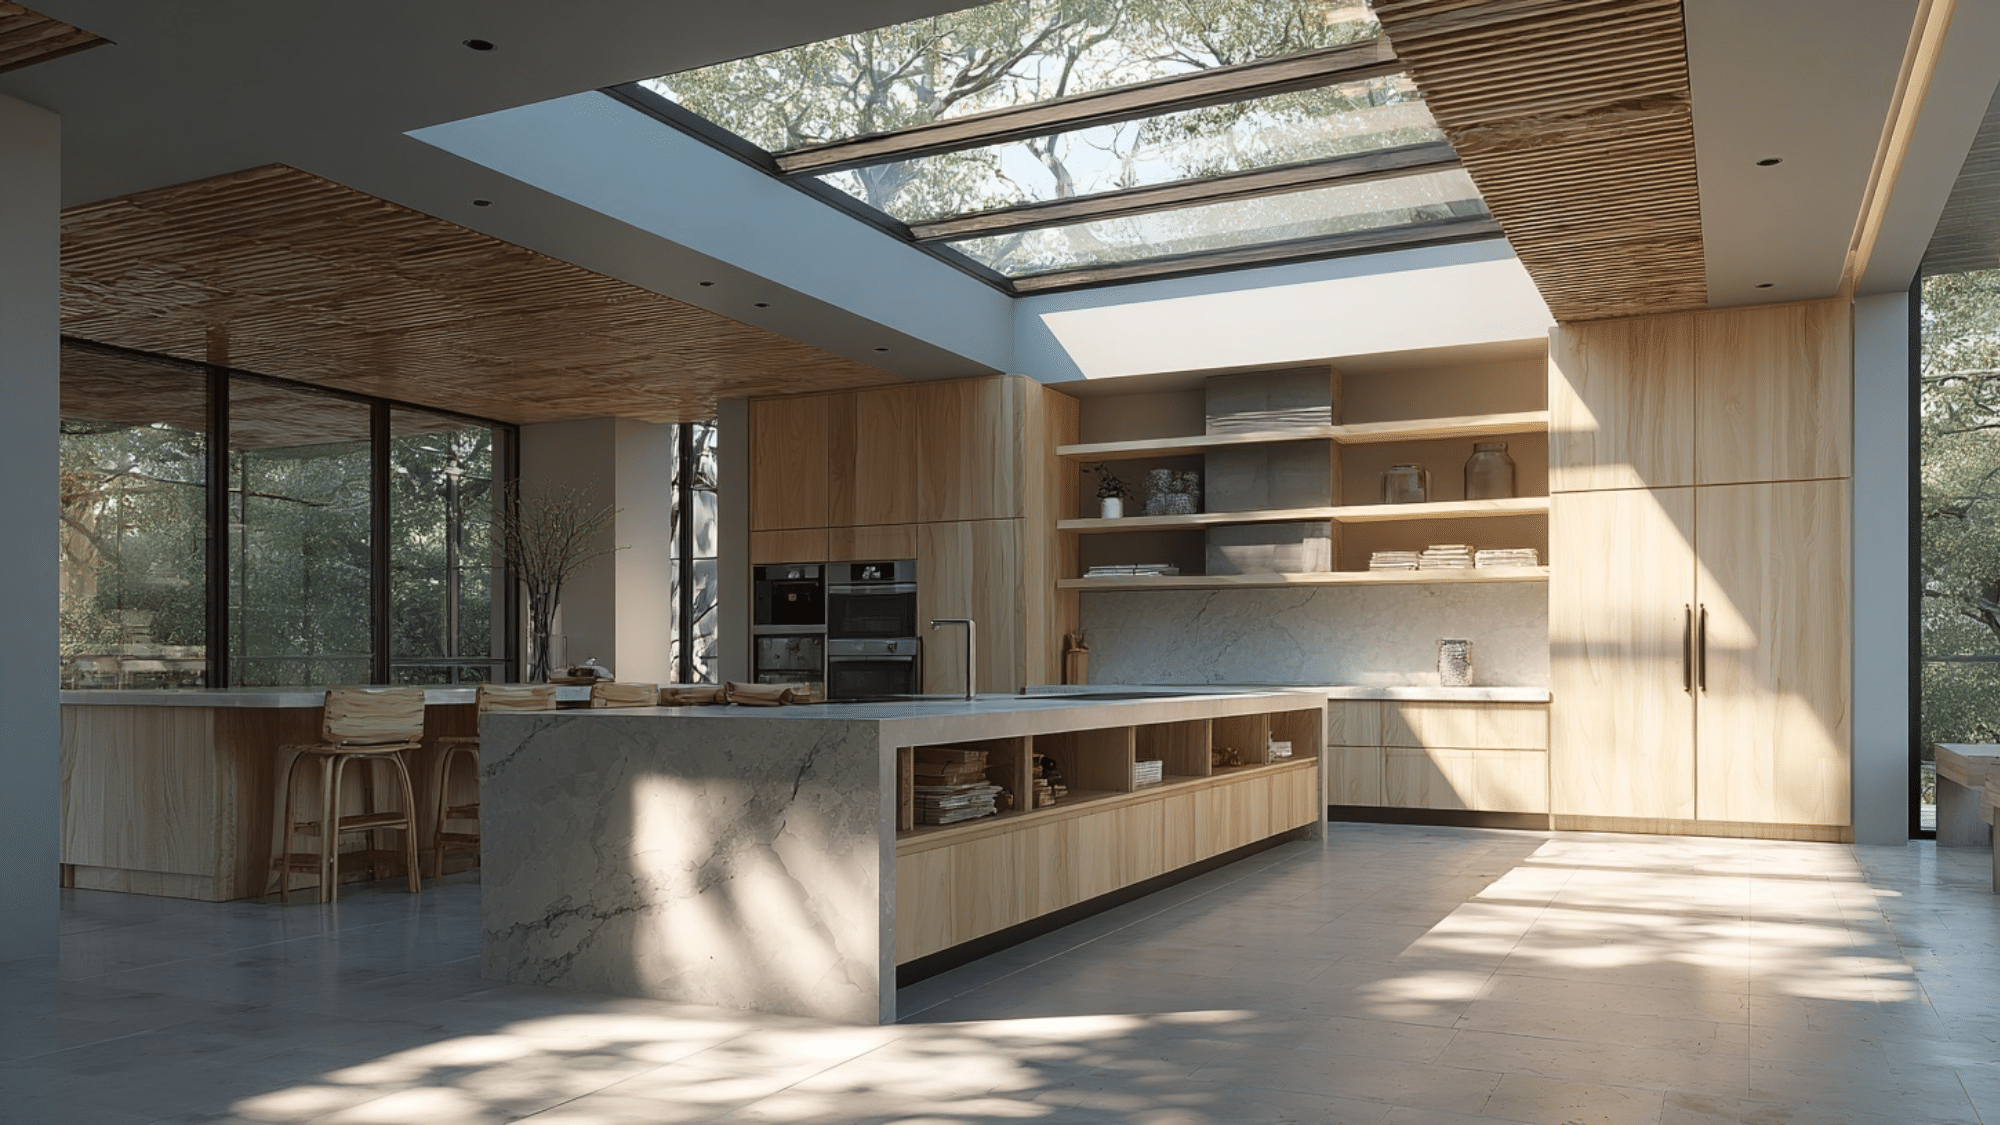
A skylight floods the island with natural light from above. This changes the space with brightness and creates shifting shadows throughout the day.
Natural overhead light reduces reliance on artificial fixtures. It brings the outdoors in, a core principle of both Japanese and Scandinavian design.
Pro Tip: Add diffusing shade for harsh afternoon sun control.
23. Paper or Rice-Paper Pendant Lighting
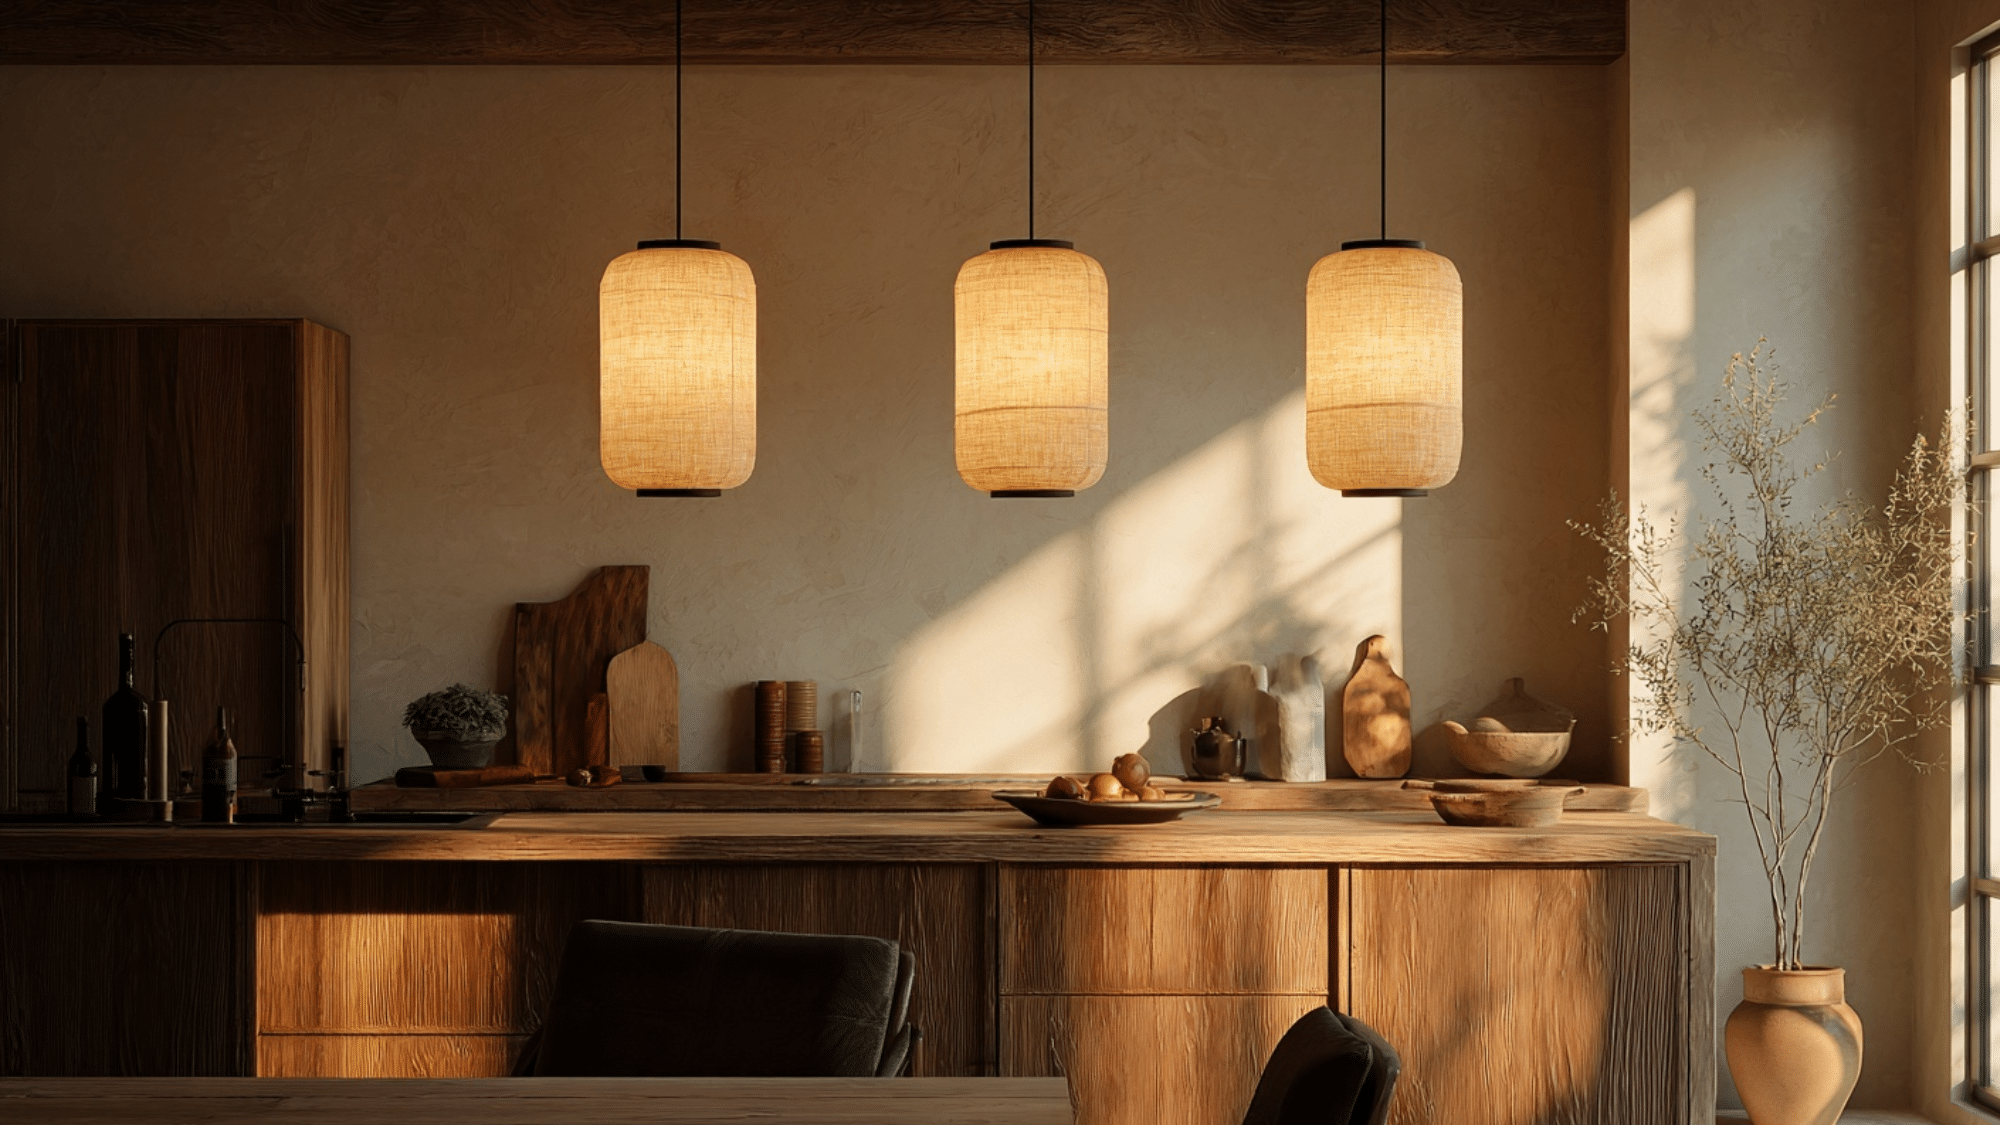
Paper lanterns or rice-paper pendants cast warm, diffused light. They’re lightweight, sculptural, and inherently Japanese in origin.
These fixtures soften overhead lighting while adding textural interest. The glow feels intimate and never harsh.
Pro Tip: Hang paper pendants in odd numbers at varying heights.
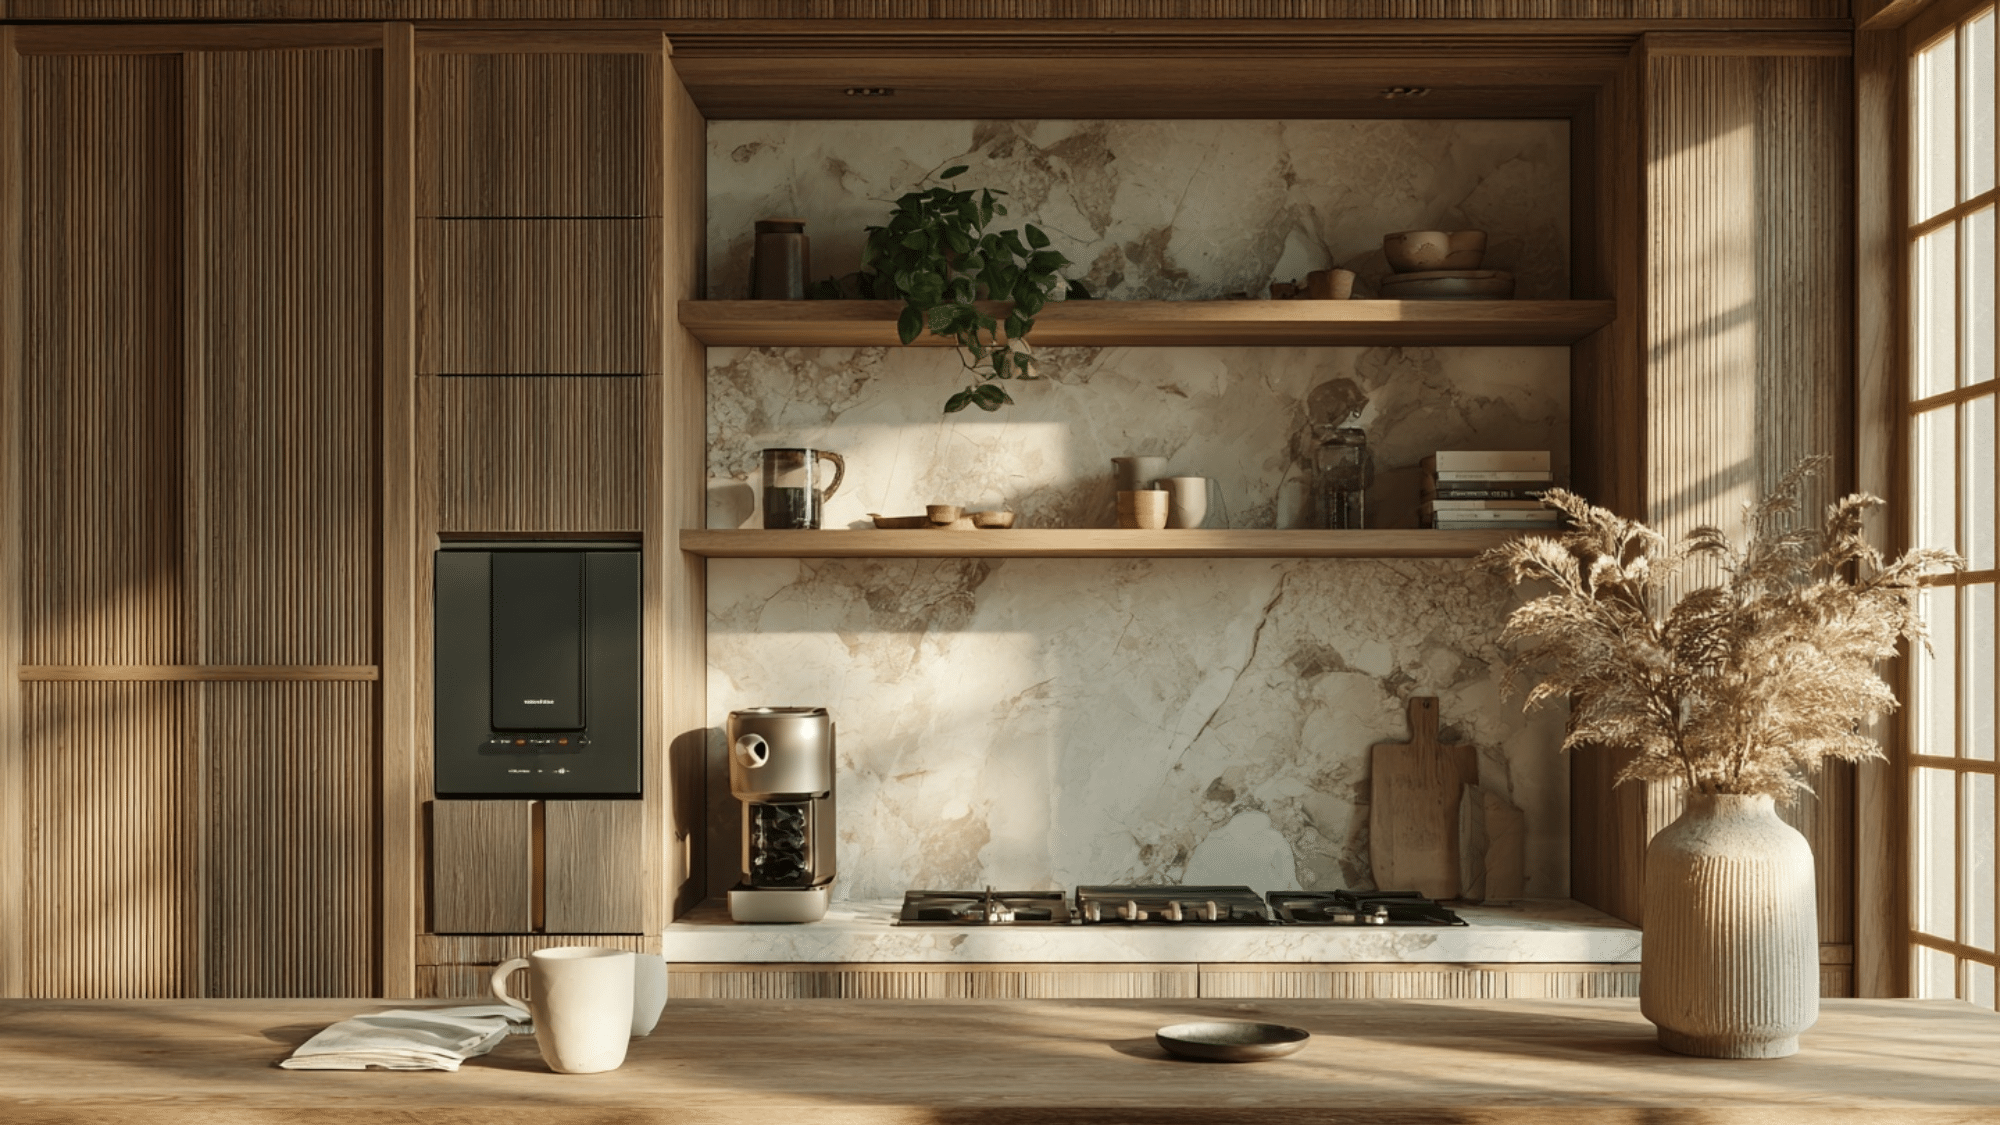
24. Recessed LED Strip Lighting Behind Shelves
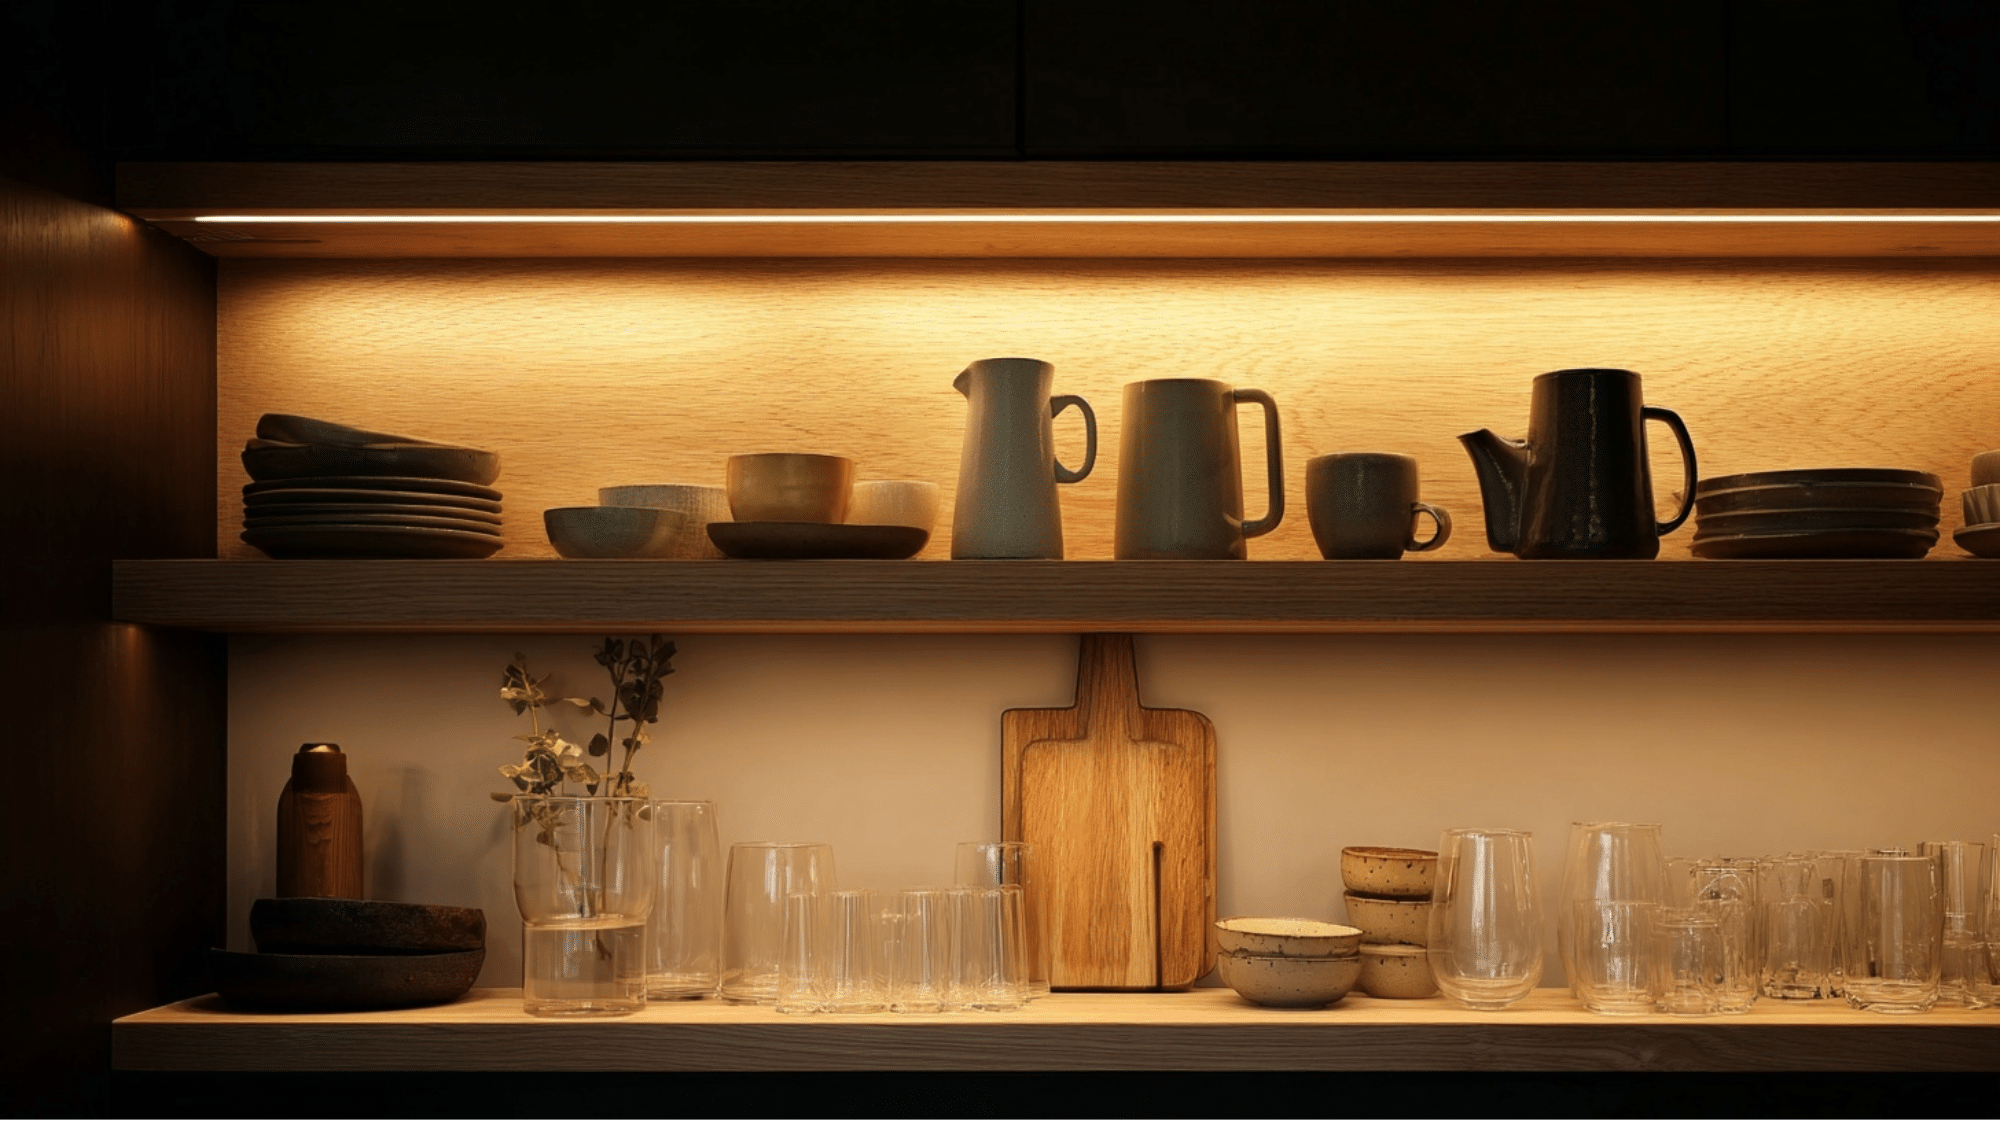
LED strips tucked behind open shelving create a soft glow that highlights displayed items. The light source stays hidden while the effect is warm.
This ambient lighting adds depth and makes evening cooking feel calmer. It draws attention to your curated ceramics and glassware.
Pro Tip: Choose warm white LEDs around 2700K with dimmers.
25. Toe-Kick Lighting to Add Subtle Ambience
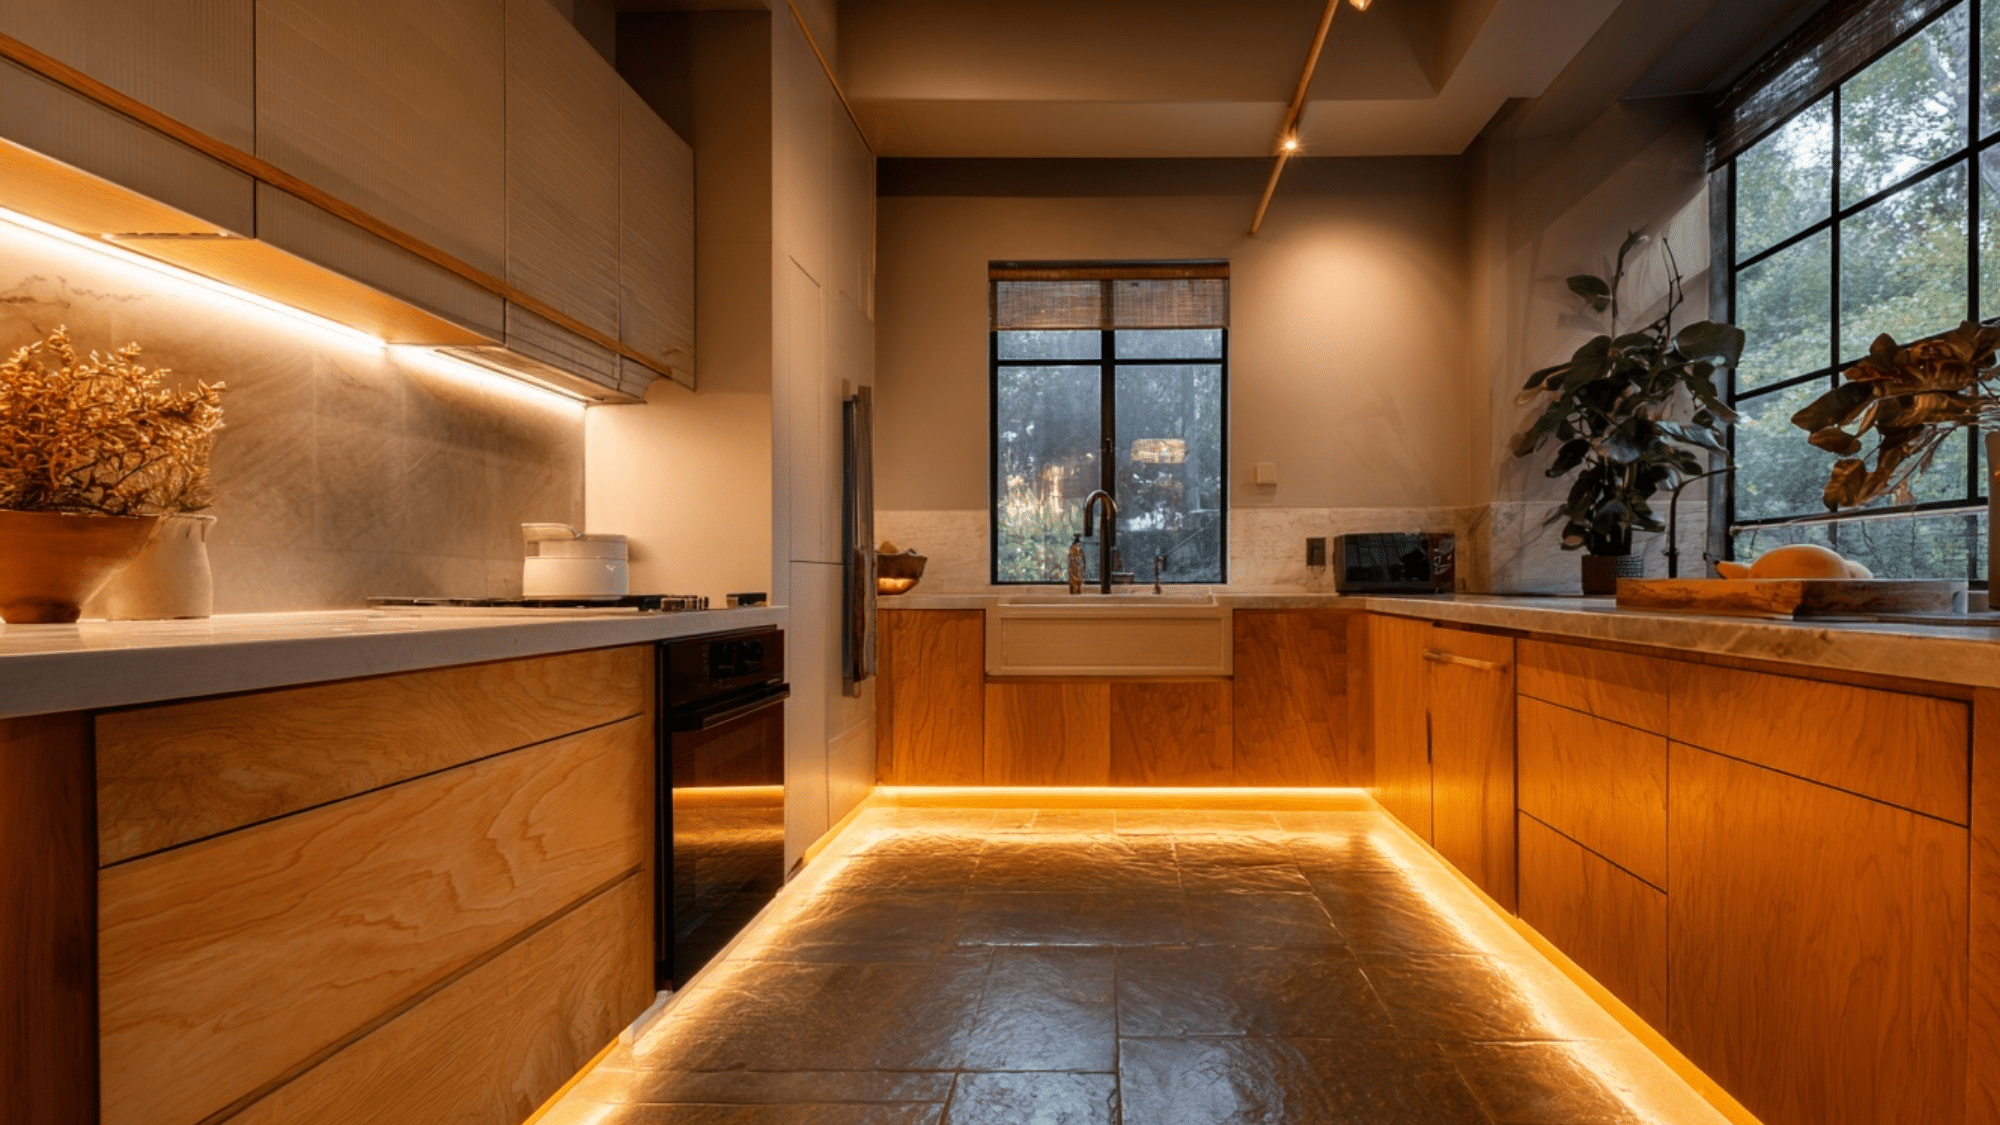
LED strips installed in cabinet toe-kicks create a floating effect. The soft glow provides nighttime navigation without harsh overhead lights.
This subtle detail adds warmth at floor level. It makes the cabinetry appear to hover, lending an airy quality.
Pro Tip: Motion sensors add convenience and save energy.
26. Ribbed or Fluted Glass Cabinet Doors
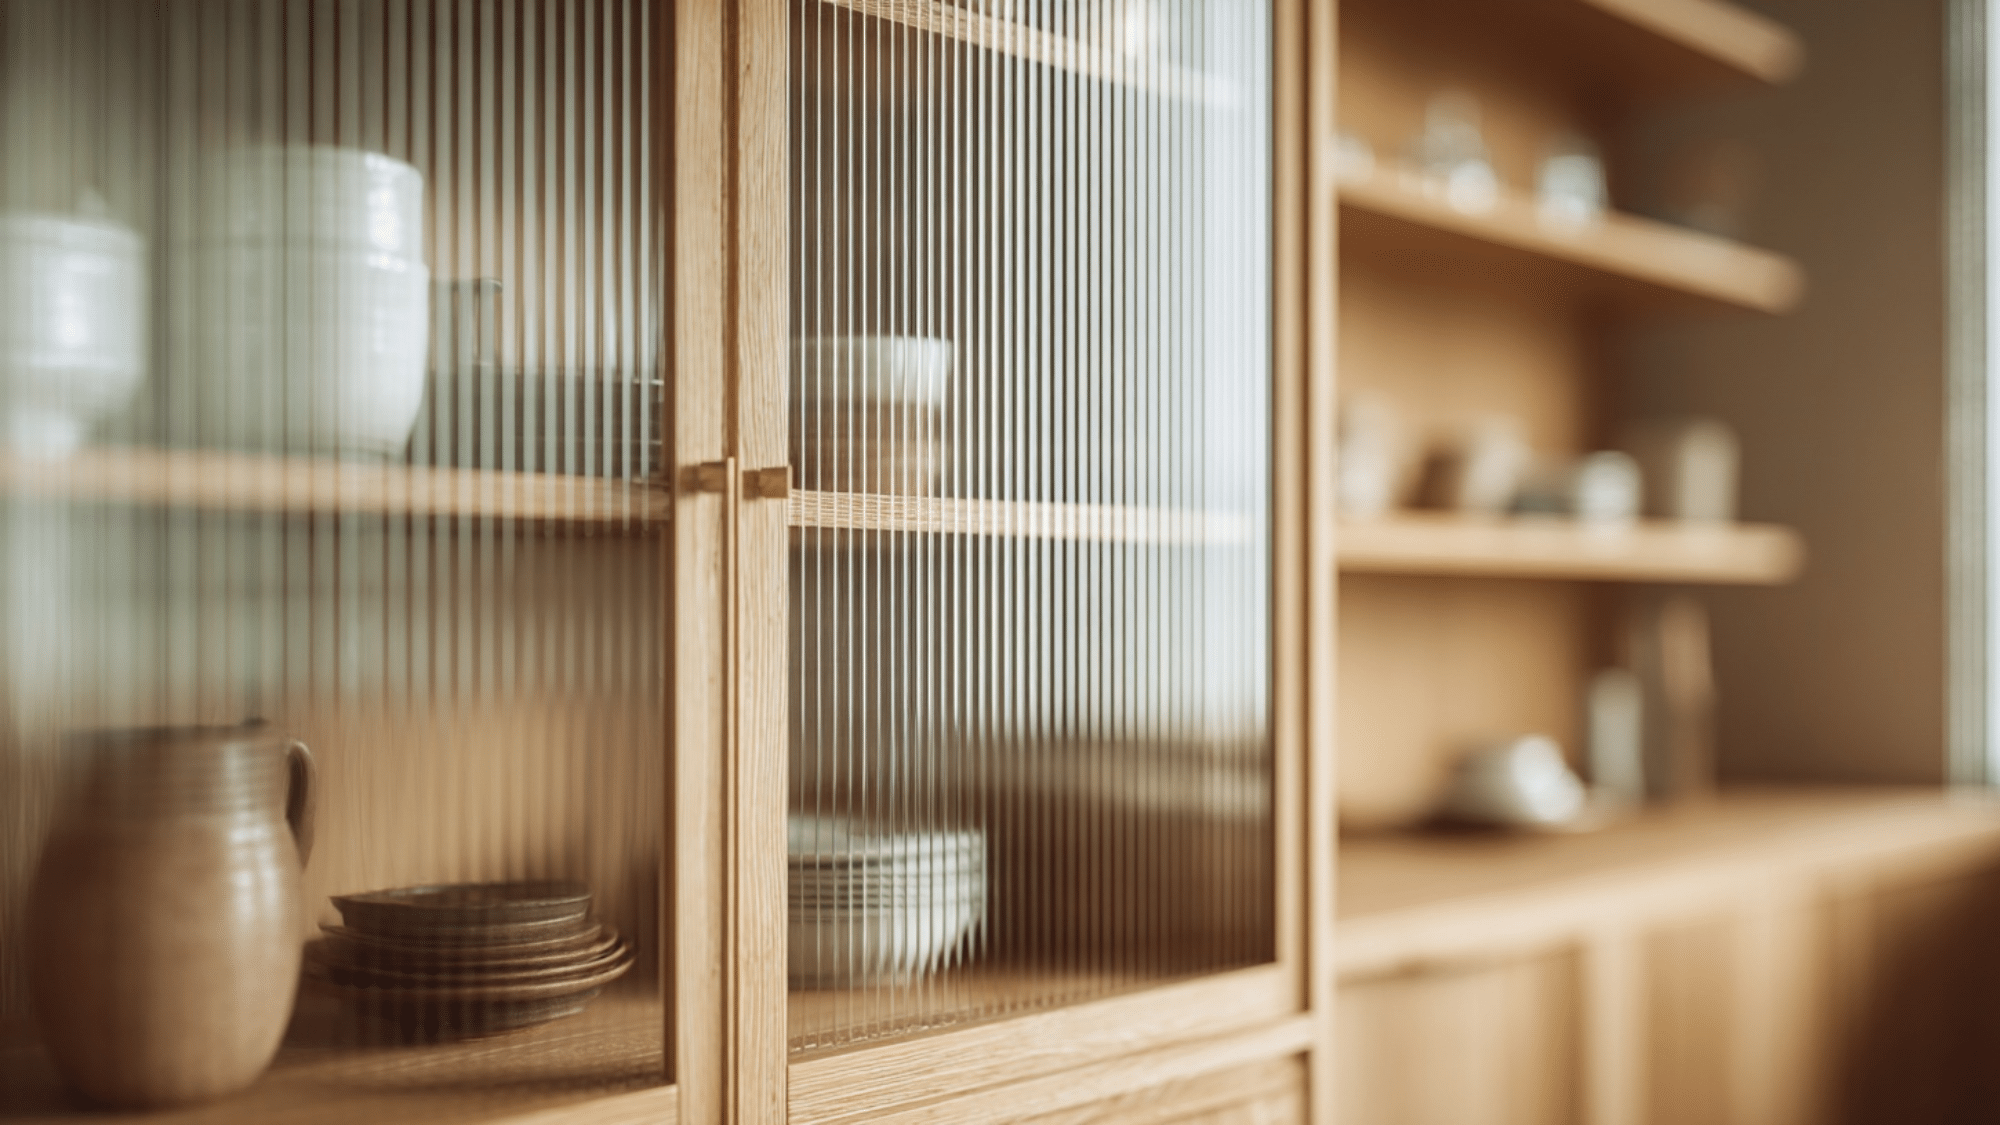
Textured glass cabinet fronts obscure contents while letting light through. Ribbed or fluted patterns add visual interest without busy colors or shapes.
This treatment keeps upper cabinets from feeling heavy or opaque. It maintains openness while hiding everyday dishware.
Pro Tip: Use textured glass on select uppers only, not all.
27. Hand-Thrown Ceramic Accents on Display
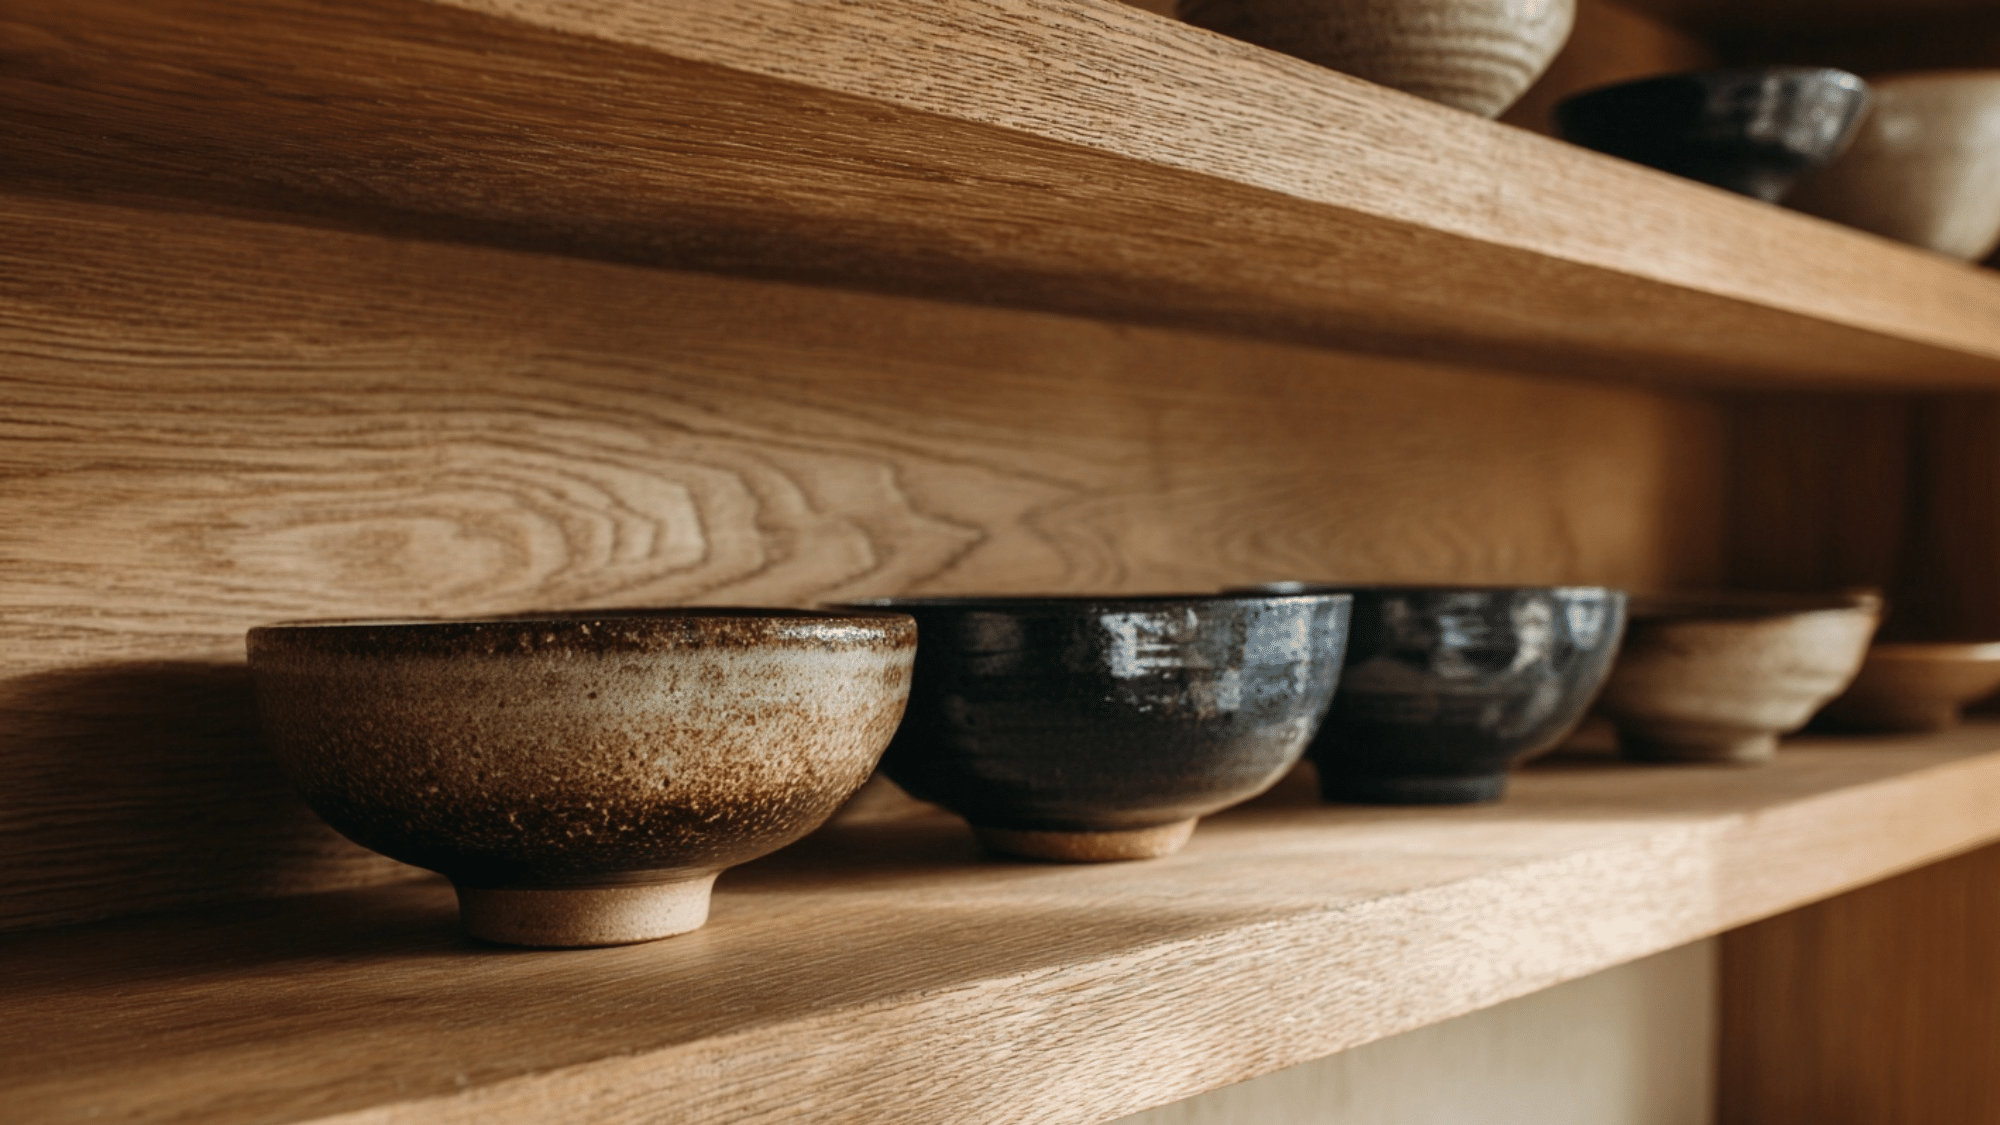
Handmade ceramic bowls, vases, or plates bring artisan quality to open shelves. Each piece carries visible imperfections that add character.
These objects honor the Japanese concept of wabi-sabi, finding beauty in impermanence and imperfection. They feel personal and lived-in.
Pro Tip: Group ceramics in sets of three or five with spacing.
28. Cane or Rattan Drawer Fronts for Organic Texture
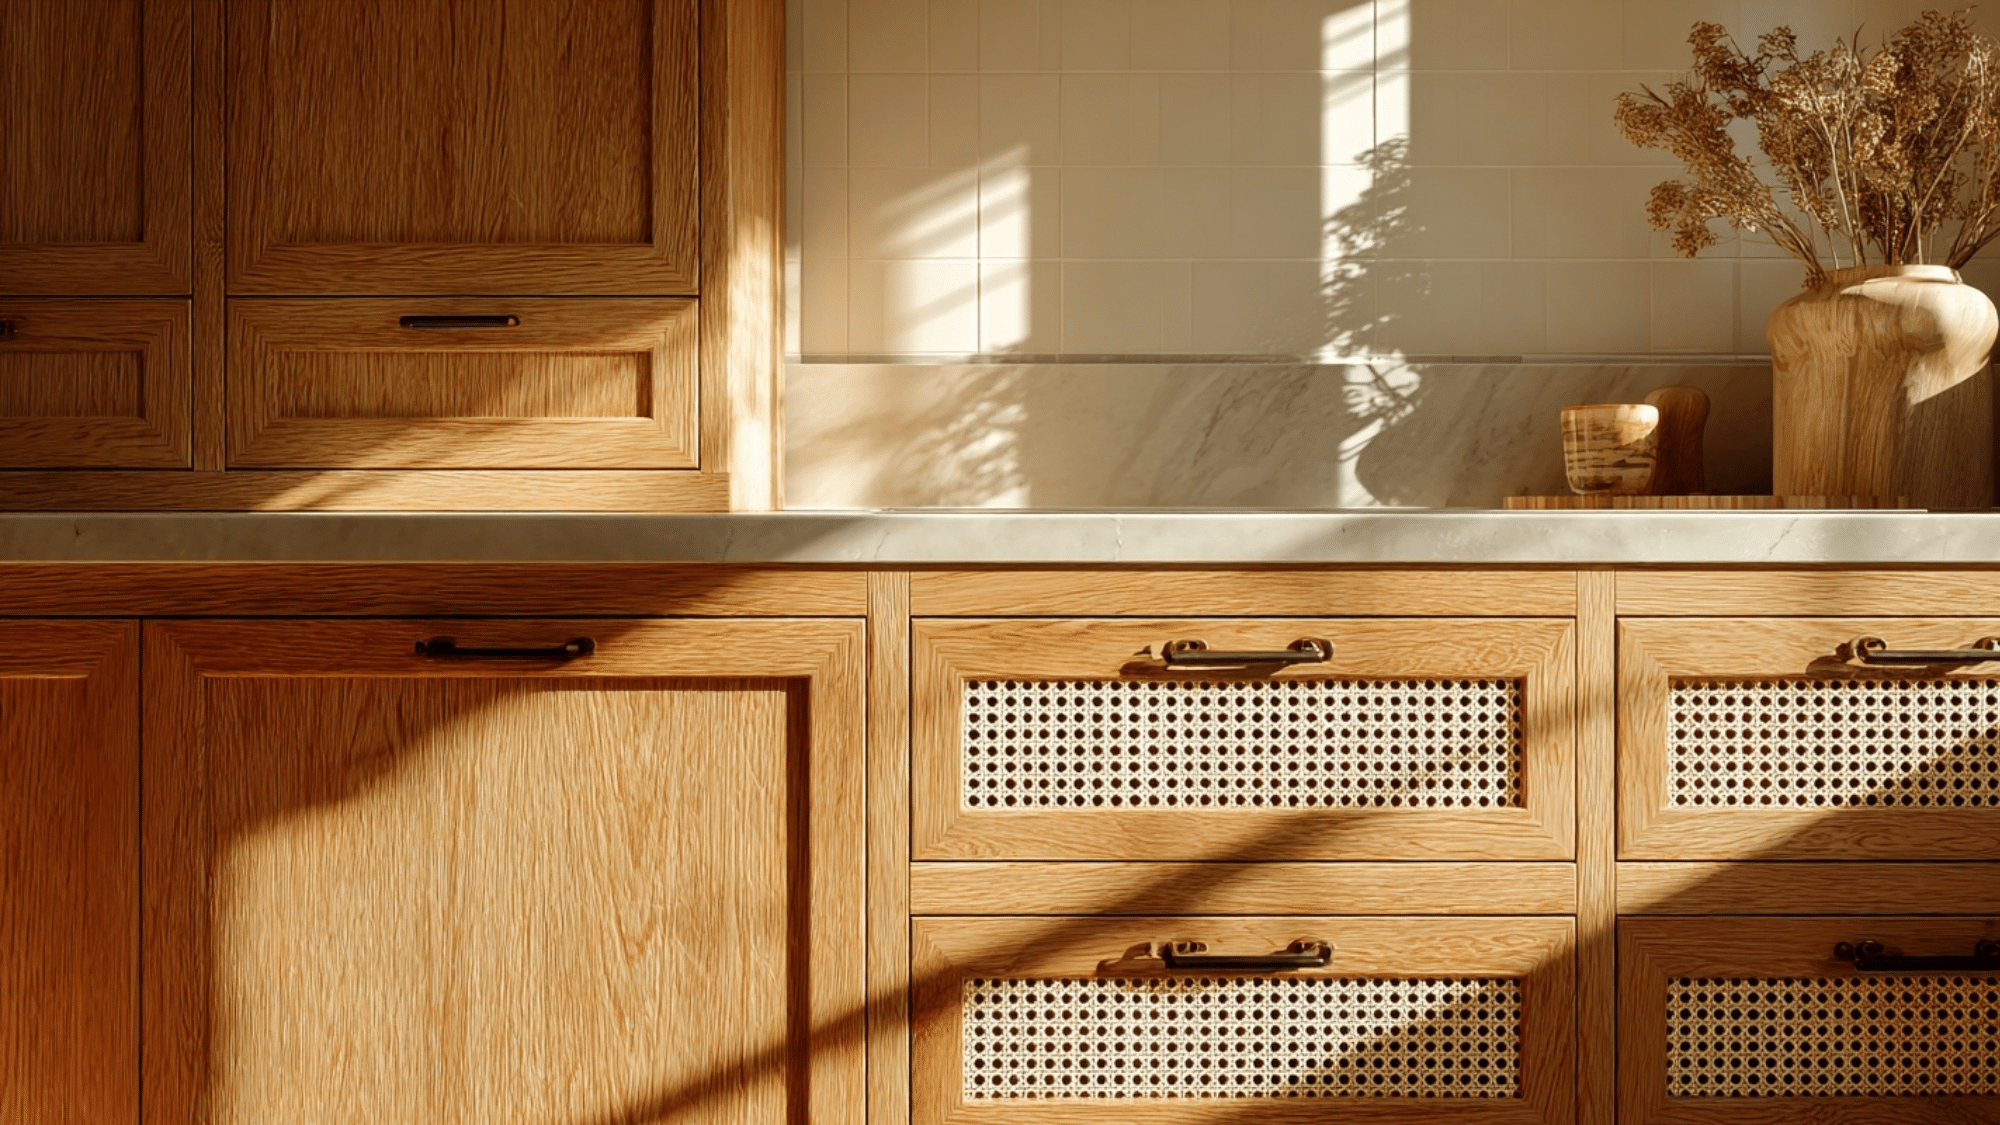
Cane or rattan inserts in select drawer fronts add natural texture. The woven material contrasts beautifully with smooth wood and stone surfaces.
This detail references traditional Japanese screens and Scandinavian mid-century design. It’s warm and tactile without feeling rustic.
Pro Tip: Use cane fronts on just a few drawers as accents.
29. Linen or Cotton Curtains in Open Shelving
Fabric curtains on tension rods conceal lower open shelving when needed. Linen or cotton in natural tones softens the space while adding function.
This flexible solution lets you hide or reveal storage as desired. The fabric introduces softness against harder kitchen surfaces.
Pro Tip: Choose pre-washed linen for relaxed, lived-in drape.
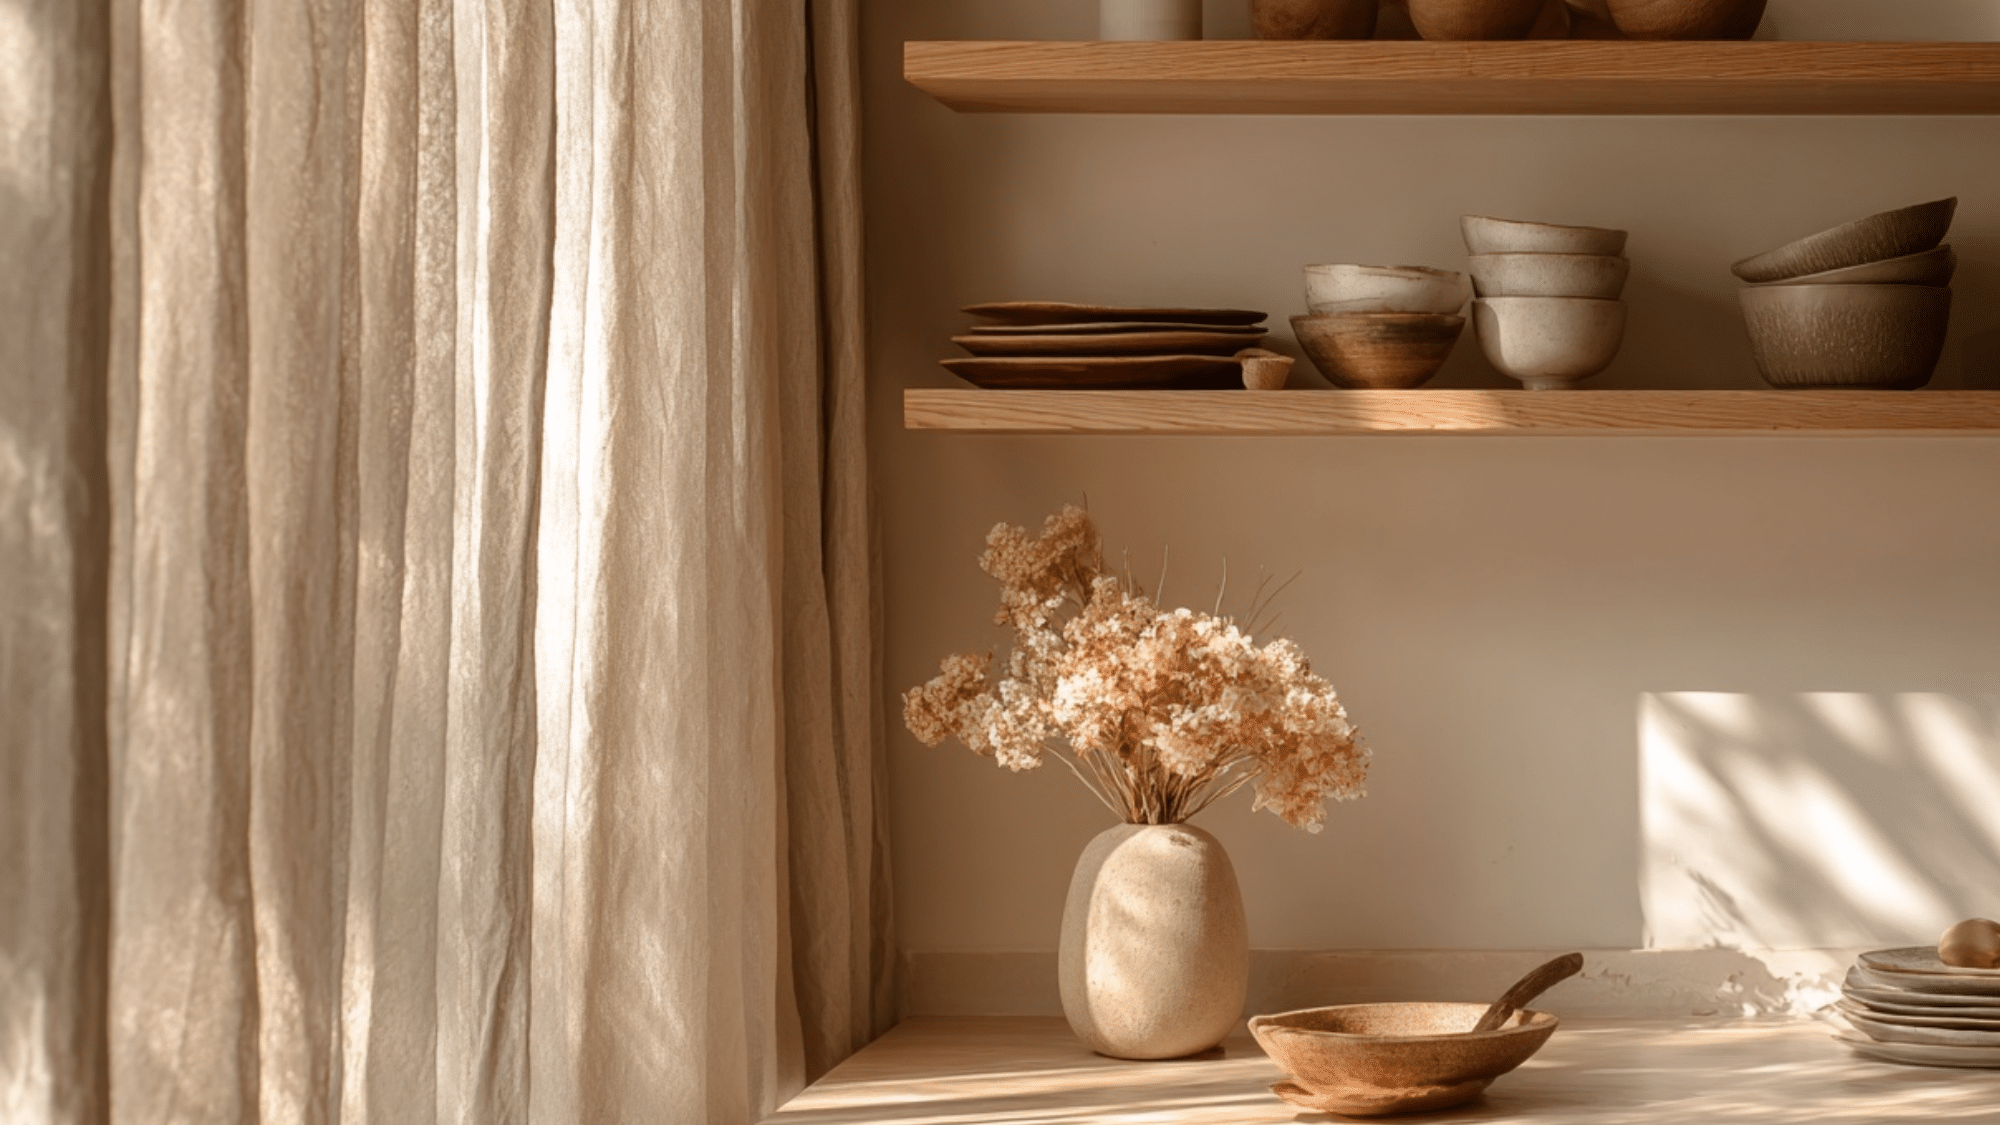
30. Tall Vase with Branches or Bamboo Accent
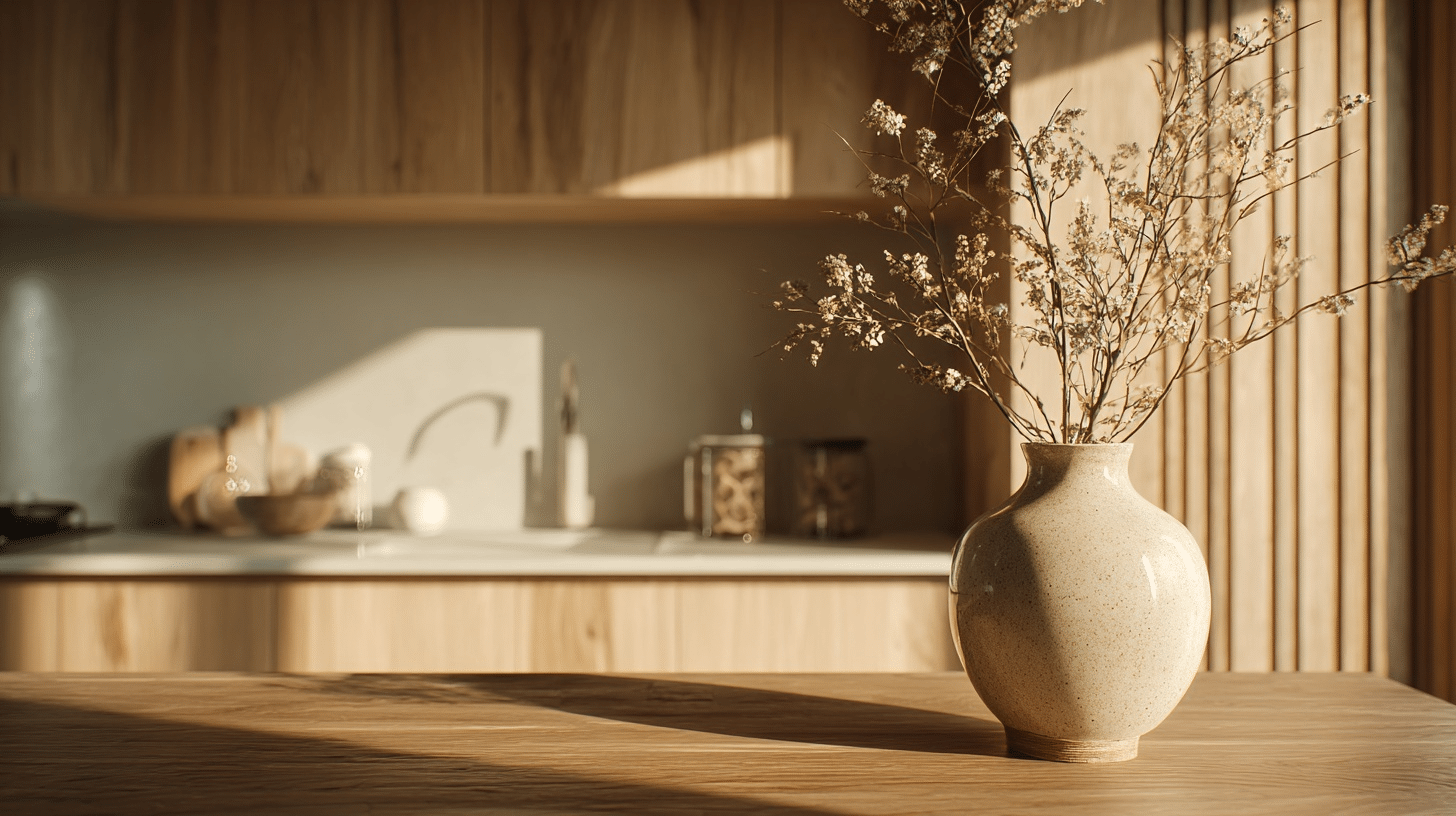
A single tall vase holding branches, bamboo, or dried grasses adds height and organic form. The simple arrangement brings nature indoors with minimal effort.
This styling choice feels intentional without being fussy. It references Japanese ikebana principles of mindful, sparse arrangement.
Pro Tip: Change branches seasonally to keep display fresh.
31. Wabi-Sabi Ceramics for Imperfect Beauty
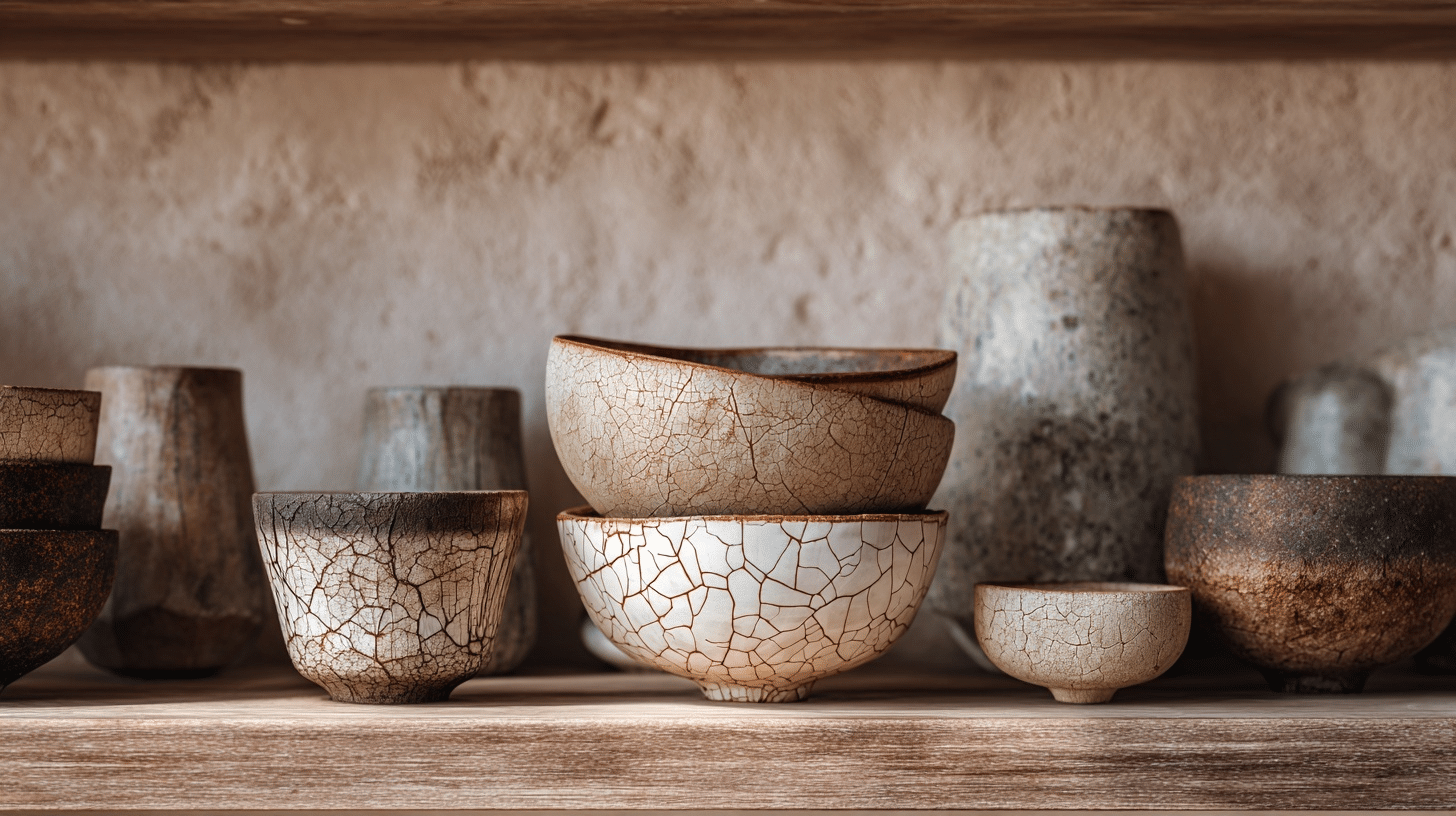
Ceramics with irregular shapes, visible cracks, or asymmetry celebrate the wabi-sabi philosophy. These pieces honor impermanence and natural aging.
The imperfections tell stories and add humanity to the space. They stand in beautiful contrast to modern appliances and perfect surfaces.
Pro Tip: Source pieces from local potters or vintage shops.
32. Matte Black or Aged Brass Hardware Details
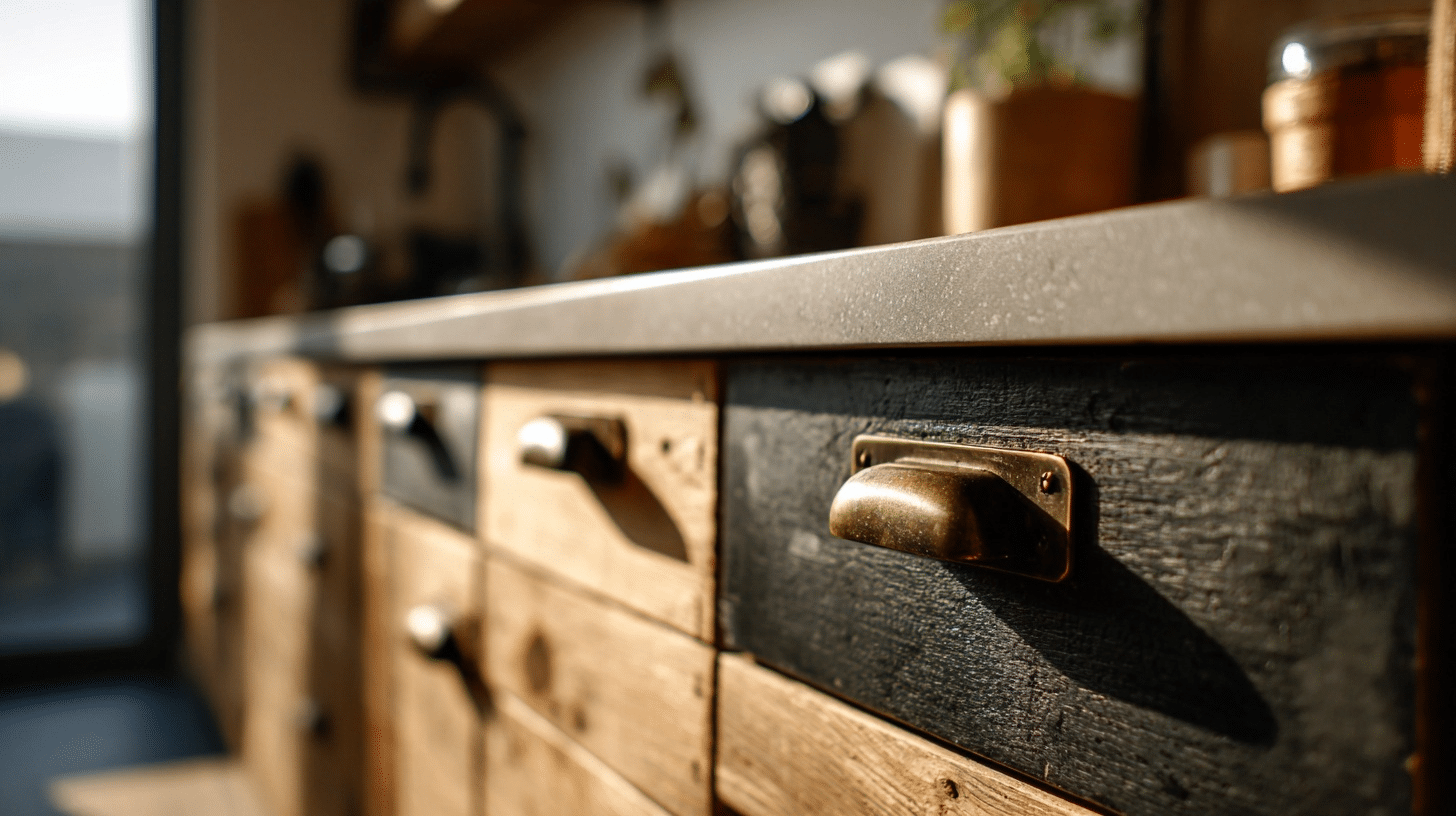
Matte black pulls and knobs add contrast without shine, while aged brass brings warmth. Both finishes work beautifully in japandi spaces.
Hardware is a small detail with a large impact. The right finish ties together the entire color palette subtly.
Pro Tip: Mix matte black and brass for layered interest.
33. Driftwood Trays or Natural Wood Decor
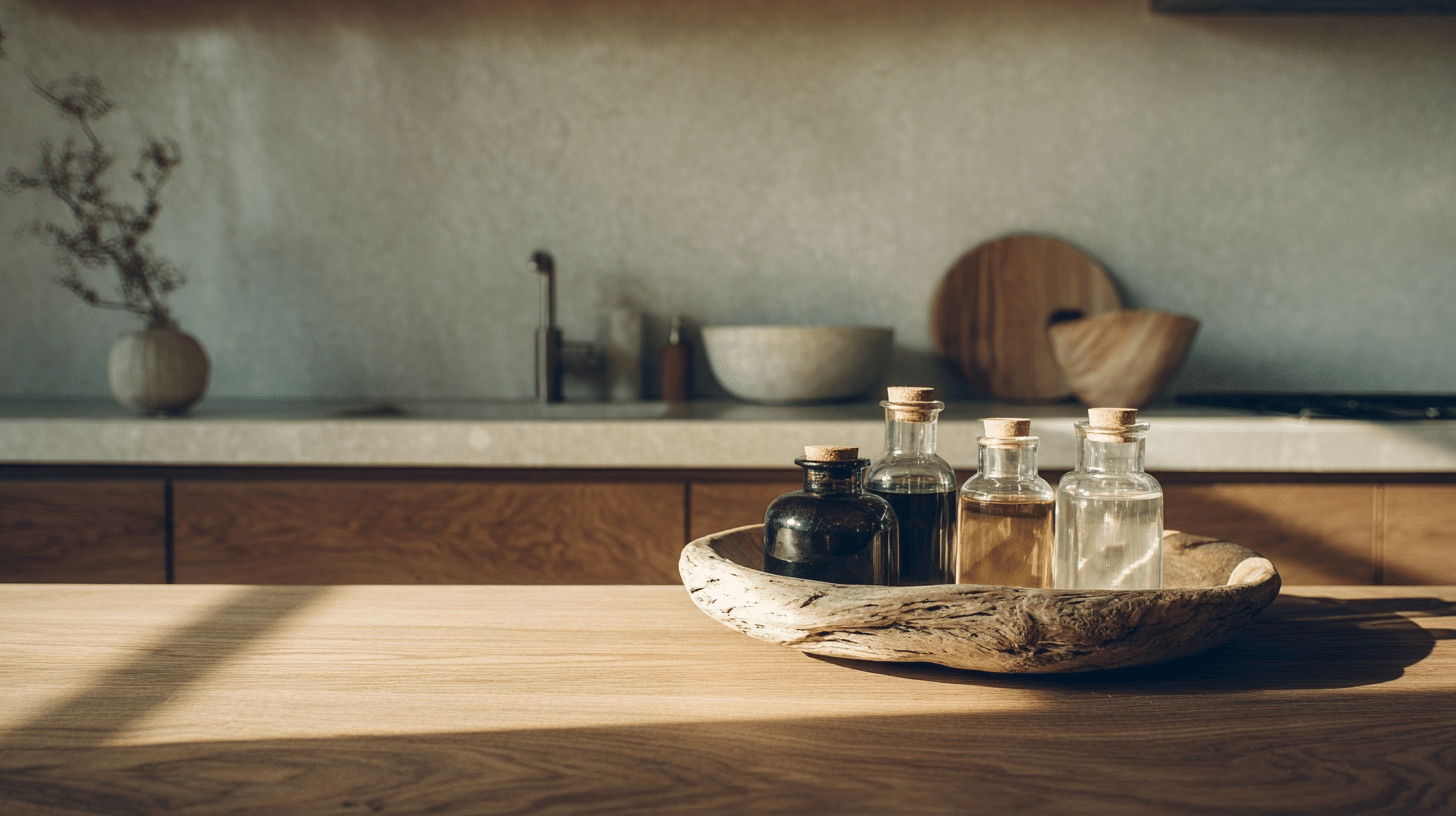
Driftwood pieces or live-edge wood trays add organic sculpture. Their weathered textures bring the outdoors in with raw, unfinished beauty.
These natural objects ground the space in nature. They require no maintenance and age gracefully over time.
Pro Tip: Use driftwood trays to corral oils and condiments.
34. Minimal Line Art or Botanical Wall Prints
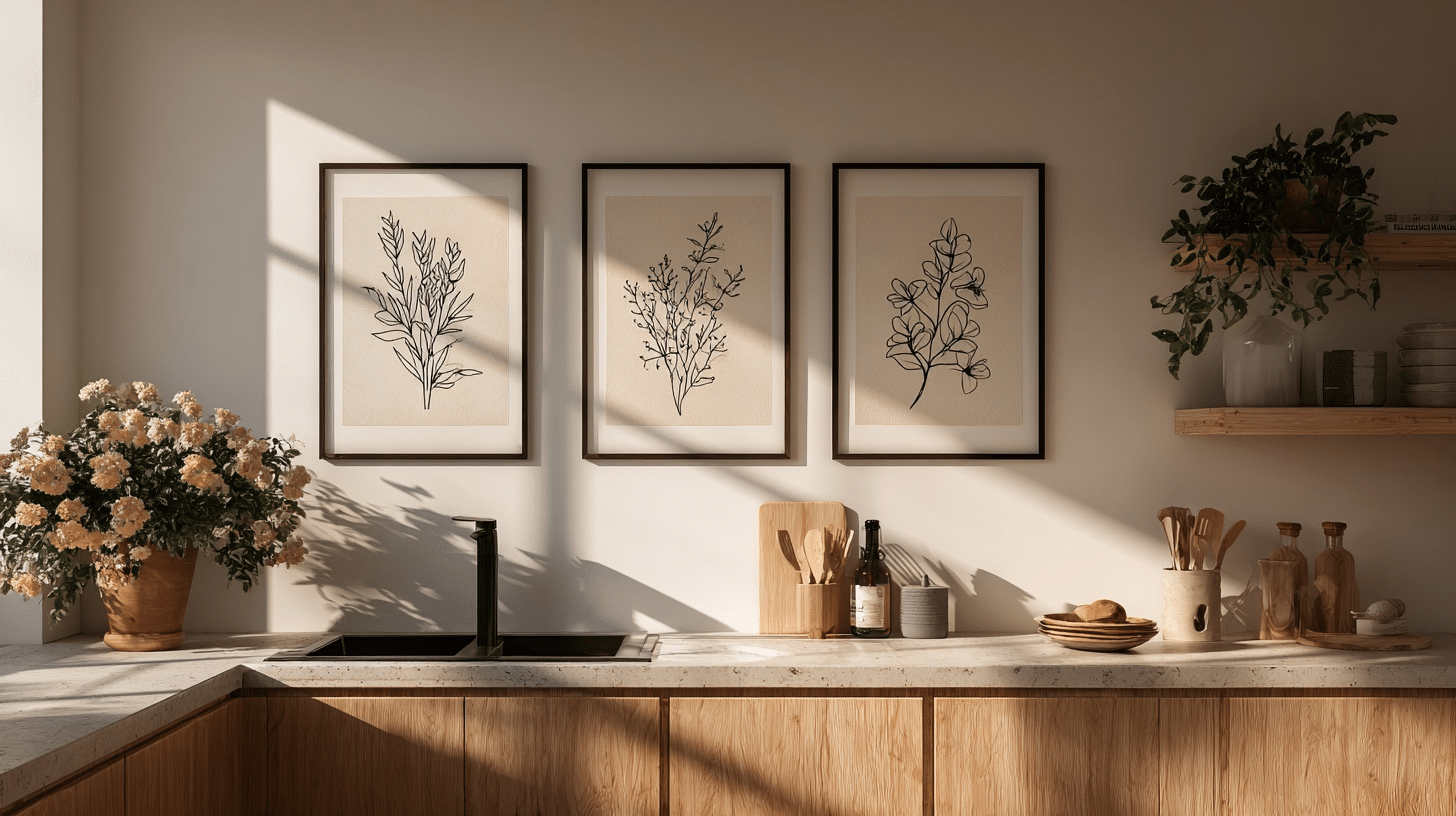
Simple line drawings of plants or abstract forms in black ink on white paper fit the japandi charming. The art stays subtle and never loud.
These prints add personality without color chaos. They reference Japanese ink painting traditions while staying modern.
Pro Tip: Frame in natural wood and hang in small groupings.
35. Compact Japandi Galley Kitchen Layout
A galley layout with parallel counters maximizes efficiency in smaller spaces. Every inch serves a purpose without wasted circulation area.
This linear design keeps the workflow tight and organized. It’s perfect for apartments or homes where space is limited.
Pro Tip: Use light colors on both walls to prevent closed-in feel.
36. Fold-Down Bar or Pull-Out Table for Flexibility
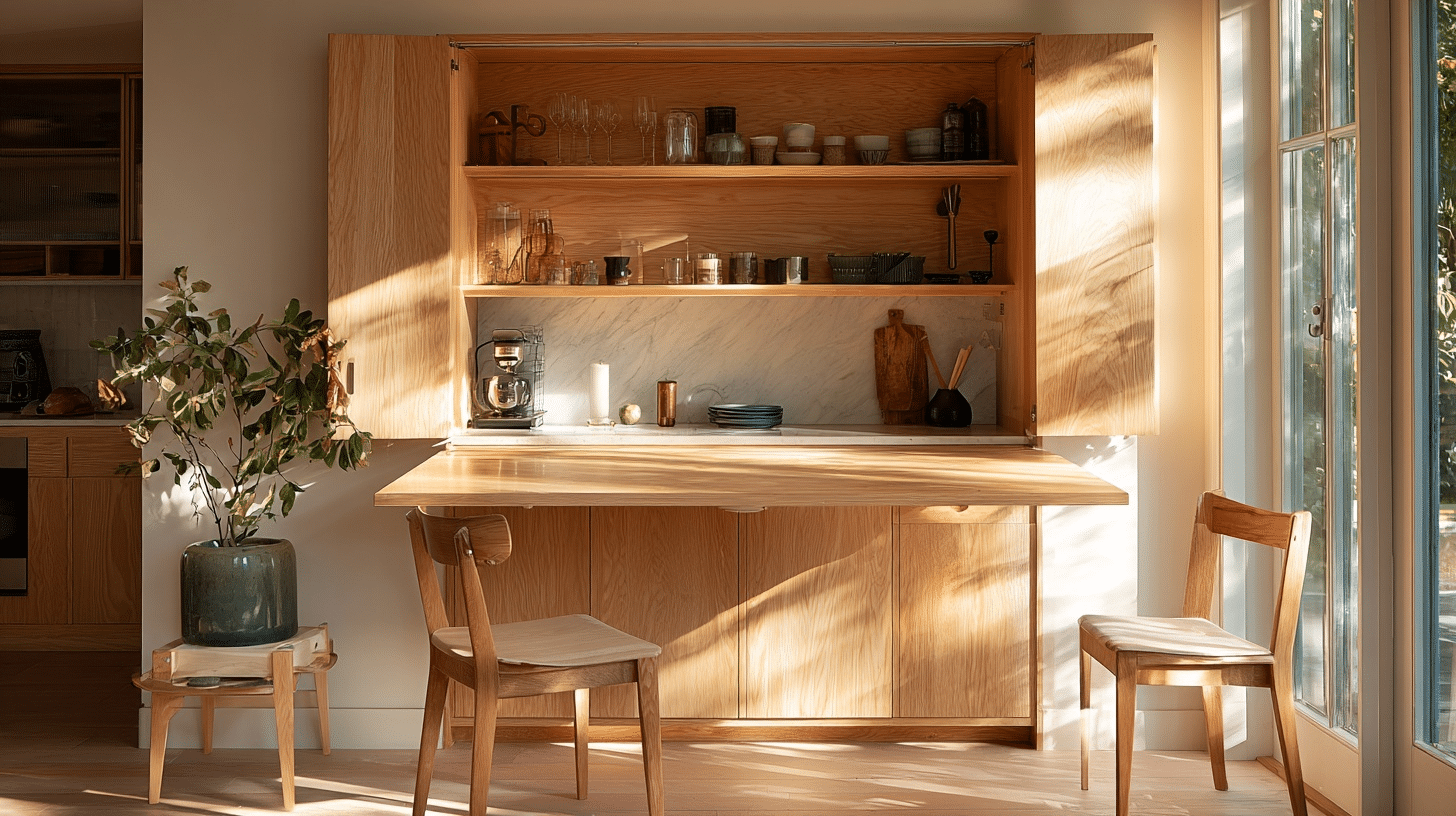
A fold-down eating bar or pull-out table extends when needed and disappears when not. This flexibility suits smaller kitchens perfectly.
The hidden feature maintains clean lines most of the time. When extended, it provides dining space without permanent furniture.
Pro Tip: Ensure mechanism is smooth and sturdy for daily use.
37. Vertical Storage and Tall Pantry Solutions
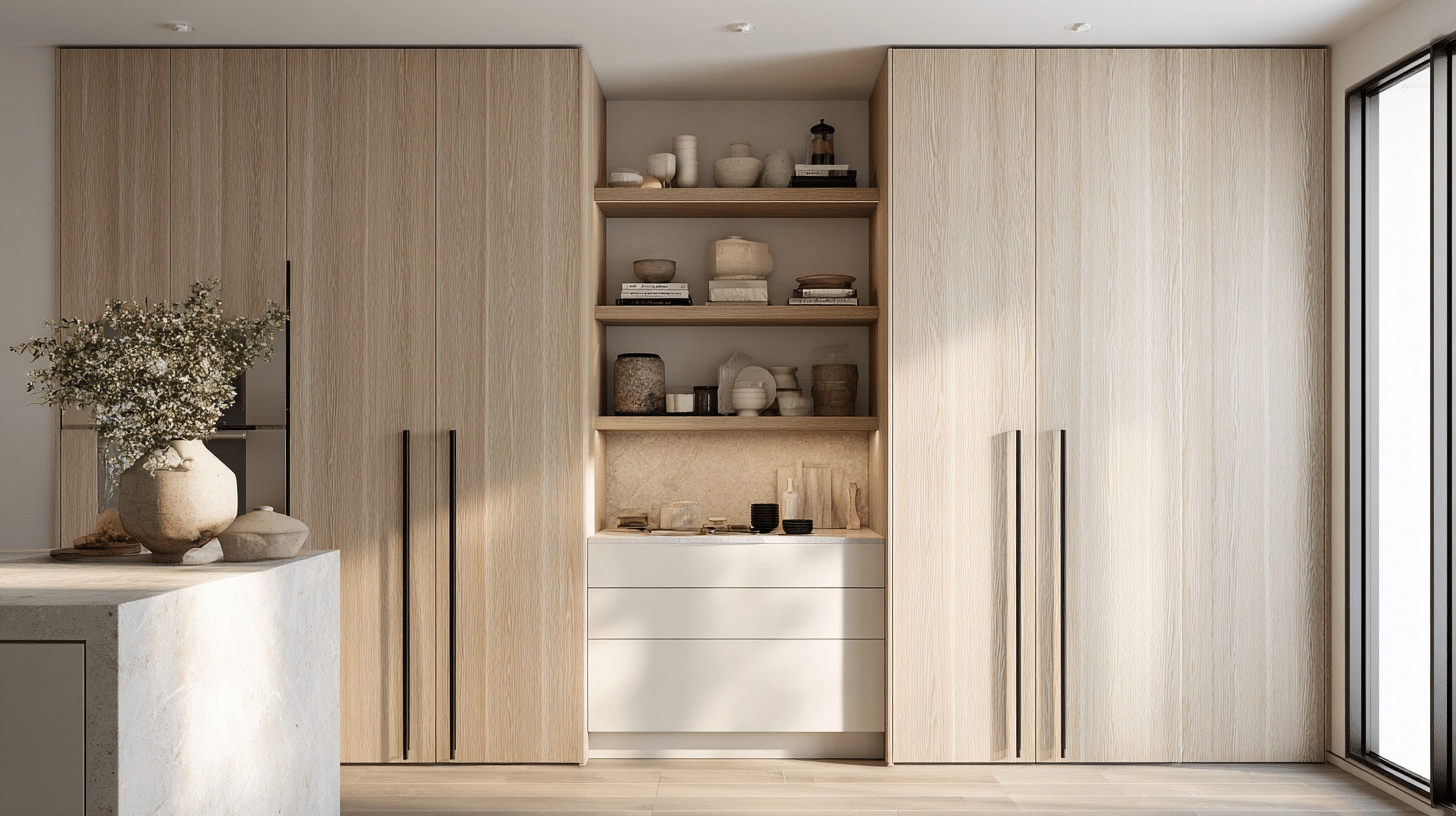
Floor-to-ceiling pantry cabinets maximize vertical space while keeping contents hidden. Tall storage reduces clutter without expanding the kitchen’s footprint.
Vertical solutions work especially well in compact kitchens. They keep everything accessible while maintaining japandi’s clean sightlines.
Pro Tip: Install pull-out shelves so back items stay reachable.
Budget-Friendly Japandi Kitchen Upgrades
You don’t need thousands to achieve the japandi style. These tiers help you prioritize based on your budget.
| Upgrade Level | What to Change | Result | Budget | Where to Shop |
|---|---|---|---|---|
| Refresh Tier | New hardware, repaint walls warm neutral, add warm LED lighting | Calm, airy japandi feel | $200–$800 | IKEA, Target, H&M Home, Etsy |
| Mid-Range | Re-face cabinets, honed stone counters, matte tile backsplash | Balanced japandi look with impact | $1,500–$5,000 | Lowe’s, Home Depot, Fireclay Tile, Wayfair |
| Full Remodel | Redesign layout, panel-ready appliances, natural wood cabinetry | Complete functional japandi kitchen | $8,000–$25,000+ | Semihandmade, Rejuvenation, IKEA |
| Cost-Saving Tips | Reuse layout, reclaimed wood, LED bulbs, durable finishes | Eco-smart and budget-friendly | Saves 10–30% | Habitat ReStore, Green Building Supply |
Smart Strategy: Start with the refresh tier, live with it for months, then decide what needs more investment.
Common Mistakes & Design Traps
Even with the best intentions, these missteps can pull your japandi kitchen off balance. Here’s what to avoid.
- Over-decorating or too many accessories: Cluttered counters defeat minimalist principles. Keep only essentials and one or two meaningful objects.
- Using ultra-bright or cool white lighting: Harsh, cool bulbs create a clinical feel. Stick to warm 2700K-3000K for an inviting glow.
- Glossy or high-sheen surfaces: Shiny cabinets and polished granite feel too slick. Choose matte or honed finishes instead.
- Misplaced contrast with too much dark: Excessive black creates heaviness. Use dark tones sparingly in hardware or accents only.
- Visible appliance clutter: Countertop appliances break the clean look. Store them in cabinets between uses.
- Inconsistent material finishes: Too many wood tones or stone types create chaos. Stick to one or two materials throughout.
Remember: Japandi thrives on restraint. When in doubt, remove rather than add.
Conclusion
Your kitchen should be a place you want to linger, not escape from. Japandi style proves that calm and function aren’t luxuries; they’re essentials for a space you use daily.
The beauty lies in what you remove as much as what you add. A cleared counter, wooden cutting board, and soft light combine into something bigger: a kitchen that feels genuinely yours.
You don’t need perfection or a huge budget, just intention. Start with one drawer, one corner, one material swap. Notice how different it feels when there’s room to breathe.
Ready to begin? Start clearing one surface today and see where it takes you.