


A good kitchen is one that not only looks good but is also functional. One of the main functions of a kitchen is cooking. A kitchen is where you cook food, whether it’s a small snack in the middle of the night or lunch on a Saturday.
If you’re designing a kitchen and you want to make sure that it is well up to the task for your cooking needs in the future, you’re doing well to read this guide.
Let’s get started with some tips that you can follow to design a kitchen that makes cooking easier.
Plan Around the Work Triangle
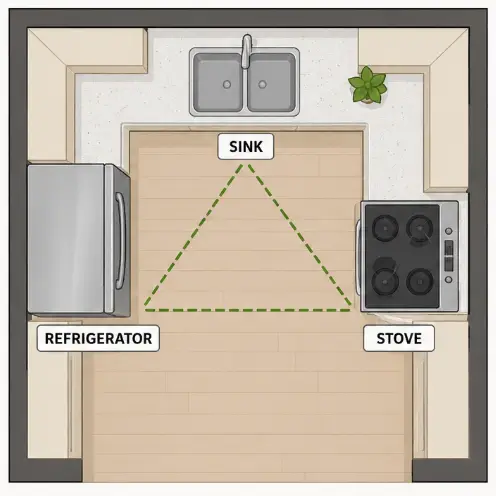
The work triangle connects your sink, stove, and refrigerator: the three stations you move between most during cooking. When these are positioned too far apart, you waste steps. When they’re too close, the kitchen feels cramped.
- Aim for 4 to 9 feet between each point of the triangle
- Avoid placing the fridge at the end of a run where it blocks traffic
- In galley kitchens, keep the sink and stove on the same wall and the fridge opposite
- Don’t let an island interrupt the triangle path. It becomes an obstacle every time
Here is what the work triangle looks like:
Protect Your Countertop Space Next to the Stove
Cooking generates a constant flow of things that need somewhere to land: hot pans, resting meat, and ingredients waiting to go in. Without counter space beside the stove, you’ll be improvising every time.
- Allow at least 15 inches of counter on one side of the stove, 12 on the other
- If space is tight, a pull-out cutting board beside the range is a workable fix
- Avoid placing the stove in a corner where one side is hemmed in entirely
- Keep this surface clear of appliances. It needs to be available when you’re mid-cook
Store Things Where You Actually Use Them
Most kitchens are organized by category: all the pots together, all the dishes together, rather than by workflow. Reorganizing around how you cook saves more time than almost any physical renovation.
Here is a little reference guide to remember about storing things in the kitchen:
|
Item |
Where to store it |
|
Pots and pans |
Drawer or cabinet beside or below the stove |
|
Cutting boards and knives |
Primary prep counter |
|
Everyday plates and glasses |
Close to the dishwasher |
|
Spices and oils |
Within arm’s reach of the cooktop |
Keep Your Most-Used Items at Arm’s Reach
The space between your knees and shoulders is the most accessible storage in any kitchen. Everything you use daily should live here. Everything else can go higher or lower.
Here are some actionable tips that you can keep in mind for this part.
- Reserve upper cabinets above the counter for things used a few times a week at most
- Deep lower cabinets are best for bulky items used occasionally: stand mixers, large stock pots
- Use drawer organizers to keep frequently used utensils visible and reachable
- Wall-mounted magnetic knife strips free up drawer space and keep blades accessible
Get the Lighting Right
Standard overhead lighting creates shadows directly over your cutting board and stove, the two places where you most need to see clearly. Good task lighting is one of the cheapest upgrades with the most noticeable impact.
Below, I’ve shared some lighting ideas as well as their estimated prices that you can consider getting for your kitchen.
- Under-cabinet LED strip lights: $20–$80 for a typical run; plug-in versions require no rewiring
- Recessed lights above the stove: $100–$300 installed, depending on whether new wiring is needed
- Pendant lights over an island: $80–$400 per fixture, purely aesthetic but useful if the island is a prep zone
Use warm-white bulbs (2700–3000K) for a less clinical feel without sacrificing brightness
Get a Workstation Sink
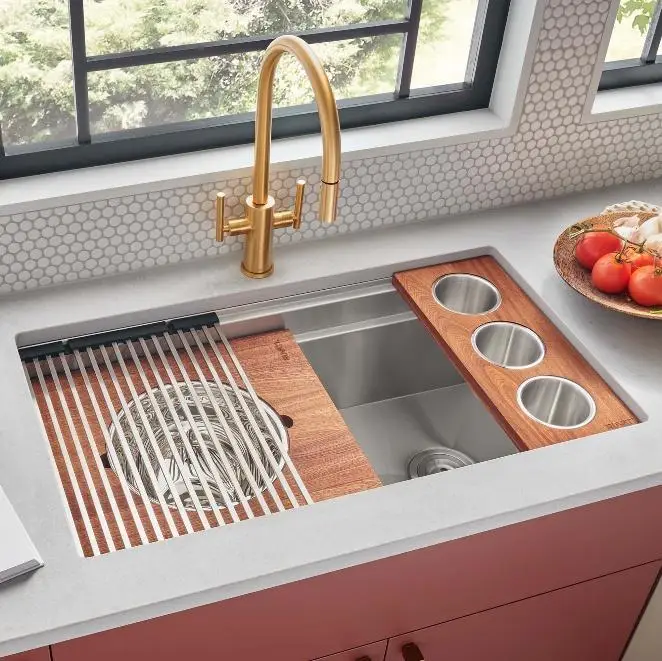
A workstation sink has a built-in ledge around the rim designed to hold accessories: cutting boards, colanders, drying racks, and mixing bowls. Instead of shuffling wet produce across the counter, you prep, rinse, and drain all in one place. For smaller kitchens, it functions as a genuine second work surface.
- Entry-level workstation sinks: $300–$500, usually stainless steel with a basic accessory kit
- Mid-range options: $600–$1,000, with deeper basins and more complete accessory sets
- Premium (such as from Ruvati): $1,000–$1,800+, with tight-fitting accessories and better build quality
Choose a single deep basin over a divided one. Divided sinks limit what you can wash and fit. Also, measure your cabinet width carefully: workstation sinks typically require a 30–36 inch base cabinet.
Not sure what a workstation sink looks like? Don’t worry, we got you. Here is an image of a workstation sink that I’ve taken from Ruvati, a brand well-known for their high-quality products in this category:
Leave a Landing Zone Next to the Fridge
Opening the fridge with your hands full and nowhere to set things down is a small but constant annoyance. A dedicated landing counter beside the fridge solves it entirely.
Here is what you can do:
- Allow at least 15 inches of counter directly adjacent to the fridge’s handle side
- If the fridge sits at the end of a run with no counter beside it, consider a small butcher block cart
- Avoid placing tall pantry cabinets right up against the fridge on both sides
- Counter-depth fridges help here. They don’t project as far into the walkway, making the surrounding space feel more usable
Plan Your Bin Placement Early
Bin placement is almost always an afterthought, and it shows. A bin that sits across the kitchen from where you prep means carrying scraps and packaging further than necessary every time you cook.
The ideal spot is directly beside or below the prep counter. Under the sink is a natural fit.
You can also try pull-out bin systems. Pull-out bin systems built into a base cabinet ($50–$200) keep things tidy and out of sight
Choose Drawers Over Cabinets Where You Can
Lower cabinets with doors force you to crouch and dig. Drawers bring everything to you. The difference in day-to-day usability is significant enough that most kitchen designers now recommend drawers as the default for base storage.
Here are some ways in which you can bring this to your kitchen design.
- Deep drawer sets for pots and pans ($200–$600 per unit installed) are more practical than a single pot cabinet
- Use a three-drawer configuration for base cabinets: shallow top drawer for utensils, deeper lower drawers for cookware
- Pull-out shelf inserts ($30–$100) can retrofit existing lower cabinets if a full replacement isn’t in budget
- Soft-close hardware is worth the small added cost. It prevents slamming and extends the life of the drawers
Duct Your Range Hood Outside
A range hood that recirculates air back into the kitchen filters out some grease and odors, but it doesn’t remove steam or heat. Over time, cooking in a kitchen with inadequate ventilation means lingering smells, moisture buildup, and a less comfortable space to work in.
Here is what you should remember.
A ducted hood should move at least 100 CFM (cubic feet per minute) for every 10,000 BTUs your range produces
As for options, here are some to consider:
- Basic ducted hood: $150–$400; installation adds $200–$500, depending on duct routing
- Mid-range (Broan, Zephyr): $400–$900 installed
- High-performance hoods for gas ranges: $1,000–$3,000+
If exterior ducting isn’t possible, choose a recirculating hood with a high-quality carbon filter and replace the filter every 3–6 months
Wrapping Up
If you follow all of the tips that we’ve mentioned above, you’ll find yourself in a kitchen that both looks aesthetic and is also extremely functional and practical. Of course, if you can’t act on all of the tips mentioned above, try to work on some of them.
Planning around the work triangle, getting a workstation sink, and arranging the right lighting, for instance, are some of the essentials that you should focus on.
Did you have fun reading this? I sure had fun writing it. Take care now.