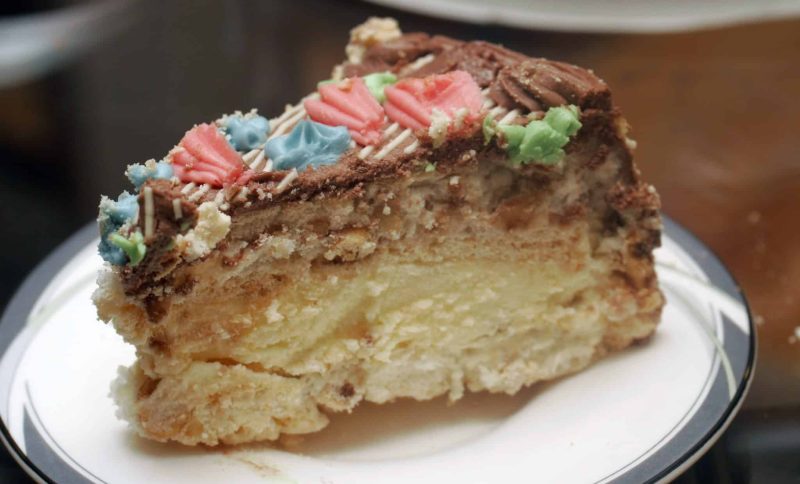
If you’ve ever scrolled through travel food content about Ukraine and spotted that gorgeous layered cake with the little cream flower decorations on top, that’s the one. The Kyiv cake. It shows up in patisserie windows, on café counters, in gift boxes at the airport – and once you know its story, you’ll want to bake it yourself immediately.
You may think it’s just a pretty dessert, but it’s got history, a happy accident baked right into its origin, and a texture combination that’s hard to find anywhere else in the world. A crunchy, nutty meringue base, a silky chocolate buttercream, and perfectly contrasting layers create a wonderful story.
Here’s everything you need to know about this delicious cake, including a version you can actually make at home.
A Cake Born from a Mistake (The Best Kind of Origin Story)
The Kyiv cake was created in 1956 at a confectionery factory in Kyiv. The story goes that a pastry team accidentally left egg whites sitting out overnight before a shift. Rather than throw them out, they used the naturally fermented whites to bake a meringue – and the result was so good they built an entire cake around it.
Eventually, a simple mistake resulted in one of the most iconic cakes in all of Eastern Europe. For decades, it was sold exclusively in Kyiv, which meant people would travel specifically to bring it home as a gift. It became so tied to the city’s identity that it was officially named a symbol of Kyiv in 2018.
Today, if you visit, you’ll find it in nearly every coffee shop in Kyiv – from sleek third-wave cafés to cozy neighbourhood spots that have been around for generations.
A note for those planning a visit: Kyiv is an active wartime city. While the café and food scene remains remarkably vibrant and welcoming to visitors, the capital of Ukraine has been deeply affected by the ongoing war waged by Russia, and missile and drone attacks are still very common here. Always check current travel advisories before your trip and refer to up-to-date local guidance. The city continues to receive visitors, and its hospitality is something special – just go informed.
What Makes This Cake Different
Most layered cakes rely on sponge or butter cake as the base. The Kyiv cake does something completely different: it uses a cashew meringue dacquoise – a baked nut meringue that’s simultaneously crisp on the outside and slightly chewy within. Two of these discs sandwich a generous filling of Charlotte buttercream, which is an old-school cooked butter cream made with eggs, milk syrup, and a generous splash of cognac rather than just butter and icing sugar.
The result is richer and more complex – to be perfectly honest with you, it puts a standard cream cake to shame.
Making a Kyiv cake on your own does not require professional pastry skills. The steps are easy, and knowing the logic behind each stage makes you a much more confident baker. So before we get into the ingredient list, keep in mind: this is a cake that rewards patience. Give it time at each stage, and it’ll come together beautifully.
What Goes Into a Real Kyiv Cake
This is as close to an authentic Kyiv cake recipe as you’ll get at home – here’s everything you need.
For the cashew meringue layers (makes 2 x 22cm discs):
- 6 egg whites, room temperature (ideally aged overnight – a nod to the original!)
- 250g caster sugar
- 1 tbsp cornflour
- 200g roasted cashews, roughly chopped (hazelnuts work beautifully too)
- 1 tsp white vinegar
For the Charlotte buttercream:
- 200ml whole milk
- 200g caster sugar
- 2 egg yolks
- 250g unsalted butter, softened
- 2 tbsp good-quality cocoa powder (for the chocolate layer)
- 1 tsp vanilla extract
- 2 tbsp cognac or brandy (don’t skip this – it’s one of the cake’s most distinctive flavours)
How to Make a Kyiv Cake: Step by Step
Step 1 – Make the meringue bases
Preheat your oven to 150°C (130°C fan). Line two round cake tins or trace two 22cm circles on baking paper.
Whip the egg whites to soft peaks, then gradually add the sugar, one spoonful at a time, until you have a glossy, stiff meringue. Fold in the cornflour, vinegar, and chopped cashews gently – you don’t want to knock out all the air, but getting the nuts evenly distributed matters.
Divide the mixture between your two circles and spread it level. Bake for 1 hour and 45 minutes, until the surface is dry and pale gold. Turn the oven off and leave the meringues inside with the door slightly ajar to cool completely – then leave them out at room temperature for a full 24 hours before assembling. This part is non-negotiable. The meringue needs that time to firm up properly, and if you rush it the layers will crumble when you try to work with them.
Pro tip for how to get crispy Kyiv cake meringue at home: the slow bake plus the overnight rest is where it all comes together. It feels like a long wait, but the texture on the other side of it is worth every hour.
Step 2 – Make the Charlotte buttercream
Whisk the egg yolks with the sugar in a small saucepan. Add the milk and cook over medium heat, stirring constantly, until the mixture thickens to a thin custard consistency. Don’t let it boil. Remove from heat and cool completely to room temperature.
Once cooled, beat your softened butter until pale and fluffy, then gradually add the custard mixture, a spoonful at a time, beating as you go. You should end up with a smooth buttercream that’s lighter than a standard American-style one. Divide it in half – stir the vanilla and cognac into one portion, and mix the cocoa into the other. The cognac gives the filling that warm, slightly boozy depth that sets a Kyiv cake apart from everything else.
Step 3 – Assemble
Place one meringue disc on your serving plate. Spread the vanilla buttercream generously across the top. Lay the second disc carefully on top – meringue is fragile, so be gentle but confident about it.
Cover the top and sides with the chocolate buttercream. Traditionally, the Kyiv cake is decorated with small rosettes of cream and a simple flower pattern in contrasting colours. You can go classic, or do your own thing – there are no rules on decoration.
Refrigerate for at least 4 to 6 hours before serving – overnight is even better.
Tips Before You Start
- Age your egg whites. Leave them uncovered in the fridge overnight before whipping. This is one of those small steps that makes a difference to meringue stability.
- Cashews vs. hazelnuts. The modern standard is cashews, but the original recipe used hazelnuts. Both are delicious – cashews give a slightly sweeter and creamier result.
- Don’t skip the cooling time. The meringue layers need to cool slowly, or they’ll shrink and crack badly.
- Cutting the cake. Use a long, sharp knife and a single confident stroke – sawing back and forth will crush the meringue.
Bring a Little Kyiv to Your Kitchen
There’s something poignant about baking food that belongs to a city living through something so difficult right now. Kyiv’s café culture has refused to stop – people are still meeting over coffee, still celebrating birthdays, still putting Kyiv cake in the window. That resilience is part of what makes this cake mean something beyond its ingredients.
Whether you’re researching traditional Ukrainian dessert recipes to try at home or are curious about Eastern European layered cakes with meringue, this one is absolutely worth your time. It takes patience and a few steps, but the result is unlike anything you’ll make from a standard recipe book – and if you ever get the chance to try it in one of Kyiv’s own cafés, you’ll understand exactly why it became a symbol of the city.
That first bite – the crack of the meringue, the hit of cognac in the cream – and you’ll completely understand why people used to carry this cake home on the plane.